How to Clean a Fish Before Cooking Step-by-Step Guide 🐟
Whether you’re an avid angler or just someone who enjoys cooking seafood at home, it’s imperative to know how to properly clean and gut fish. Not only is it essential for food safety, but it also impacts the texture and taste of the dish you’re preparing. Properly cleaned and gutted fish is the foundation of any great seafood meal!
Why is it Important? 🧐
✅ Food Safety: Properly gutting and cleaning fish removes its internal organs, which can contain harmful bacteria and parasites. If not removed and cooked properly, these can lead to foodborne illnesses.
✅ Taste and Texture: The guts of a fish have a strong, bitter taste that can affect the overall flavor of your dish. Proper cleaning ensures that you get the best possible taste and texture from your fish.
✅ Presentation: A well-cleaned and filleted fish makes for a more appealing presentation on the plate. Whether you’re cooking for yourself or guests, it’s always nice to have a dish that looks as good as it tastes!
Ready to Dive In? 🌊
Now that you understand the importance of properly gutting and cleaning fish, you’re ready to dive into our comprehensive guide. We’ll walk you through every step of the process, from selecting the right tools to mastering the technique. Grab your apron, and let’s get started! 🍽️✨
Stay tuned and keep reading for a step-by-step guide to mastering the art of fish cleaning! 📘
A Fisherman’s Guide to Gutting and Cleaning Fish

The Imperative of Gutting and Cleaning Fish 🎣
Gutting and cleaning fish is a crucial skill that every seafood enthusiast, home cook, or professional chef should master. It’s not just about the aesthetics or the culinary tradition; it’s fundamentally about food safety, enhancing taste and texture, and presenting a dish that appeals to the eyes as much as it does to the palate.
Food Safety: Banish Bacteria and Parasites ☠️
First and foremost, gutting and cleaning fish is vital for food safety. Fish, like other animals, have internal organs that can harbor harmful bacteria and parasites. The digestive tract, for instance, contains bacteria that help the fish digest food. While these bacteria are harmless to the fish, they can cause foodborne illnesses in humans if not removed properly.
Parasites, on the other hand, are organisms that live inside the fish and can be harmful if ingested. Some common parasites found in fish include tapeworms and roundworms. Cooking the fish properly usually kills these parasites, but it is always better to be safe than sorry by removing the organs that might host them.
Taste and Texture: Banish the Bitterness 😝
The second reason to gut and clean a fish properly is to improve its taste and texture. The guts of a fish have a very strong and bitter taste that can overpower the delicate flavors of the flesh. Additionally, the texture of the guts is slimy and unpleasant. By removing the guts, you are left with the tender, flavorful flesh that can absorb the flavors of your chosen seasonings and cooking methods.
Moreover, the bloodline—the dark line that runs along the spine of the fish—also has a strong flavor that many people find unpleasant. It’s essential to remove the bloodline along with the guts to ensure the best taste and texture for your dish.
Presentation: Please the Eye and the Palate 🍽️
Lastly, the presentation is another crucial aspect of any dish. A well-cleaned and filleted fish makes for a more appealing presentation on the plate. It shows that care and attention have been put into the preparation of the meal, which is always appreciated by those dining.
Additionally, a well-prepared fish is easier to cook evenly and makes for a more enjoyable eating experience. No one likes to find bits of scale, fin, or bone in their meal! 🐟
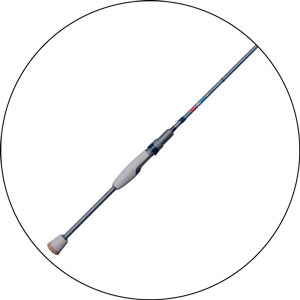
Body. Tools of the Trade 🔪
Before diving into the process of gutting and cleaning fish, it’s important to gather all the necessary tools. Having the right tools at your disposal will not only make the process easier and more efficient but also safer. Here are the essential tools you will need:
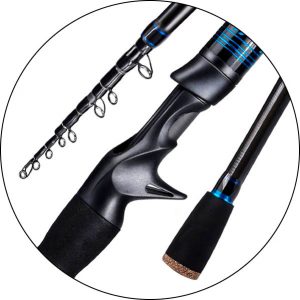
A Sharp, Flexible Filleting Knife
The most important tool you will need is a sharp, flexible filleting knife. The sharpness of the knife is crucial for making clean cuts, while the flexibility allows the blade to move along the contours of the fish, helping you to remove the fillets with minimal waste. A dull knife can make the process more difficult and increase the risk of accidents, so make sure your knife is well-sharpened before starting.
A Sturdy Cutting Board
A sturdy cutting board provides a stable surface for gutting and filleting the fish. It’s best to use a cutting board with a groove around the edge to catch any liquids that escape during the cleaning process. Additionally, a non-slip cutting board or placing a wet cloth underneath the board can help prevent it from moving around while you work.
Gloves
Wearing gloves is optional but recommended, especially if you are new to gutting and cleaning fish or have sensitive skin. The gloves will protect your hands from the fish’s scales, fins, and any sharp edges. Additionally, gloves can provide a better grip on the fish, making it easier to handle.
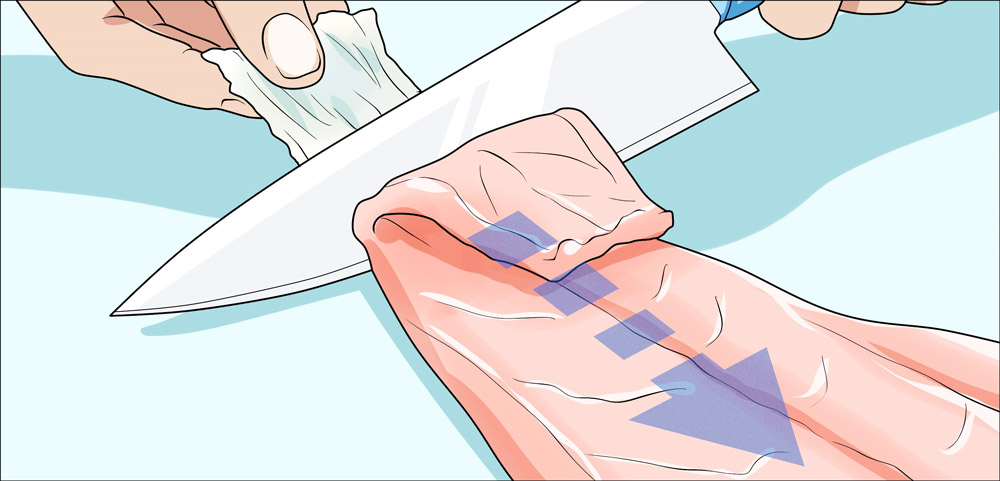
A Clean Cloth or Paper Towels
Having a clean cloth or paper towels on hand is essential for wiping your knife and hands during the process. This will help to remove any scales, slime, or blood that accumulate on the knife and prevent them from being transferred back onto the fish or your work surface.
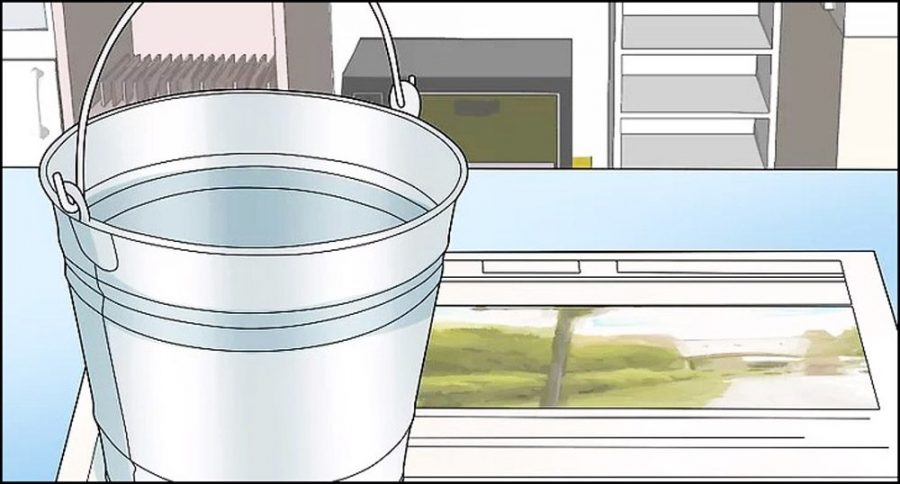
A Bowl for the Guts and Waste
Lastly, you will need a bowl or container to collect the guts and other waste materials. This helps to keep your workspace clean and organized. Remember to dispose of the waste responsibly. Some people like to compost the waste, while others prefer to bury it or dispose of it in the trash.
Gathering the right tools before starting the gutting and cleaning process is essential for efficiency, safety, and minimizing waste. A sharp, flexible filleting knife, a sturdy cutting board, gloves, a clean cloth or paper towels, and a bowl for the guts and waste are all necessary tools to have on hand. With these tools at your disposal, you will be well-equipped to gut and clean a fish like a pro! 🐟
Preparation Before Gutting
Before you begin the actual process of gutting the fish, there are a few essential preparatory steps that need to be taken. Proper preparation ensures a smoother gutting process and a better final product.
Killing the Fish Humanely 🐟
The first step in preparing a fish for gutting is to kill it humanely. It’s important to treat the fish with respect and minimize its suffering. There are several methods to humanely kill a fish, but one of the most recommended methods is “ikejime” or brain spiking. This involves inserting a sharp object, like a knife or an “ikejime tool“, into the brain of the fish, which causes immediate brain death. Another method is a firm knock on the head with a blunt object. Make sure to check the regulations and recommended practices in your region as they can vary.
Removing Scales ✨

The next step is to remove the scales of the fish. This is an essential step because the scales are not pleasant to eat and can interfere with the cooking process. To descale the fish, lay it flat on your work surface and hold it firmly by the tail. Using the back of your knife, scrape against the direction of the scales, starting from the tail and moving towards the head. Make sure to remove the scales from both sides of the fish and rinse it well under cold water to remove any remaining scales.
Removing Fins ✂️
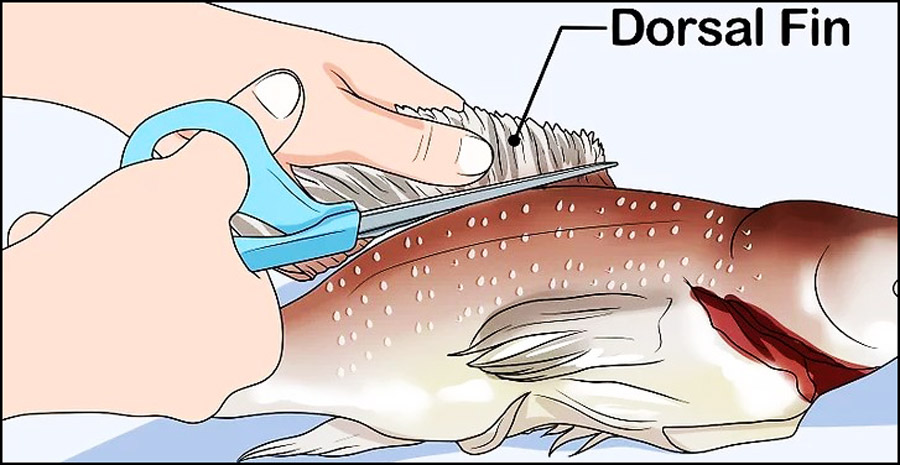
The last preparatory step before gutting is to remove the fins. This step is optional and some people prefer to leave the fins on, especially if the fish will be cooked whole. However, removing the fins can make the fish easier to handle and eat. To remove the fins, use a pair of kitchen shears or a sharp knife to cut them off at the base. Be careful not to cut into the flesh of the fish. The dorsal fin (on the top of the fish) and the anal fin (on the bottom of the fish) can be a bit tricky to remove, so take your time and be careful.
Proper preparation before gutting the fish is crucial for a successful outcome. Killing the fish humanely, removing its scales, and cutting off the fins are all important steps that will make the gutting process easier and result in a better final product. With these preparatory steps completed, you are now ready to begin the process of gutting and cleaning the fish. 🐟✨
Step-by-Step Guide to Gutting 🐟🔪
Gutting a fish is a straightforward process, but it’s essential to do it correctly to ensure the fish is safe to eat and tastes its best. Here is a step-by-step guide to gutting a fish:
Making the First Incision 🔪
Start by laying the fish flat on your work surface with its belly facing up. Take your sharp filleting knife and make the first incision right behind the gills and pectoral fin (the fin located on the side of the fish, near its head). The cut should be deep enough to penetrate the belly cavity but not so deep that it cuts into the spine.
Cutting the Belly ✂️
Next, take your knife and cut along the belly of the fish from the incision you just made down to the anal vent (the small hole located on the bottom of the fish, towards the tail). Be careful not to cut too deep and puncture the intestines as this can cause the contents to spill out and contaminate the flesh.
Removing the Guts 👋
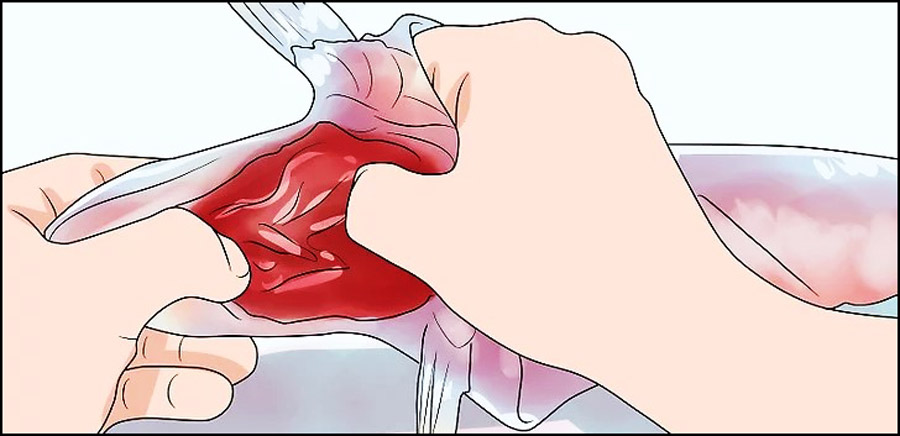
Now, you can remove the guts. Reach into the belly cavity and pull out all the internal organs. It’s essential to remove everything, including the gills, liver, intestines, and swim bladder (a thin, transparent sac located near the spine). You can use your fingers or a spoon to help scoop out the organs. Be thorough, but gentle, to avoid rupturing any of the organs.
Cleaning the Bloodline ❤️
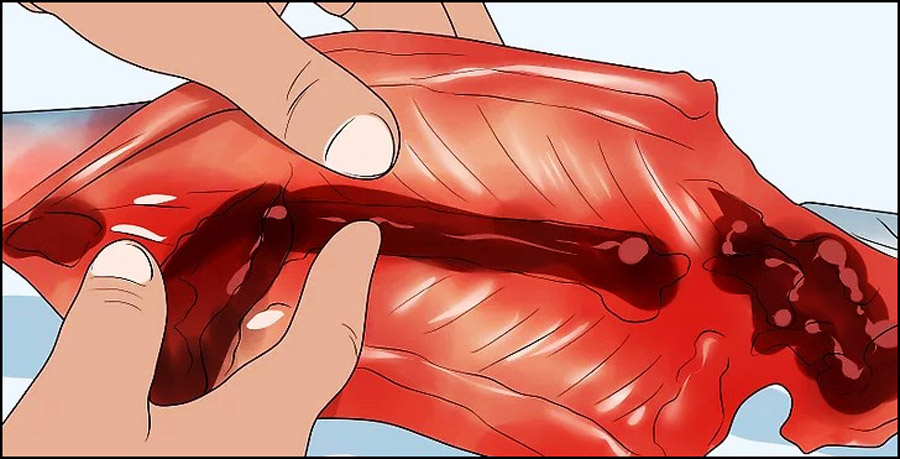
After removing the guts, you’ll notice a dark line running along the spine of the fish. This is the bloodline, and it needs to be removed as it can have a strong, fishy taste. Use the tip of your knife or a spoon to scrape out the bloodline. Be careful not to dig too deep into the flesh.
Rinsing the Fish 💦
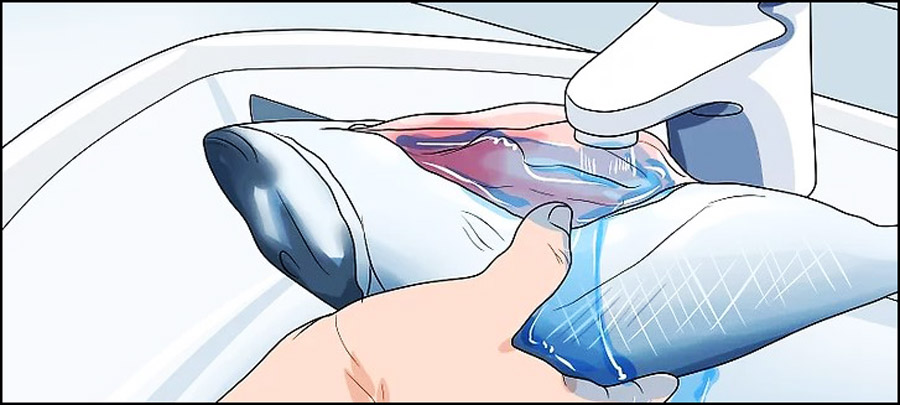
The final step in the gutting process is to rinse the fish thoroughly under cold, running water. Make sure to rinse inside the belly cavity to remove any residual blood or organs. Also, rinse the outside of the fish to remove any scales, slime, or blood that may be present.
Gutting a fish may seem daunting at first, but with a little practice, it becomes quite straightforward. Remember to make the first incision behind the gills and pectoral fin, cut along the belly without puncturing the intestines, remove all the internal organs, clean the bloodline, and rinse the fish thoroughly. With these steps, you’ll have a cleanly gutted fish ready for cooking or further filleting. 🐟✨
Filleting the Fish 🐟🔪
After gutting the fish, the next step is to fillet it. Filleting the fish means removing the flesh from the bones in two large pieces, one from each side of the fish. Here is a detailed guide on how to fillet a fish after gutting:
Positioning the Fish 🛑
Start by placing the fish flat on your work surface with its back facing up and its head facing towards you. This position will allow you to make the first cut easily and guide your knife along the spine of the fish.
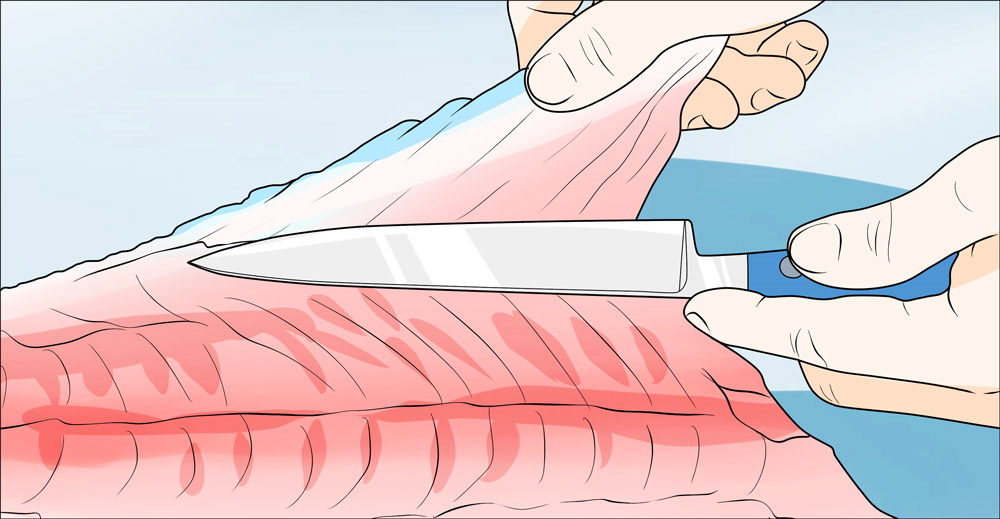
Making the First Cut ✂️

Take your sharp filleting knife and make the first cut right behind the gills and pectoral fin, cutting down to the spine. Then, turn your knife horizontally and, using the spine as a guide, cut along the length of the fish from the head to the tail. Try to make this cut as close to the spine as possible to maximize the amount of flesh you get on the fillet. Repeat this process on the other side of the fish.
Separating the Fillet from the Bones 👋
Now that you have made the initial cut along the spine, you can begin to separate the fillet from the bones. Starting at the tail end, gently lift the fillet while carefully cutting away the flesh from the bones. Use the tip of your knife to feel for the bones and guide your cuts. Work your way along the length of the fish until the fillet is entirely separated. Repeat this process on the other side.
Removing the Skin 🙌
Next, it’s time to remove the skin from the fillet. Place the fillet skin-side down on your work surface. Hold the tail end of the skin firmly with one hand while using your knife to cut between the flesh and the skin. Angle your knife slightly downwards towards the skin and use a gentle sawing motion to separate the skin from the flesh. Be careful not to cut through the skin or leave too much flesh on it.
Checking for Bones 🔍
The final step in the filleting process is to check for any remaining bones. Run your fingers along the surface of the fillet to feel for any small pin bones. These bones are often found in a line running down the center of the fillet. If you find any pin bones, use a pair of tweezers or needle-nose pliers to carefully remove them.
Filleting a fish requires a bit of practice, but with a little patience and a steady hand, it is a skill that anyone can master. Remember to position the fish correctly, make the initial cut along the spine, carefully separate the fillet from the bones, remove the skin, and check for any remaining bones. With these steps, you’ll have a beautifully filleted piece of fish ready for cooking. 🐟✨
Practical Step-By-Step Fish Cleaning Tips With Photos
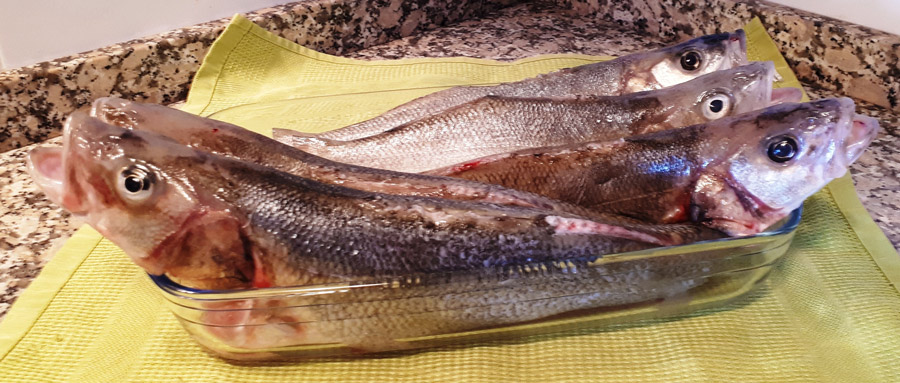
Before you start cooking dishes from sea bass, you should learn how to clean them. This stage must be carried out correctly so as not to spoil the taste and aroma of the dish. Gutting such a fish should, paying maximum attention to the removal of all the insides and gills.
The first thing to do is to buy the necessary devices:
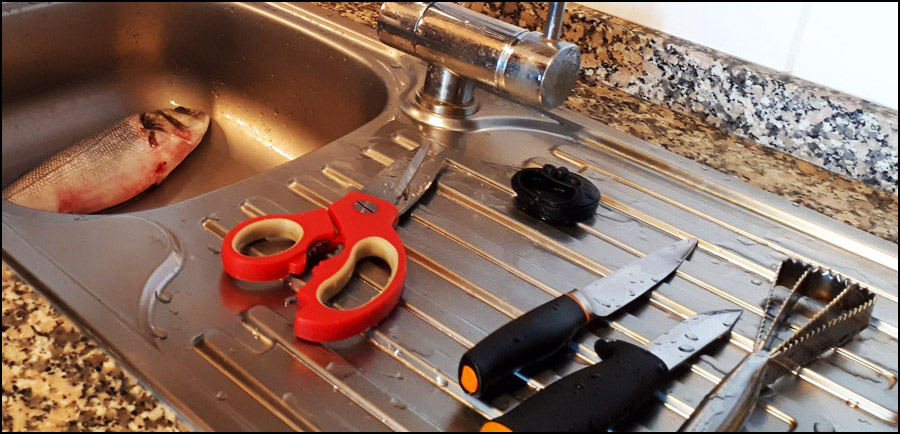
Fish Scaler Cleaning Scaling – Strip it Down to the Basics
A good and convenient fish scaler for many years will facilitate the process of removing scales. It is simple and safe for the hands. I advise you to immediately buy stainless steel. The best samples, in my opinion, are selected and presented in the table:
Choosing the Right Tools – Equip Yourself for Success Scissors for Fish
Scissors for cutting fish are also useful during fishing. Compact, with a cover, folding – any will do. Most importantly, they must be durable and corrosion-resistant. The table above lists the main equipment needed for cleaning fish:
| Equipment | Explanation |
|---|---|
| Fillet Knife | A sharp, flexible knife used to remove the skin and bones from the fish. The blade should be long enough to handle the size of the fish being cleaned. |
| Cutting Board | A flat surface used to stabilize the fish while cleaning. The board should be large enough to accommodate the size of the fish being cleaned and should have a non-slip surface. |
| Fish Scaler | A tool used to remove the scales from the fish. It can be a handheld tool or an attachment for an electric drill. |
| Gutting Tool | A tool used to remove the internal organs from the fish. It can be a knife, scissors, or pliers designed specifically for gutting fish. |
| Fish Pliers | A tool used to remove the hook from the fish’s mouth. It should have a long handle and a strong grip to make the process easier and safer. |
| Water Hose | A source of clean water used to rinse the fish and the cleaning equipment. It can be a hose attached to a sink or a portable water source. |
| Container for Discarded Parts | A container to hold the head, skin, and other parts of the fish that are not being used. It can be a plastic bag, a bucket, or a specialized container designed for fish cleaning. |
| Disposable Gloves | Gloves worn to protect the hands from the fish’s slime, bacteria, and sharp edges. They should be disposable, non-latex, and powder-free. |
Special Knife for Cutting – Removing the Innards
First step. To begin, trim with scissors two fins on the top, two on the bottom, two sides, and one spike at the bottom of the tail. They are strong, sharp, and can cut hands.
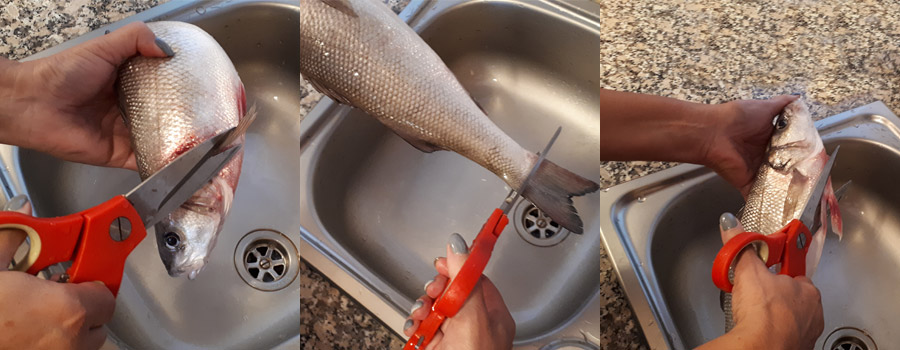
The next step is to clean the fish from the scales. Scales from the sea bass are removed quite easily. Take the fish by the tail and with a large sharp knife against the scales from tail to head, clean the fish. In order not to stain everything around, you can clean the fish in a filled sink underwater. To do this, insert the dummy valve and fill the sink with water by about one third so that the fish is completely covered with liquid. This is necessary so that the kitchen is not dirty during cleaning.
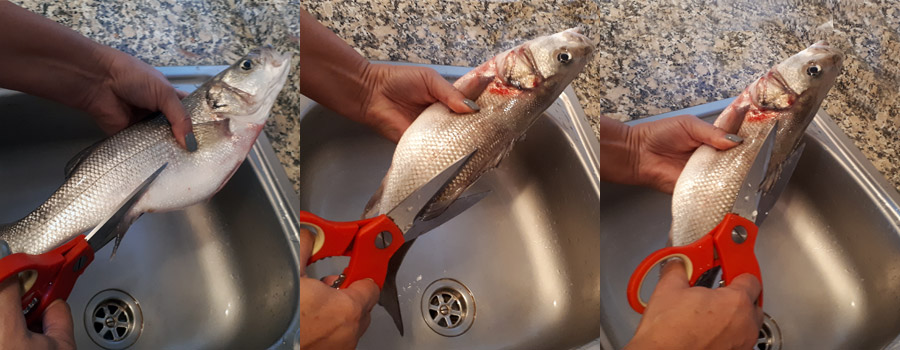
The third operation is the removal of dark mucus from fish skin with a knife and the final removal of the scales. The skin of the sea bass is very strong and there is no problem to clean it. Fourth. Then you need to gut the fish. To get all the insides, it is necessary to cut the carcass of the sea bass to the middle from the very beginning of the lips.
Already on the prepared fish, we make an incision on the stomach from the side of the hole through which the fish is emptied. Here you need a sharp knife since the skin on the tummy is also strong. With a thin, sharp knife, spread the fish’s belly from the head to the lower fin. We take scissors for cutting fish and make a continuation of this incision to the lower lip. With our left hand, we hold the upper part of the fish head (see photo) and with our right hand, we use a pair of scissors to make a curved cut along the gills.

This action will help to remove the inside of the fish in one motion. To do this, take the fish by the gills and begin to gently pull down. The intestines leave the inside of the fish along with the gills and gall bladder.
In the process of removing the intestines, make sure that the gall bladder does not burst. From the entrails, you can leave unique fat (on which you can then fry the fish), the heart, and the liver of the fish. What remains must be thrown into a bucket for food waste.
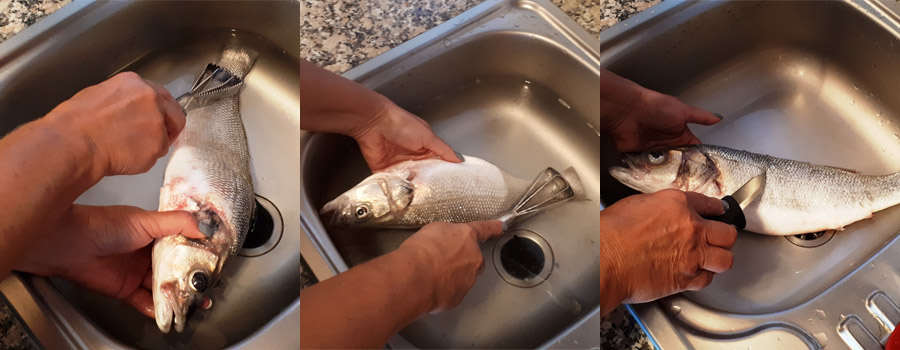
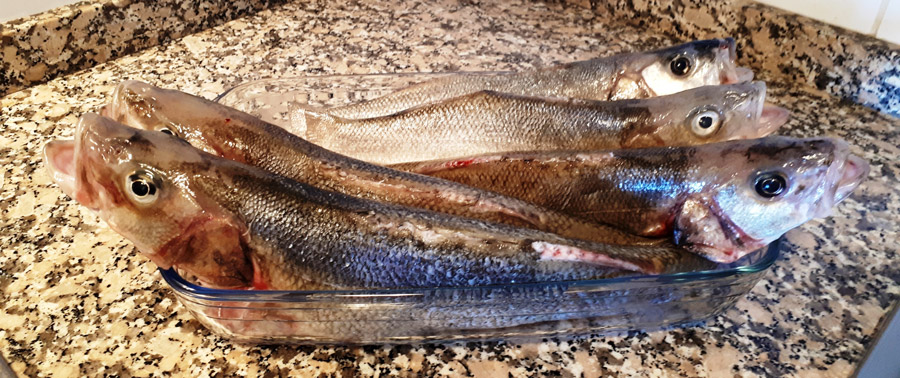
Rinse the fish’s tummy under running water and remove all blood vessels and organs. Removing excess moisture – blot dry with a kitchen towel. We put the fish ready for cooking on a dry paper towel. The table shows some of the best models of fishing knives to get a fillet:
| Model of Fishing Knife | Explanation |
|---|---|
| Morakniv Companion Heavy Duty Knife | A versatile knife with a durable stainless steel blade that is excellent for both filleting and general cutting tasks. Its ergonomic handle provides a comfortable grip even in wet conditions. |
| Rapala Fish ‘n Fillet Knife | A classic fillet knife with a flexible blade that makes it easy to maneuver around bones and other obstacles. Its birch handle provides a comfortable grip, and it comes with a durable leather sheath for safe storage. |
| Buck Knives Silver Creek Folding Fillet Knife | A compact and lightweight knife that is perfect for anglers on the go. Its flexible blade is made of corrosion-resistant stainless steel, and it folds into the handle for easy storage. |
| Kershaw Clearwater Fillet Knife | An affordable fillet knife with a strong and flexible blade made of high-quality stainless steel. Its co-polymer handle provides a comfortable and secure grip even in wet conditions. |
| Gerber Controller Fillet Knife | A premium fillet knife with a durable and corrosion-resistant blade made of high-quality steel. Its textured rubber handle provides a secure and comfortable grip, and it comes with a molded plastic sheath for safe storage. |
Filleting – Mastering the Art of the Cut Cooking Sea Bass
To separate the fillet, you must first make an incision to the bone at the head behind the fin. Then we make two deep cuts along the back ridge from the head to the tail of the fish. Then we pierce with a sharp sirloin knife from above at the beginning of the tail. In the area of the belly, draw a knife across the spine and separate the fish meat along the ridge from the belly to the tail. From the fish head with a knife, make a movement in the opposite direction to the base of the tail. We get the finished filet, from which it is necessary to get only the bones.

Practice Makes Perfect – Honing Your Fish-Cleaning Skills
Last – you need to separate the fillet from the ribs. Open the incision from the back and carefully cut the fillet from the ribs. Repeat the same on the other side. Gorgeous sea bass filet is ready!
Keeping it Clean – Tips for a Tidy Workspace
Cleaning fish can be a messy business, but it’s important to maintain a clean workspace to avoid cross-contamination and potential health hazards. Here are some tips to help you keep your workspace tidy while cleaning fish:
| Tips for Creating a Tidy Workspace while Cleaning Fish | Explanation |
|---|---|
| Use a dedicated cutting board | Using a cutting board that is designated only for fish cleaning helps prevent cross-contamination from other foods. |
| Keep cleaning supplies close | Having a bucket of soapy water and sponge nearby helps clean up spills or messes as soon as they happen. |
| Work near a sink | Position your workspace near a sink so you can easily rinse off any excess debris. |
| Wear gloves | Gloves help protect your hands from bacteria and other contaminants, and also make it easier to clean up once you’re finished. |
| Dispose of waste properly | Have a designated container for fish scraps and dispose of it promptly to avoid any unpleasant smells or attracting animals. |
| Use a plastic bag | To make cleaning up even easier, line your workspace with a plastic bag that can be easily removed and thrown away after you’re finished. |
By following these tips, you can create a clean and organized workspace to make fish cleaning a breeze.
Waste Not, Want Not – Creative Uses for Fish Scraps
When cleaning fish, it’s common to end up with scraps such as the head, bones, and other small pieces that may seem like waste. However, these scraps can actually be used in a variety of creative ways to minimize waste and add extra flavor to your meals. Here are some ideas for making the most out of your fish scraps:
| Creative Uses for Fish Scraps | Explanation |
|---|---|
| Make fish stock | Simmering fish scraps with vegetables and herbs can create a flavorful stock that can be used as a base for soups, stews, and sauces. |
| Compost | Fish scraps can be added to a garden or compost pile to create nutrient-rich compost. |
| Feed pets | Fish scraps can be a nutritious treat for pets, such as cats or dogs. |
| Fried fish bits | Small bits of fried fish scraps can be a delicious addition to salads, tacos, or as a crunchy topping for soups. |
| Fish fritters | Using the scraps to make fish fritters or croquettes is another tasty way to use up the leftover bits. |
| Fish patties | Combine the fish scraps with breadcrumbs, eggs, and seasonings to make tasty fish patties that can be fried or baked. |
By using these creative ideas, you can reduce waste and make the most out of your fish scraps while adding extra flavor and nutrition to your meals.
By getting creative with your fish scraps, you can not only minimize waste but also add extra flavor and nutrition to your meals. So next time you clean a fish, don’t throw away those scraps, put them to good use instead!
Safety First – Protecting Yourself from Harm
When it comes to cleaning fish and filleting, safety should always be a top priority. Handling sharp knives and potentially harmful fish can be dangerous if proper precautions are not taken. Here are some tips for protecting yourself from harm:
- Use a sharp knife – A dull knife is more likely to slip and cause injury. Always use a sharp knife when cleaning fish and filleting.
- Cut away from your body – When filleting, make sure to cut away from your body to avoid accidentally cutting yourself.
- Wear gloves – Wearing gloves can protect your hands from sharp knives and any potential bacteria or contaminants on the fish.
- Keep your workspace clean – A cluttered workspace can lead to accidents. Keep your workspace clean and free of any unnecessary items.
- Use a cutting board – A sturdy cutting board can prevent your knife from slipping and also protect your counters from scratches and damage.
- Watch for bones – When filleting, be careful to watch for bones that can be sharp and potentially dangerous.
By following these safety tips, you can protect yourself from harm while cleaning fish and filleting. Remember, it’s always better to be safe than sorry!
Common Mistakes to Avoid – Learning from Others’ Errors
| Title | Common Fish Filleting Mistakes to Avoid: Learning from Others’ Mistakes |
|---|---|
| Main Idea | Discussing common mistakes made while filleting fish and how to avoid them |
| Mistake 1 | Starting with a dull knife which can slip and cause injury. Always use a sharp knife. |
| Mistake 2 | Failing to properly clean the fish before filleting, which can result in contamination and health risks. Always rinse the fish thoroughly before filleting. |
| Mistake 3 | Cutting too close to the bone, which can make the fillet less appetizing and more difficult to eat. Make sure to leave some meat on the bone. |
| Mistake 4 | Removing the skin incorrectly, which can result in a loss of meat and a less desirable texture. Use a sharp knife and make small cuts while removing the skin. |
| Mistake 5 | Wasting meat by not filleting the fish properly. Make sure to remove all the edible meat and avoid leaving any behind. |
| Mistake 6 | Rushing the process and not taking the time to properly fillet the fish, which can result in a less appetizing and less enjoyable meal. Take your time and make sure to do it right. |
By avoiding these mistakes, readers can improve their fish filleting skills and create more appetizing and enjoyable meals.
I suggest also watching a useful video – how to easily and easily clean fish:
Storing the Fish 🐟❄️
After the fish has been cleaned, gutted, and filleted, it’s important to store it properly to maintain its freshness and quality. Here are some tips on how to store the cleaned and gutted fish properly:
Using Plastic Wrap or Aluminum Foil 🎁
Wrap the fish fillets or whole fish tightly in plastic wrap or aluminum foil. Make sure there is no air trapped inside as this can cause the fish to dry out or develop freezer burn. If you have a vacuum sealer, this is the best option for removing all the air and sealing the fish.
Storing in the Refrigerator or Freezer ❄️
If you plan to use the fish within 1-2 days, you can store it in the refrigerator. Place the wrapped fish in the coldest part of the refrigerator, usually at the bottom or at the back.
If you want to store the fish for a longer period, it’s best to store it in the freezer. Place the wrapped fish in a resealable plastic bag or airtight container to protect it from any odors or flavors in the freezer. Make sure to spread the fish out in a single layer in the bag or container so it freezes evenly.
Labeling with the Date 🏷️
It’s important to label the fish with the date it was caught or purchased and the date it was cleaned and gutted. This will help you keep track of how long the fish has been stored and when it needs to be used by. Use a permanent marker to write the date on the plastic wrap, aluminum foil, or resealable plastic bag.
Proper storage is key to maintaining the freshness and quality of your fish. Remember to wrap the fish tightly in plastic wrap or aluminum foil, store it in the refrigerator or freezer depending on when you plan to use it, and label it with the date. With these tips, you can enjoy delicious, fresh fish anytime. 🐟✨
❓ FAQ: Mastering the Art of Fish Cleaning!
Conclusion 🌟
Congratulations! You have successfully navigated through the essential steps of preparing, cleaning, gutting, filleting, and storing fish. Let’s recap the key points discussed in this article:
- Preparation Before Gutting: Humanely kill the fish, remove the scales, and cut off the fins.
- Gutting the Fish: Make the first incision behind the gills and pectoral fin, cut along the belly, remove all the internal organs, clean the bloodline, and rinse the fish thoroughly.
- Filleting the Fish: Position the fish properly, make the initial cut along the spine, separate the fillet from the bones, remove the skin, and check for any remaining bones.
- Storing the Fish: Wrap the fish in plastic wrap or aluminum foil, store it in the refrigerator or freezer, and label it with the date.
Each of these steps is crucial to ensure the fish is safe to eat, tastes its best, and maintains its quality until you are ready to cook it.
Practice Makes Perfect 👩🍳
Remember, like any skill, cleaning, gutting, and filleting fish requires practice. Don’t be discouraged if it doesn’t come out perfect the first time. The more you practice, the more confident and efficient you will become. And the reward is well worth it – being able to prepare fresh, delicious fish dishes right in your own kitchen.
Cook and Enjoy! 🍽️
Now that you have a beautifully cleaned and filleted fish, it’s time to get cooking. Whether you prefer your fish grilled, baked, fried, or steamed, there are countless delicious recipes to try. So, get in the kitchen, experiment with new flavors and cooking techniques, and enjoy the delicious and nutritious meals you can create with your freshly prepared fish.
Thank you for following this guide, and happy cooking! 🐟✨✨
Bonus: Additional Tips 🎣
Cleaning, gutting, and filleting a fish is a skill that every fishing enthusiast or home cook should master. To help you get the best results, here are some additional tips and tricks from a fishing professional:
Keeping the Fish Cold ❄️
It’s essential to keep the fish cold until you are ready to clean it. This not only maintains the freshness and quality of the fish but also makes it easier to handle and clean. If you are out fishing, keep the fish on ice or in a cooler until you get home. If you are buying fish from the market, store it in the refrigerator until you are ready to clean it.
Sharpening Your Knife Before Starting 🔪
A sharp knife is crucial for cleaning, gutting, and filleting fish. A dull knife can make the process more difficult and increase the risk of accidents. Make sure to sharpen your knife before starting and periodically during the process if necessary.
Using the Back of the Knife to Remove Scales 🐟
When removing the scales from the fish, use the back of your knife, not the blade. This will help to remove the scales more effectively without damaging the skin or flesh of the fish. Hold the fish by the tail and scrape from the tail towards the head using firm, short strokes.
Disposing of the Guts Responsibly ♻️
It’s important to dispose of the fish guts responsibly. Do not throw them in the water as this can attract predators and lead to overfeeding. Instead, bury them in your garden as fertilizer, or double-bag them and dispose of them in your regular trash. Some areas have special disposal sites for fish waste, so check with your local municipality for more information. 🐟✨✨
Tags: #how to clean a fish / #how to gut or clean a fish / #how to gut or clean fish before cooking / #how to clean fish quickly and easily before cooking

I live in Tenerife (Canary Islands) for the last 10+ years and share my daily fishing experiences on my website. Many years of personal experience as a fisherman and the vast experience of my friends allow me to write professionally on any fishing topics (from choosing a flashlight and equipment to deep-sea fishing).
All of my advice is based on practical real-world experience and will be useful to both novice anglers and professionals. Read more about the author.
Affiliate Disclosure: FishReeler.com sometimes gets paid for listings, through sponsors or affiliate programs like Amazon, Ebay, Cabelas, Bass Pro Shop, Shimano, Daiwa, Rapala, Renn, Okuma, KastKing, etс. Clicking a link helps keep FishReeler.com free, at no extra cost to you!
About the author: Each article is verified by the fishing expert Sergio Smirnoff. The articles are written by professional and amateur fishermen with 20+ years of fishing experience.
Note: The views and opinions expressed in this article are those of the authors and do not necessarily reflect the official policy or position of any agency. The articles are for informational purposes only, share your opinions in the comments and join the fishing discussions, let's share our fishing experiences together!

Wow, I just had my first experience cleaning and filleting a fish! It was actually fairly simple. I started with a round fish since they are easier to work with than flat fish like Sole, Halibut, or Skate.
The first thing I did was to de-scale the fish using a bread knife by dragging it along the skin toward the head. This process can get messy, so I did it in a sink where I could easily wipe down the area afterward.
Next, I needed to remove the guts. Using a thin knife, I found the fish’s pee hole on the bottom near the tail and stuck the tip of the knife in before slicing through right up the belly to the head. Then I simply pulled the guts out and rinsed the fish under cold water.
I was already amazed at how easy it was to gut a fish, but I decided to go the extra mile and fillet it. To do this, I laid the fish on its side and cut a notch on each side behind the head all the way to the spine (being careful not to cut through the spine). Then, I took the knife parallel to the bone from the notch behind the head and sliced along all the way to the tail in a smooth sawing motion as close to the bone as possible. I repeated this process on the other side.
Now, I had two almost fillets, each with little bones that could be felt when running my fingers along the flesh. I used a pair of tweezers to remove them individually and voila – I had my very own fish fillets!
To cook the fillets, I simply seasoned them with some butter and herbs before grilling them for about 14 minutes. It was such a satisfying experience to go from cleaning and filleting a fish to enjoying a delicious meal. I can’t wait to try it again with different types of fish!
Hey there, thanks for sharing these simple steps for gutting a fish! As someone who enjoys camping and fishing, it’s always great to know how to prepare your catch properly.
First off, you’ll need a sharp knife and fresh fish. If you want to keep things tidy, bring along a bucket or some old newspaper/garbage bag, and make sure you have access to cold water (a hose, sink, or stream/lake will do).
Once you’ve confirmed that the fish is dead, lay it down on your preferred surface and start by grasping the tail firmly with your right hand. Using your knife, make a small cut just to the left of the tail muscles where the underbelly is softer. This is typically where the fish eliminates waste and lays eggs, so it should be easy to spot.
From there, gently and firmly move the knife towards the head in a seesaw pattern to make the initial cut. Hold the fish still with one hand on top and use the other hand to guide the knife, making sure it doesn’t go too deep (around 1-2 inches is enough).
The cut you make should follow the belly line from just in front of the tail up to the head end of the cavity. You’ll know when you hit the end of the cavity because it will get harder to cut.
Now it’s time to gut the fish. If you have a bucket handy, this is where it comes in useful. Using your hands or your knife, separate the tough bits from the flesh on top of the belly slit you made and empty what comes out easily onto your newspaper or into your bucket.
If there are any bits that stick, gently slice the connective tissue on the outer sides of the cavity with your knife. You can also use the point of your knife to scrape the arch of the space near the spine, just to be sure you’ve removed all the bits and blood. Rinse the fish out a few times with cold water, swishing it around with your hands to ensure it’s fully cleaned.
And that’s it! You now have a shiny, empty fish ready to be cooked and eaten. Thanks again for sharing these helpful tips.
Thanks for sharing your thoughts on gutting fish! I completely agree that having a good flexible knife and keeping it sharp is essential to the process. And yes, having a friend or mentor show you the ropes is invaluable, especially when it comes to learning the little tricks and nuances that can make all the difference.
When it comes to smaller fish like perch and crappie, filleting isn’t always necessary. Simply removing the head and guts can be enough to prepare them for cooking. And the great thing about these fish is that you can cook them whole in a variety of ways – fried, baked, or grilled. In fact, some people even enjoy eating the tail fin, which can be delicious when it’s nice and crispy.
Overall, gutting and preparing fish is a skill that takes practice, but with the right tools and guidance, it’s definitely achievable. So if you’re interested in learning, don’t be afraid to seek out resources and give it a try!
As someone who has filleted a fair amount of fish, I can attest to the fact that having a sharp, flexible fillet knife is absolutely essential. You simply can’t fillet a fish with just any old knife – it needs to be thin, sharp, and flexible.
Once you have your fillet knife, the first step is to make a slight vertical cut down the meaty side of the fish right behind the gills. Then, make a second slightly diagonal cut towards the tail. These two cuts are crucial in starting the fillet.
From there, you’ll want to work your knife into the desired thickness of the fillet and cut backward, either through or around the ribcage. It can take a bit of practice to get the hang of it, but there are plenty of videos on YouTube that can help you master the technique.
When it comes to practice, I highly recommend starting with panfish. They’re small enough to handle easily, but still, offer enough meat to work with. Just make sure the fish are big enough to get a decent fillet off.
Overall, filleting fish is a skill that takes time and practice to perfect. But with the right tools and guidance, anyone can learn to do it well. So don’t be afraid to give it a try – your taste buds will thank you!
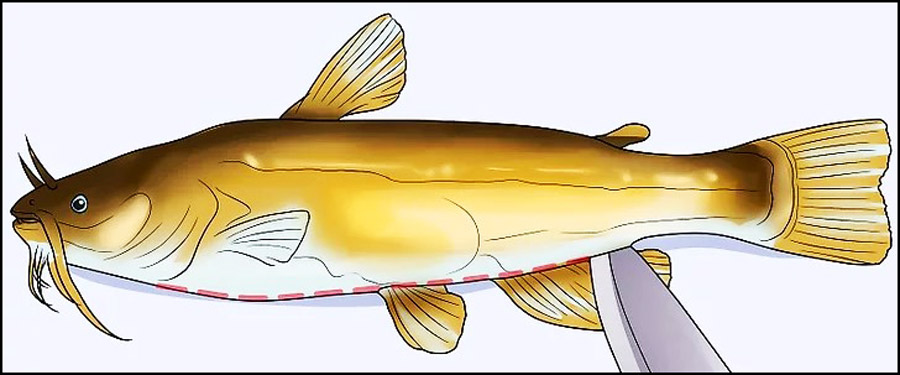
Knowing the bone structure of the fish you want to fillet is crucial to avoid any unpleasant surprises when eating it. Once you know the family the fish belongs to, you can make an educated guess on how to clean it. For perch, the quickest way is to remove the scales first.
Start by cutting the fish from the pectoral fins to the pelvic fins and cleaning out the guts. Then, cut off the dorsal fin above the spine. Next, make shallow vertical and horizontal cuts on both sides of the fish. After that, you can batter and fry the whole fish for no more than 4 minutes at 375 degrees Fahrenheit. The meat will flake off easily without any bones.
If you’re new to filleting fish, it’s important to take your time and be cautious. You can also find many helpful videos and tutorials online to guide you through the process. Happy fishing and cooking!
When it comes to cleaning trout, scaling is not always necessary. One simple way to clean the fish is to remove the head and tail, then cut the belly open and remove the organs.
Trout also have a visible bloodline along the spine, which should be removed by pushing it out with your thumb. Rinse the fish afterward and it’s ready to cook. I recommend watching a video on how to clean trout for a more detailed explanation. Slow cooking the trout will result in tender meat that easily falls off the bone.
If you’re fishing for trout, you don’t have to worry about scaling them since their skin is smooth and edible. Just be sure to wash them thoroughly to remove any slime.
For larger fish, filleting is an option, but for smaller fish, it’s easier to just gut them, remove the head, and season the cavity with your preferred herbs or citrus. Then, wrap them in foil and cook until the meat is flaky. This way, you can eat them like finger food and pick the bones clean, getting more meat off the small fish.
When fishing, I always carry a sealable plastic bag to keep my catch in. As I catch fish, I gut them and keep them in a bag, submerging them in the water to keep them cool on hot days. I hope this tip helps you on your next fishing trip!
Learning how to clean and cut fish is an important skill that can come in handy when you’re out in nature. When I first learned how to do it, I didn’t have access to a standard kitchen or cutting board, so I had to make do with what I had. Even now, as I cook in my apartment, I still use many of the habits I picked up in that village.
While I’m confident in my knife skills, I understand that not everyone has the same level of experience. That’s why I made sure to include a disclaimer in my video. If you happened to see me using my hands as a cutting board, then you should have also seen the disclaimer. If you missed it, please take note of it in the future.
Having a sharp, thin-bladed knife is essential when filleting a fish to avoid waste and get the best results. While a pocketknife or worked chert may suffice, a good fillet knife is highly recommended.
However, if you find yourself in a situation where you don’t have the necessary tools or experience, you can still enjoy your catch. Roasting the fish on a stick over an open flame or making a stew are great alternatives. Some people enjoy eating the head, but if you’re not very hungry, it’s not necessary.
Just remember to drink the fish broth after you’re done with the fish. It’s a delicious and nutritious addition to any meal.