Why Bobbers Matter in Fishing: Dive In! 🎣
Ever stared at the serene water, patiently waiting, only to end up with a minimal catch? Or perhaps you’re new to the angling world and want to make the most out of your first fishing trips? Here’s the golden nugget of information you’ve been searching for: the way you put a bobber on your fishing line can greatly influence your fishing success. 🌊✨
✅ Easier Detection 🚨: A correctly positioned bobber allows you to easily detect when a fish bites, increasing your chances of a catch.
✅ Perfect Depth 🌊: With bobbers, you can ensure your bait remains at the desired depth, attracting more fish.
✅ Avoid Snags 🌿: Reduce the chances of your hook getting stuck in weeds or on the riverbed.
By mastering the simple technique of placing a bobber on a fishing line, not only will you amplify your chances of landing a good catch, but you’ll also ensure a more enjoyable fishing experience. Ready to dive deep into the details? Let’s cast a line into the world of bobbers! 🐟🎉
The Magic of Proper Bobber Placement 🎣

Every angler, be it a novice or a seasoned pro, knows the thrill of the catch. The anticipation as the fishing line tightens, the joy of reeling in a prize fish—it’s an adrenaline rush like no other. Yet, it’s surprising how many overlook one essential aspect that can drastically enhance their fishing experience: the correct placement of the bobber. 🌊
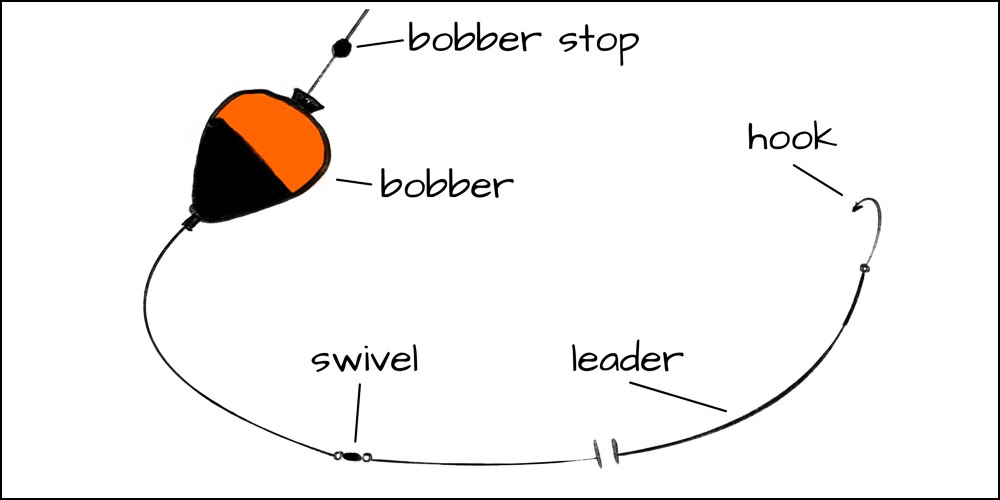
Bobbers, often considered the unsung heroes of the fishing world, are not just floating accessories on our lines. Their primary function, which is indicating when a fish has taken our bait, is crucial. But, to effectively carry out this role, it’s paramount that they’re positioned accurately on the fishing line.
When a bobber is correctly placed:
📍 Depth Mastery: It ensures that the bait is suspended at the precise depth where fish are feeding. It’s like delivering food right to their doorstep!
🌿 Lesser Snags: Correct placement can prevent your bait from sinking too low, getting caught in weeds, or entangled in submerged objects.
🐟 Better Bite Indication: An optimally positioned bobber will respond more distinctly to a fish’s bite compared to water currents or other disturbances.
In essence, understanding and mastering bobber placement isn’t just about enhancing your chances of catching a fish. It’s about refining your entire fishing technique, ensuring every moment spent by the waterside is both productive and enjoyable. So, let’s set the stage for success and dive into the importance of getting that bobber just right! 🌟🐠
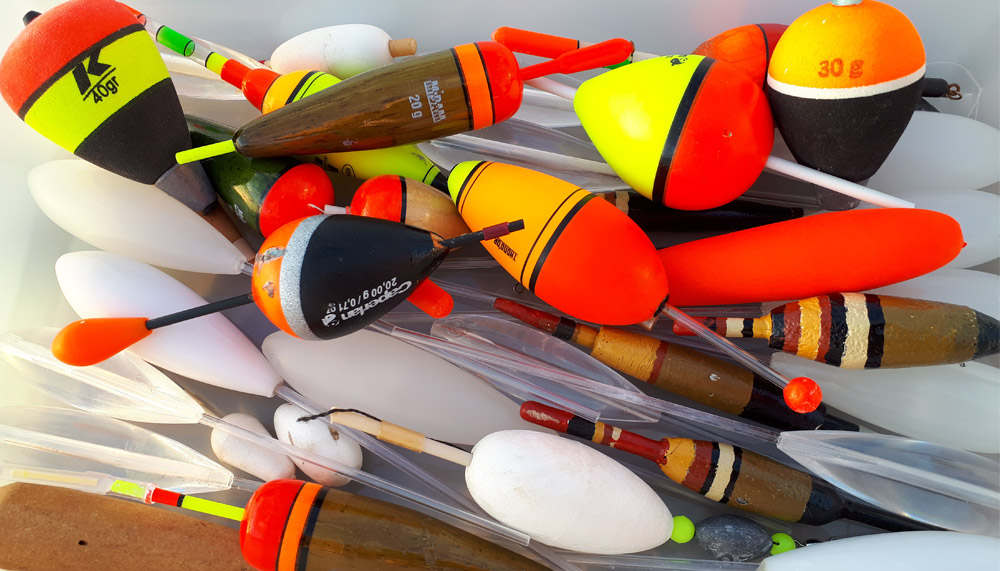
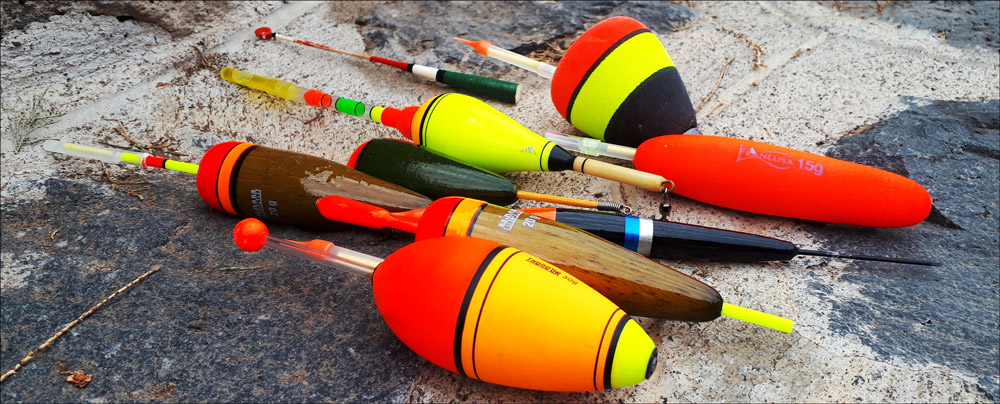
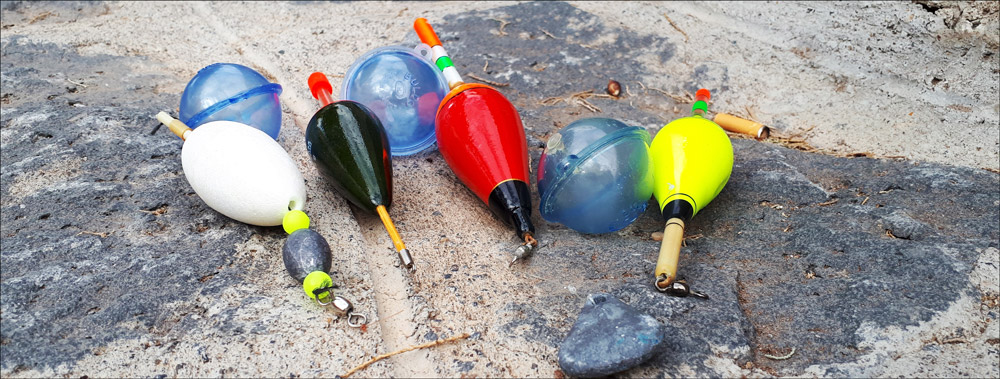
The Basics of Bobbers: Dive into Diversity & Materials 🪶
One crucial tool, often misunderstood or overlooked, is the humble bobber. These floating indicators have evolved over the years, coming in various styles and materials, each tailored for specific fishing scenarios. 🎣
Types of Bobbers
| Type of Bobber | Functionality | Best For |
|---|---|---|
| Bullet Bobbers 🚀 | Their streamlined shape helps cast longer distances, perfect for reaching farther spots in the water. | Deep water fishing and targeting fish species that dwell in the middle or bottom layers of water. |
| Round Bobbers 🟠 | Typically attached directly to the line. They’re easy to use and provide consistent bait depth. | Still waters like ponds or lakes where precise depth control is crucial. |
| Slip Bobbers 🎈 | Allow for adjustable depth, letting anglers change how deep their bait goes without modifying the entire setup. | Variable-depth fishing or when fish are active at different levels in the water. |
Understanding Bobber Materials
| Type of Bobber | Advantages | Best For |
|---|---|---|
| Foam Bobbers ☁️ | Lightweight, affordable, and highly visible on water. Their buoyancy makes them a favorite among many. | Freshwater fishing, especially in calm waters. |
| Plastic Bobbers 🟢 | Durable, resistant to wear and tear. Offer a variety of sizes and are usually brightly colored for visibility. | Both freshwater and saltwater fishing, particularly for beginners. |
| Cork Bobbers 🍾 | Naturally buoyant and eco-friendly. Provide a more subtle presentation in the water, less alarming to cautious fish. | Fly fishing or in scenarios where a delicate approach is needed. |
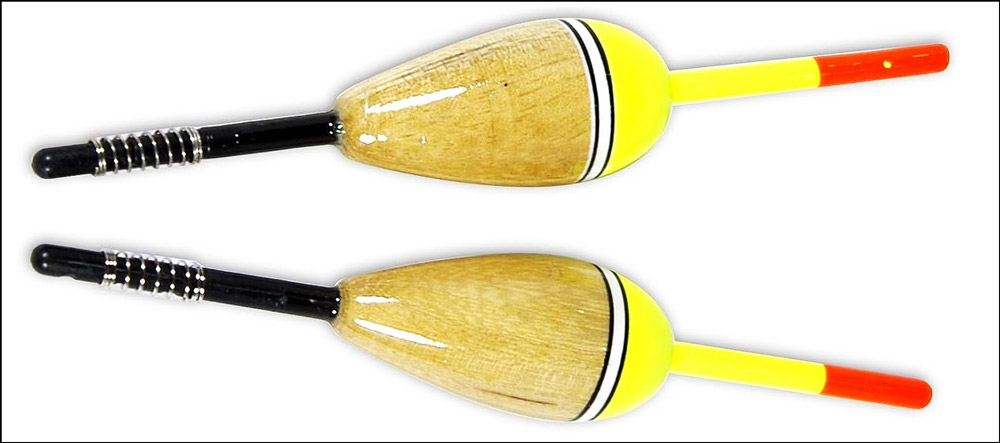
| Balsa Wood Bobbers 🌳 | Extremely light and sensitive. Their organic feel and buoyancy make them ideal for detecting even the slightest nibble. | Fishing in clear waters where fish might be wary of artificial elements. |
In essence, the world of bobbers is vast and varied. Knowing the difference between them and understanding when and where to use each type can drastically improve your fishing game. Equally important is recognizing the materials and their respective advantages. The next time you gear up, give a thought to your bobber choice – it might just be the game-changer you’ve been looking for! 🌊🐟
🎣 The Right Tools for Bobber Attachment 🎣
In the realm of bobber fishing, the way you attach your bobber to your line can significantly affect your success rate. Let’s dive into the essential tools you should consider.
🔍 Tools Overview: Importance of having the right tools for different bobbers
The bobber’s primary purpose is to suspend your bait at a specific depth, making it more attractive to fish. But without the right tools to attach them correctly, bobbers can slide, twist, or even scare away potential catches. Ensuring you have the right tools for attachment, suited to the specific type of bobber and fishing conditions, is paramount.
| Tool | Purpose | Usage Tip |
|---|---|---|
| Bobber Stops ✋ | These small yet essential components are used to fix the bobber at a particular depth on the fishing line. They prevent the bobber from sliding up and down, ensuring your bait remains at the desired depth. | When using slip bobbers, bobber stops are crucial. They’re adjustable, allowing you to change the depth at which your bait is suspended easily. |
| Beads 📿 | Typically used in conjunction with bobber stops, beads protect your knots from wear and tear. They provide a buffer between the stop and the bobber, ensuring the bobber doesn’t pass the stop. | Ensure the bead size complements the size of your bobber and doesn’t interfere with its functionality. |
| Swivels 🔄 | Swivels prevent line twists, which can be caused by the spinning motion of the bait or bobber. They’re especially useful when casting and retrieving frequently. | Opt for a swivel size that matches your fishing line’s weight. A swivel that’s too large or small can impact casting and retrieval. |
By equipping yourself with these tools and understanding their specific functions, you’ll enhance the efficiency of your bobber fishing technique, ensuring every cast has the potential for a catch.
Step-by-Step Guide to Bobber Attachment: Ensuring the Perfect Float 🎣
Setting up a fishing line may seem simple, but there are small intricacies that can make all the difference. One of these intricacies is attaching a bobber correctly. Whether you’re using a bullet, round, or slip bobber, each has its unique attachment method. To ensure your bait stays at the right depth and you don’t miss any bites, let’s delve into a detailed guide on how to secure these bobbers to your line.
Bullet & Round Bobber Attachment 🚀🟠
Identifying Top and Bottom:
- The top is typically narrower or has a button or small protrusion.
- The broader end is usually the bottom, which may have a hook or clip.
Clipping Onto the Line:
- Hold the line taut.
- Press the button or pinch the top of the bobber. This will expose the hook or clip on the bottom.
- Place your line into the hook and release the button. Your bobber should now be secured.
Adjusting for Desired Depth:
- To set your bait at a specific depth, decide the distance from the hook you want the bobber.
- Pinch the bobber’s top and move it up or down the line to your desired position.
Slip Bobber Attachment 🎈
Threading the Bobber Stop onto the Line:
- Most bobber stops come pre-looped. Run your line through this loop and slide the bobber stop onto your line.
- Cinch it down and trim excess material.
Adding a Bead:
Next, thread a bead onto your line. This will prevent the bobber stop from sliding into the bobber.
Sliding the Slip Bobber onto the Line:
- Identify the top (narrower end) of the slip bobber.
- Thread your line through this end, ensuring it exits through the broader bottom end.
Securing with a Swivel and Adjusting for Depth:
- Tie a swivel to the end of your line. This will keep the bobber from sliding off and will act as a stop for depth.
- To adjust depth, simply move the bobber stop up or down the line. The distance between the swivel and bobber determines your bait’s depth.
Final Thoughts 🤔: Attaching a bobber correctly enhances your fishing prowess, ensuring that your bait is presented at the optimal depth for your target fish. By mastering these simple steps, you’ll be well on your way to a more fruitful and enjoyable fishing experience. 🐟🌊
Pro Tips for Bobber Fishing: Elevate Your Angling Game 🎣🌟
Bobber fishing is more than just watching a floating device on the water’s surface; it’s an art. An angler equipped with pro tips will not only have a higher catch rate but also an enhanced fishing experience. Dive into these expert insights to understand bobber movement, adjust for currents, and match the right bobber size to your bait.
Reading Bobber Movement: The Art of Decoding 🕵️♂️
Fish Bites:
🔲 Quick and Sharp Tugs: These often mean a fish has bitten your bait. If the bobber goes under and stays there, it’s a sign of a good catch.
🔲 Gentle & Rhythmic Pulses: Sometimes fish might just be nibbling or playing with the bait rather than taking a bite. Be patient!
Natural Bobber Movement:
🔳 Continuous Sway: This is usually a result of water currents, wind, or ripples and not necessarily a fish.
🔳 Random Bobbing: Occasionally, debris or underwater plants might cause your bobber to twitch.
Adjusting for Currents: Stay in Control 🌊🔄
Fast Currents:
🟪 Heavier Bobber: Opt for a heavier bobber to keep it stable and prevent it from being dragged too quickly downstream.
🟪 Shorter Line Length: Reduce the distance between the bait and bobber to ensure the bait doesn’t get swept away.
Slow or Still Waters:
🟫 Lighter Bobber: A more sensitive, lighter bobber will respond better to subtle fish movements.
🟫 Longer Line Length: Allows your bait to sink deeper and access fish that might be further below the surface.
Matching Bobber Size to Bait: Achieving Perfect Harmony 🎶🐟
🟦 Why It’s Crucial: A bobber that’s too large for your bait won’t effectively signal fish bites, while one that’s too small may get submerged too easily, missing potential catches.
🟦 Smaller Bait: Opt for smaller, more delicate bobbers. This ensures sensitivity to even the slightest nibbles.
🟦 Larger Bait: Go for a bigger, sturdier bobber that can support the weight of the bait without sinking.
🟦 Test & Adjust: After casting, observe if your bobber remains upright. If it leans to a side or gets submerged, consider adjusting the size.
🟥 In Closing 🌅: Fishing with a bobber isn’t just a passive activity; it requires observation, interpretation, and strategic adjustments. Equipped with these pro tips, every angler can up their fishing game, ensuring not just a catch, but a delightful experience by the water. 🎣🌟🐠
Common Bobber Fishing Mistakes and How to Dodge Them 🎣🚫
Even seasoned anglers can make mistakes when bobber fishing, but recognizing these pitfalls is half the battle. By understanding common errors and learning how to counteract them, you can optimize your fishing experience. Let’s dive into these missteps and navigate the best ways to sidestep them.
Overloading the Bobber: The Delicate Balance ⚖️
The Impact:
🟤 Reduced Sensitivity: Overloading causes the bobber to partially submerge, making it less responsive to fish bites.
🟤 Distorted Casting: Too much weight can alter the trajectory of your cast, sending it off target.
How to Balance:
🧿 Check Floatation: After attaching bait and sinkers, place the bobber in still water. It should float upright without tipping.
🧿 Adjust Gradually: If it’s leaning or submerged, reduce the weight bit by bit until the bobber remains stable.
Misjudging Depths: Dive Deeper (or Shallower) 📏🌊
🔷 The Problem: Casting too shallow might mean your bait isn’t reaching the fish. Too deep, and it may get snagged on underwater obstacles.
Tips for Accurate Depth Assessment:
⚪ Use Markers: Attach small, removable markers on your line at different lengths to quickly gauge depth.
⚪ Observe Surroundings: Look for signs like fish activity, underwater structures, and vegetation. They can give clues about where fish might be.
⚪ Start Shallow, Then Go Deep: Begin by fishing at a shallower depth. If no bites, progressively move deeper until you find the sweet spot.
Using the Wrong Bobber for Conditions: Adapt and Conquer 🔄🌦️
🔷 The Issue: Using a small bobber in choppy waters or a bulky one in calm waters can result in missed fish bites or scare away fish.
Choosing and Adjusting:
🔘 Calm Waters: Opt for sensitive, lightweight bobbers that can detect even the faintest nibbles.
🔘 Rough Waters: Choose sturdier, larger bobbers that won’t be tossed around too much by waves or wind.
🔘 Consider Visibility: On overcast days or during dawn/dusk, a brightly colored bobber can be more visible.
Wrapping Up 🌐: Fishing is as much about technique as it is about patience and observation. By being vigilant about these common missteps and adapting your approach based on conditions, you can dramatically enhance your angling success. Remember, the best anglers learn not just from their catches, but also from their mistakes. 🎣🌟🍀
Care and Maintenance for Bobbers: Ensuring Long-lasting Floats 🎣💡
Bobbers, like all fishing gear, require regular attention and care to maintain optimal performance. Proper maintenance not only extends their lifespan but ensures they function effectively during every fishing trip. Dive into this guide for preserving your bobbers and guaranteeing the best possible experience on the water.
Routine Checks: Be the Bobber Detective 🕵️♂️🔍
Signs of Wear and Tear:
- Cracks or Breaks: Especially in plastic or foam bobbers, look for any visible cracks.
- Fading Colors: Over time, the bright colors on bobbers can fade, making them less visible in water.
- Water Logging: If your bobber doesn’t float as it used to, it might be taking on water.
How to Check:
- Visual Inspection: Before and after every trip, do a quick look-over.
- Float Test: Occasionally, put your bobber in water and ensure it floats correctly.
- Feel: Sometimes, tactile checks can help identify irregularities like bumps or rough patches.
Proper Storage: Give Your Bobbers a Safe Home 🏠🎣
Environment:
- Dry Place: Always store bobbers in a dry location to prevent mold or water damage.
- Avoid Direct Sunlight: Prolonged exposure can degrade materials and fade colors.
Storage Tips:
- Separate Compartments: Use tackle boxes with different compartments to prevent bobbers from crushing each other.
- Avoid Excessive Weight: Don’t stack heavy gear on top of your bobbers.
Replacing Bobbers: Knowing When It’s Time to Let Go 🔄⌛
Why It’s Essential:
- Optimal Functionality: A damaged bobber can impair your fishing experience by not floating correctly or becoming less visible to you.
- Prevent Loss: A compromised bobber might break during casting or when a fish bites, leading to lost bait or even fish.
When to Replace:
- Visible Damage: Any cracks, significant color fading, or deformities are clear indicators.
- Performance Issues: If the bobber sinks, leans heavily to one side, or doesn’t respond well to bites, it’s time for a replacement.
Final Thoughts 🌅: Like any other piece of equipment, bobbers need love and care to ensure they serve you well. A small investment in time for their maintenance can lead to many fruitful and hassle-free fishing adventures. May your bobbers always float and your lines always tighten! 🎣🌊🌟
From Novice to Pro: Setting up Your Bobber Like an Expert!
In almost any fishing article, you will find information on how important it is to attach the bobber to the line before going fishing. But almost no one gives you a clear answer on how to do this properly. Bobbers are very different and can be attached in dozens of ways. And for a beginner, this can become a very severe headache when at the initial stage you are faced with the problem of how to properly attach the bobber to your equipment.
Important: My recommendation is a float design for any beginning angler. Complete: 6 meters of fishing line, a small fishing hook, sinkers, float with a replaceable antenna for night fishing, a long body underwater, which does not let you get tangled when throwing the tackle.
Bobber Design
Before we put our bobber on the line, let’s figure out how it works. So, almost every bobber has the following elements:
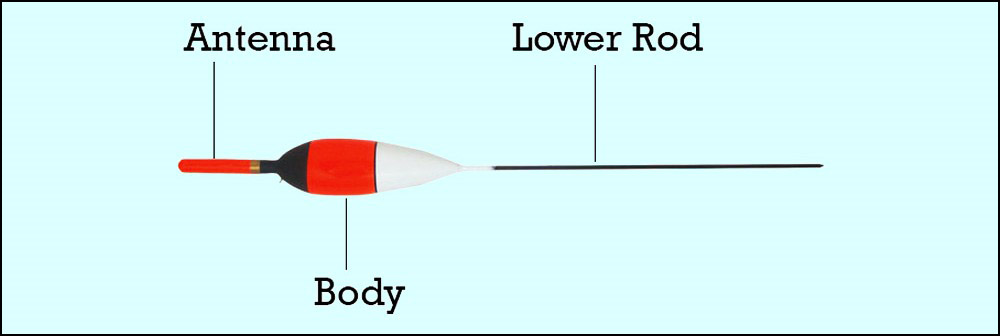
- Body or middle. This is the thickest part of the structure, from which all other elements stick out.
- Antenna, or upper part, or tail sticking out of the body. A very flexible element that can dangle.
- The fin or lower rod sticking out of the body.
But some bobber models do not have these elements. There are many examples of this. For example, a plastic surface carp bobber does not have an antenna or a rod. Or there are models in the form of a tube, where all the elements are similar to each other. I just described the general bobber design that you will encounter most often.
Mount Types
All the ways to tie a bobber to a line can be divided into two broad categories:
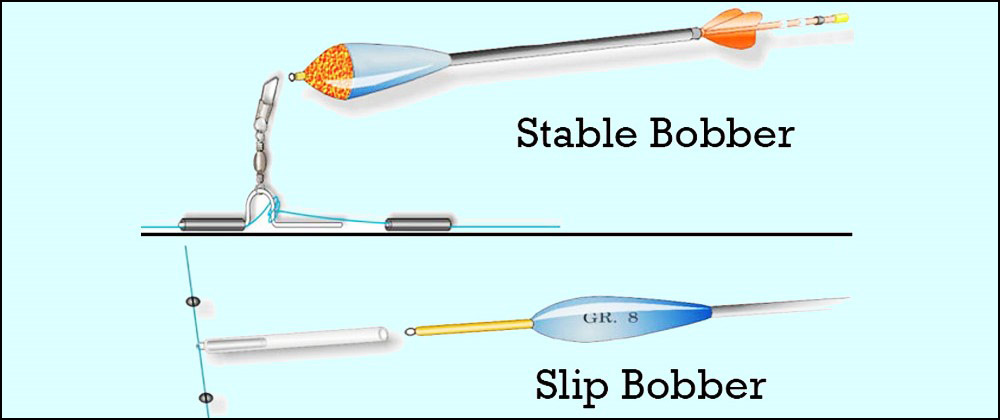
- Stable bobber. The bobber holds at one point during the entire fishing process; it can only be moved by applying force.
- Slip bobber. The bobber moves along the line between the locking elements. The depth of the fishing spot is determined by the location of the upper stopper.
The stable bobber is used in a wide variety of conditions, for almost all types of fishing. Fixation can be carried out at one, two, or three points. A slip bobber is used when fishing for a predator with live bait or when the depth of the place does not allow using a stable fixation option.
Stable Bobber
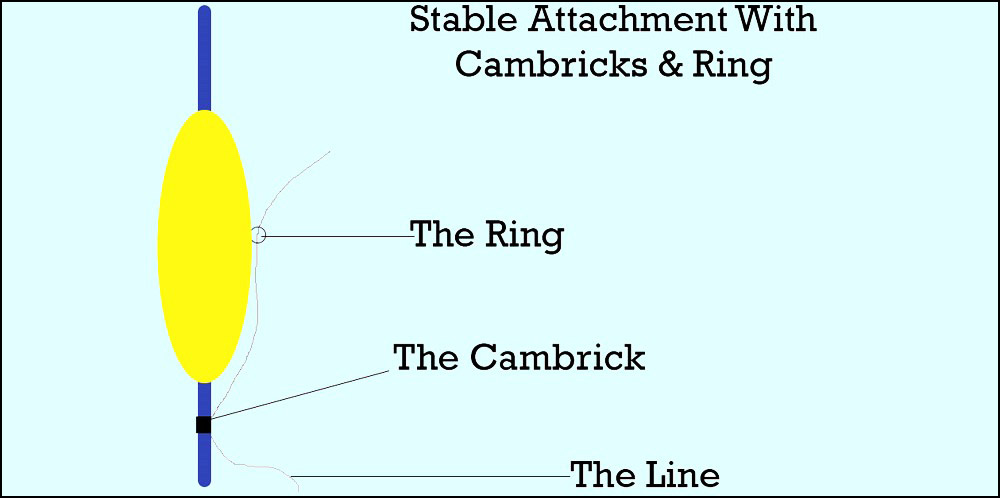
All stable attachments of bobbers can in turn be divided into three groups: attachment with cambricks, attachment with a ring, attachment with a stop of the line passed through the body. If your bobber’s antenna and rod are thin enough and there is no ring, then attaching it is very simple. It is enough to put the required number of cambricks on the line, and then pull them on the antenna, lower rod, or both here and there.
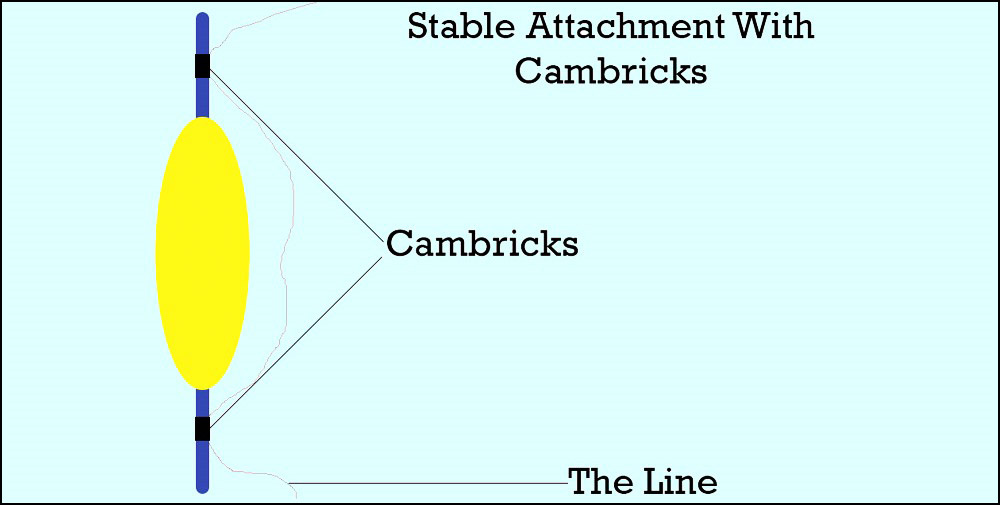
If the bobber’s lower rod is very long, sometimes two attachment points are made on it: the upper cambric should be placed directly under the body, and the lower one – at the very end with a descent to the fishing line. This is done to avoid line tangling.
For models that have a short thick antenna, a ring is glued or screwed into the body. Then the fastening is carried out differently. The fishing line is passed through this ring and fixed with cambrics at the bottom. Their number depends on the length of the lower rod.
Slip Bobber Mount
Slip mounting allows the bobbers to move freely over the line from stopper to stopper. The fishing line is passed, depending on the model, through a ring or a hole in the body of the bobber.
Slip-mount stoppers come in a variety of materials:
- Rubber. Silicone rubber beads are the best at absorbing shocks and protecting bobbers. It is better to put silicone tips in several pieces in a row to prevent shifts.
- Plastic beads. They are easy to put on the line, they move freely along it. The bead attachment is fixed with knots. To soften the blows, cambric is placed in front of the beads.
- A thread. Special thread stoppers with beads are on sale. Such stoppers often relax, they have to be constantly tightened.
- Lead pellets. In case of urgent need and no other stoppers, you can use sinker pellets by clamping them above and below the bobber. In this case, it will be correct to use shims to soften the impact of the pellets on the fastening elements of the structure.
When using this or that stopper, you need to pay attention to how it will pass when casting through the rings of your rod.
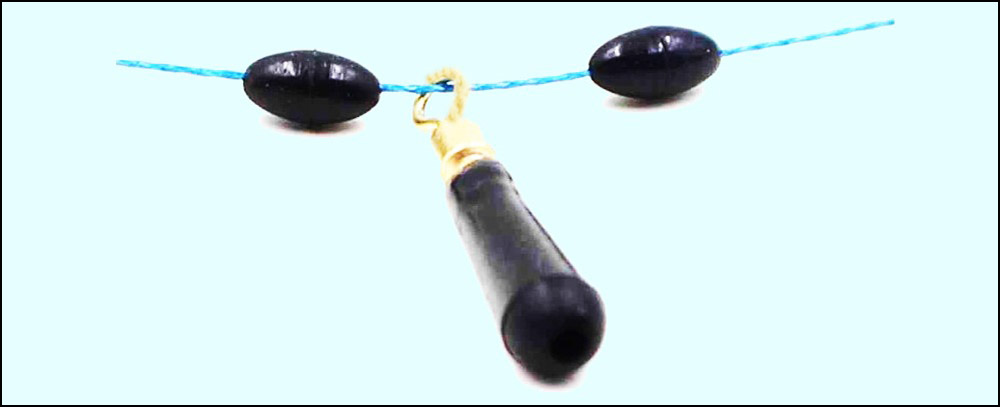
The Bobber With A Ring At The End
Nowadays, bobbers with one ring on the lower rod are very common. These bobbers are the most popular on the market. But not all anglers switching from old bobbers to modern ones can understand the intricacies of installing such bobbers. I will give you some tips for installing such bobbers.
Here are some other ways to blindly secure bobber models with a ring:
- The loop is inserted into the ring and thrown over the body. Does not require additional elements for installation. But to move the bobber, you need to loosen the resulting loop every time.
- The fishing line is threaded into the bobber ring, and silicone or rubber stoppers are placed on both sides of it. This method allows you to change a stable mount to a slip mount, you just need to move the stoppers apart.
- If the ring turns out to be larger than your stoppers, you can first attach a small carabiner with a swivel to it, and then pass the fishing line through the swivel ring. This design will allow you to quickly change the bobber if necessary.
- A small metal or plastic bracket is inserted into the ring, the ends of which are placed in the cambric pieces. They must first be put on the fishing line.
- A wire is inserted into the ring, a twist is made, which is then placed in a silicone rubber tube, put on a monofilament or braided line.
There are various silicone adapters on the market that fit over the bottom of the bobber, thereby simplifying its attachment. Such designs, as well as the built-in ring, allow for a stable installation at one point.
Some models are installed bypassing the line through the body. Thus, for example, bobbers for winter fishing are often placed. Although this method is also used when fishing in open water. The stopper in such models is long, which can combine the functions of both antennas and a rod.
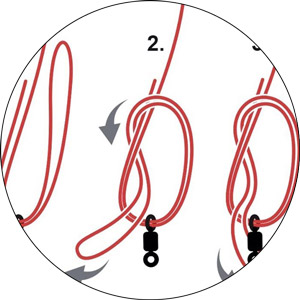
How To Use And Tie Stopper Knots
Instead of buying stoppers from a store and installing them on your line, you can simply tie your stoppers from monofilament or other materials and they will work the same way. When installing the bobber, you can knit locking knots on it. Especially for a slip bobber. The main task of the stop knots is to limit the free sliding of the bobber along the line.
Why are These Knots Needed?
You can buy a stopper, but it is easier and more reliable to learn how to knit stopper knots from monofilament, or better from woolen threads.
Homemade movable stoppers can successfully replace store stoppers, but at the same time they have several advantages that store stoppers do not have:
- Shock absorption with a heavy bobber.
- The ability to bind the stopper to the mainline with full rigging of your fishing rod.
- Independence from additional rigging materials.
- Besides, homemade stopper knots can also be successfully used to restrict the free movement of swivels during spinning fishing, to restrict the movement of the feeder, or for stopping weights and sinkers.
- For better indication, stop knots are best made of colored material.
Three Kinds of Stop Knots, Simple and Reliable.
There are three types of easy-to-tie stop knots: clinch, double clinch, and uni. They do not deform the mainline and regularly perform their main function of a reliable stopper.
Using Bobbers For Various Types Of Fishing
Various types of bobbers and methods of their attachment exist for a reason. Depending on the fishing conditions, you can use and customize your bobbers in different ways for the most efficient fishing. Below I have listed the main ways to use bobbers in fishing.
Fly fishing. This is a classic, well-known method of fishing. A small bobber with a medium rod and thick antenna will work best. There are mainly two attachment points here: one for the ring sticking out of the body, the second for the cambric in the lower part.
Plug fishing. The difference from fly fishing is only in the length of the upper part of the bobber for better visualization.
Fishing with a telescopic rod. It involves casting at different distances. It is better to equip such a rod with a model with long antennas. Attachment at three points: to the apex or through a ring in the body and two cambric below.
Fishing with live bait. Slip the bobber bypassing a line through the bobber’s body. This design will give the bait more freedom of movement, and also less alert the predator when biting.
Spinning rods and reels. Here, models are used with a single point attachment, per ring. It can be both stable, with a shallow fishing depth, and a slip with sufficient depth.
Winter fishing. Stable attachments with a stopper on the antenna are used when the fishing line is passed through the body, or by fastening at one point for the ring or pin of the bobber’s rod.
About Spare Bobbers
Let’s be honest. The bobber is not the most durable thing in the world. Your line can easily catch on a snag in water or a bush and break. This means that on almost any fishing you run the risk of losing a piece of the line along with the bobber, stoppers, and cambric.
Therefore, I recommend that you bring at least one spare bobber, two cambric, and two stoppers. You can take more and stuff it in your tackle box. This will make you feel confident and will not ruin your fishing at the most inopportune moment.
How To Put A Bobber On A Fishing Line – Video
To make it as clear as possible, I am attaching a helpful video on how you can quickly and efficiently install a bobber on your line. After all, it is much clearer when you see the whole process with your own eyes.
Conclusion: Mastering the Art of Bobber Attachment 🎣📘
As we draw our comprehensive guide on bobbers to a close, let’s take a moment to revisit some pivotal points and reflect on the path forward.
Recap: The Power of Proper Bobber Attachment 🔄📌
Bobbers aren’t just simple floating devices; they are an angler’s eyes on the water surface. Correct attachment can:
- Boost Bite Detection: A well-placed bobber translates to improved sensitivity to those elusive fish nibbles.
- Enhance Depth Control: Delivering your bait to the exact depth where fish are active is an art that starts with bobber mastery.
- Increase Longevity of Your Equipment: Proper attachment means fewer damages, ensuring that both your line and bobber last longer.
Embarking on the Journey: Practice Makes Perfect 🚀🎯
The age-old saying remains true: practice does make perfect. The intricacies of bobber attachment and usage might feel overwhelming initially, but remember, every expert angler started somewhere. The more you familiarize yourself with your gear, test different waters, and adjust to varying conditions, the better you’ll become. 🌊🐟🏆
❓ FAQ Section: Unraveling the Bobber Mysteries 🎣❓
Bobbers are an essential tool in the angler’s arsenal, but they also come with their fair share of questions. In this section, we’ll address some of the most frequently asked queries surrounding bobbers, their applications, and the challenges they might pose.
Final Thoughts 🌟: Remember, fishing is as much about learning as it is about catching. Continually ask questions, seek answers, and experiment with different techniques and tools. The world of bobbers and beyond awaits your discovery! 🐟🎣📘

I live in Tenerife (Canary Islands) for the last 10+ years and share my daily fishing experiences on my website. Many years of personal experience as a fisherman and the vast experience of my friends allow me to write professionally on any fishing topics (from choosing a flashlight and equipment to deep-sea fishing).
All of my advice is based on practical real-world experience and will be useful to both novice anglers and professionals. Read more about the author.
Affiliate Disclosure: FishReeler.com sometimes gets paid for listings, through sponsors or affiliate programs like Amazon, Ebay, Cabelas, Bass Pro Shop, Shimano, Daiwa, Rapala, Renn, Okuma, KastKing, etс. Clicking a link helps keep FishReeler.com free, at no extra cost to you!
About the author: Each article is verified by the fishing expert Sergio Smirnoff. The articles are written by professional and amateur fishermen with 20+ years of fishing experience.
Note: The views and opinions expressed in this article are those of the authors and do not necessarily reflect the official policy or position of any agency. The articles are for informational purposes only, share your opinions in the comments and join the fishing discussions, let's share our fishing experiences together!

I have always been a fan of using a bobber when fishing for certain species. It’s just another tool in your tackle box that can help indicate a strike when you might not be able to detect one otherwise. The hook and bobber technique is widely used because it’s easy and effective, especially for catching small fish like bluegill and sunfish.
However, if you’re up for a challenge, you might want to consider losing the bobber and fishing with artificial bait. I usually opt for this method as I find it more rewarding to bob my bait across the bottom of the lake, trying to mimic the natural movements of prey.
At the end of the day, the choice of using a bobber or not ultimately depends on the type of fish you’re targeting and the bait you’re using. But regardless of your preference, it’s always important to enjoy the experience of being out on the water and appreciates the beauty of nature.
As a fishing enthusiast, I understand that there is a certain stigma attached to using bobbers, and many seasoned anglers avoid them altogether. However, there are a couple of reasons why bobbers are still relevant and effective in certain situations.
Firstly, fly fishermen, who are often considered the most snobbish of all anglers, frequently use bobbers when fishing wet flies in mountain streams, although they refer to them as “strike indicators.” This just goes to show that bobbers can be a useful tool even for the most discerning anglers.
Secondly, when fishing with live bait, bobbers can be an excellent option. Personally, I love using them when targeting large saltwater pelagics like mackerel or cobia. By sending a small pinfish out about 6 feet under a bobber, I’m able to position the bait right in front of any passing fish, including sharks.
If you’re looking to use bobbers while still looking like a seasoned angler, I would suggest setting up a chugging cork rig. These corks are designed to be slowly jerked across the surface of the water, creating a commotion that mimics the sound of something falling into the water. This can attract predators and increase your chances of getting a bite.
Finally, one of the biggest advantages of using bobbers is that they allow you to adjust the depth of your bait in the water. By experimenting with different depths throughout the day, you can increase your chances of finding the “sweet spot” where the fish are biting.
In conclusion, while using bobbers may not be the most glamorous or sophisticated approach to fishing, they can still be an effective tool in certain situations. It’s all about using the right tool for the job, and sometimes, that tool happens to be a humble bobber.
When it comes to using bobbers, there are two main types that I like to use: the traditional bobber and the slip bobber. Here’s how I set up each of them.
For the traditional bobber, I tie the hook onto the end of my line and then attach a sinker about 6-10 inches above it. After that, I attach the bobber about 6 inches or more above the sinker. Once everything is set up, I bait my hook, cast my line out, and wait for a bite.
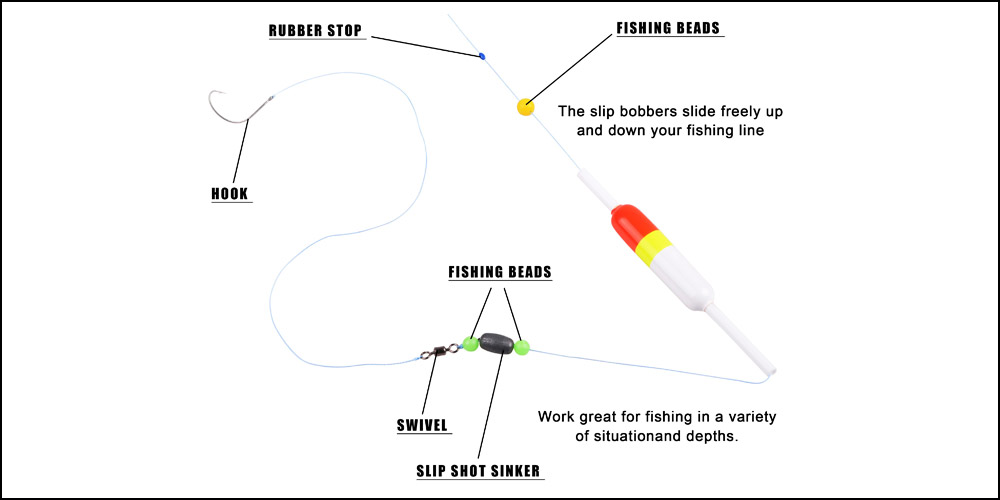
For the slip bobber, the setup is a bit different. First, I put a bobber stop on my line, followed by a bead. Next, I attach the slip bobber to the line. Then, I tie the hook onto the end of the line and add a sinker 6-10 inches above it, but below the slip bobber. Once everything is in place, I adjust the bobber stop to set the desired depth for my hook. After that, I bait my hook, cast my line out, and wait for a bite.
Both methods have their advantages, and the choice between them depends on the situation and personal preference. However, no matter which method you choose, using a bobber can be a simple yet effective way to catch fish.
Using a bobber setup can be very effective when fishing for panfish such as bluegill and crappie. My usual setup consists of a #6-#8 hook tied to the end of the line, a small 1/32 – 1/8 oz split shot 12-18″ above that, and a bobber usually 12-24″ above the split shot.
However, casting this setup can be a bit challenging due to the different weights on each section of the line. So, I prefer to use this setup when I’m fishing vertically right below the boat or when I’m casting only a short distance from the boat.
When I need to cast farther out or if I need to position the hook deeper in the water, I use bobber stops and a slip bobber. This allows me to cast without getting my line all tangled up. You can find a lot of great information on using slip bobbers by looking it up on YouTube.
Thanks for sharing your experience with using bobbers! It’s great to see others interested in this fishing technique. As you mentioned, the distance between the bobber and hook depends on the depth of the water you’re fishing. You want to make sure that your bait is at the right depth where the fish are feeding, so adjusting the distance as needed is important.
Adding a split-shot sinker about 6″ below the bobber is a great idea to ensure that your line hangs straight and to help with casting. This weight can also help your bait sink to the right depth more quickly. However, the exact distance may vary based on the depth and current of the water you’re fishing in.
Overall, using a bobber is a versatile and effective technique, and it’s great to experiment with different setups to find what works best for your specific situation. Don’t be afraid to try different depths, weights, and bait to see what the fish are biting on.
One thing that can be frustrating about using a traditional bobber is that it’s always fixed at a certain point on your line. If you’re trying to set a specific depth, this can make casting difficult because you already have that much line hanging loose when you cast. Plus, if the fish are deeper than the depth you set your bobber, you’re out of luck.
Enter the slip bobber! Slip bobbers have a tube through them that allows you to set the depth at which the bobber will “stick” on your line. And the best part? It’s really easy to do. Slip bobbers usually come pre-rigged and ready to put on your line. All you need to do is tie a simple knot at the depth you want the bobber to stop.
When you cast, the bobber will slide all the way down to your rig or hook at the end of your line, making casting much easier. Once your rig starts to sink, the bobber will allow the line to go out to the depth you set the knot at and then stop at that point. Adjusting the depth is simple too – you can slide the knot up and down your line with your fingers. I’ve found that using slip bobbers is the best way to go for any depth when using bobbers.
When it comes to fishing, slip bobbers can be a real game changer. As a float that slides up and down your line, slip bobbers allow you to attach a stop at a certain length so the float doesn’t go any higher on the mainline.
This means you can set the maximum depth of the hook, while also having the flexibility to fish in more shallow water than the max depth. Overall, slip bobbers offer a great level of control and versatility to your fishing technique.
Based on my limited experience with river fishing, I would suggest adjusting the depth of your bobber until you start catching fish or reach the bottom.
Keep in mind that if the river is moving quickly, your bobber will move downstream faster than your lure, so the depth of your lure will be less than the distance between the bobber and the lure.
If you notice your bobber occasionally bumping against rocks on the bottom and not catching any fish, it’s likely your lure is also hitting the bottom.
When I go bobber fishing, I like to make sure I’m using the right equipment for the job. It’s important to choose a bobber that can handle the weight of your hook and bait, and not exceed the max weight or it’ll sink instead of float.
Depending on the fish species and water depth, the hook should be adjusted to the appropriate level. Watching the bobber is key to catching fish – if it starts popping up and down quickly, that’s a good sign. Don’t pull up too early, though, as it can scare the fish away. Wait for a few nibbles and then a good pull-down before setting the hook.
Holding the rod is important, too – it allows you to feel the fish biting and adjust your technique accordingly. Some fish nibble a lot, so threading the hook through the worm can be helpful. Speaking of worms, make sure to put more on the hook than you think you need – it’ll increase movement and attract more fish.
Overall, bobber fishing is an effective and easy method for catching fish. Just be patient, pay attention to the bobber, and enjoy the experience.
I agree that many people underestimate the power of bobber fishing. I have personally used bobbers to catch some amazing fish, including catfish. In fact, I have a specific catfish rig that utilizes bobbers and it has proven to be incredibly effective. I think those who believe bobbers are only for beginners are missing out on the finesse and versatility that can come with this technique.
Of course, bobber fishing is also a great way for beginners to get started. It can help to prevent frustration from snagging and provides a simple way to gauge if fish are biting. So, whether you are a beginner or an experienced angler, don’t overlook the potential of bobber fishing. It can truly be a game-changer in your fishing adventures.
Using premade looper knots for bobber stoppers is a great way to make the setup process easier. Once the looper knot is on your line, you can slide the plastic tube off and add a slip bobber, and a bead, and then tie on whatever rig you prefer.
When it comes to adjusting the depth of your rig, simply slide the looper knot up or down your line depending on which part of the water you want to check for fish. Reeling in slow will keep the bait low while reeling in fast will cause the bobber to slide towards the bait, making it swim higher in the water.
Setting the bobber stopper high up on the line shouldn’t be an issue when casting since it’ll reel into the eyelets smoothly. You can also try using a neon green/black float stick to hold your bait/rig up in choppy water.
Pair it with a vertical jig, small spoon, or smaller maps tipped with a rosey red minnow, and set the bobber 2.5 to 5 feet from the jig. Don’t be afraid to experiment with depth, sunlight penetration, water temperature, barometric pressure, and other variables to increase your chances of success.
Using a bobber stop and a bead is the best way to set up your fishing rig with a slip bobber. You can easily tie a bobber and stop using a mono line by following a tutorial on YouTube. After that, just thread the bead and slip the bobber onto your line in that order, with the bead preventing the bobber from passing over the knot.
I prefer the slip bobber setup over clip-on bobbers because of its versatility. However, if you need to remove the bobber quickly, clip-on bobbers are a good option. For instance, if you’re using a micro jig for trout or crappie, you can easily remove the clip-on bobber and continue fishing without it.
One great tip is to use clear slip bobbers that can be filled with water, also known as bubble floats. These floats have a peg in the middle that can be opened, allowing you to fill the float with water. With this setup, you can launch your rig into deep waters from the bank.