🎣 The Art of Tying Fishing Lures: More Than Just Knots! 🎣
🐟 Have you ever wondered why some fishermen seem to always have luck on their side, reeling in fish after fish? Often, it’s not just luck; it’s the mastery behind the little details, like how they tie their fishing lures to the line. But why is this seemingly minor task so crucial? 🌊
🌟 Importance of Properly Tying Fishing Lures to Fishing Line 🌟
✅ Security Above All 🛡️: A strong, well-tied knot ensures that the lure doesn’t come off, especially during a vigorous fight with a big fish.
✅ Stealth Mode Activated 🤫: Properly tied lures present naturally in the water, mimicking real prey and attracting more fish.
✅ Dollar Savings 💸: Regularly losing lures due to weak knots? A proper tie can save money in the long run.
✅ Boosted Confidence 🚀: Knowing your lure is securely tied boosts confidence, allowing you to focus on the actual fishing.
✅ Adaptability 🔄: Different fishing scenarios require different knots. Mastery gives you versatility in various fishing environments.
So, whether you’re a beginner looking to start on the right foot or a seasoned angler wanting to refine your skills, understanding the art of tying fishing lures can make all the difference. 🎣🌟
🎣 The Moment I Learned the Power of a Well-Tied Lure 🎣
It was early in my fishing career, a time when eagerness often overpowered expertise. As I felt a robust pull on my line – the unmistakable tug of a hefty catch – and began reeling in with bated breath, the unexpected happened. My line went slack. The lure? Gone. The fish? It had escaped.
It wasn’t about the mightiest rod, the sleekest boat, or even the most strategic fishing spot. No, the true heart of a successful fishing expedition lies in the minute details, and one of the most paramount among them is mastering the art of tying a lure. 🪢
And in this world, knowing how to properly tie your lure to your fishing line isn’t just a skill; it’s an art. An art that holds the power to transform missed opportunities into triumphant catches and frustrating outings into tales of fishing legend.🌟
Whether you’re standing at the shores of a calm lake or battling the waves of the roaring sea, the strength and technique behind each knot can make the difference between returning home with tales of the one that got away or the satisfaction of a successful catch. So, as we delve deeper into the realms of fishing, remember: every knot, every tie, every detail matters. 🐟🏆
Best Fishing Knots For Lures Of All Time
The correct ways to tie a lure to the line can be useful not only for beginners but also for some avid anglers. I often find that anglers only use one method, which isn’t always a good one. According to my observations, this leads to the loss of fish when playing, as well as to the loss of rather expensive parts of the tackle.
I can confidently say that the correct fishing lure knot is one of the components of successful fishing. It doesn’t matter if you use monofilament or braided line, the result will depend on your knot. So that the most important knots for anglers are always at hand, I decided to write this article and tell you about all the nuances.
Many fishermen are unresponsive to such an important step as tying a lure. As I already told you, many experienced fishermen find one knot they like and use it from time to time. There are many good ways to tie a knot though. You should also know that depending on the fishing conditions, you need to choose the most suitable node option. An improperly tied knot can lead to line breakage and thus your prey will slip away from you. When a fishing line or cord is tied in any knot, it will reduce the strength at that point. In order to minimize the loss of strength, the following methods can be used, for example:
- You don’t have to tighten the line all the way. Thus, the line won’t be compressed too much and will be more durable.
- Try using a self-tightening or movable knot.
- Place a small piece of the fishing line inside the knot. But I want to warn you that this method is a little more difficult to perform than others.
- Do you know that wetting the assembly before tightening will reduce the frictional force?
- The strength of the line is determined by the strength of the weakest section. Most often it is an improperly tied knot.
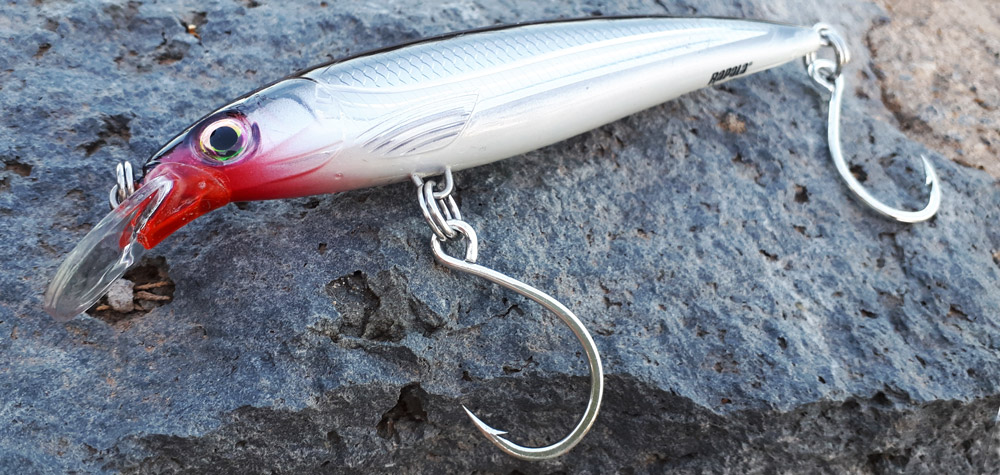
Recommended Fishing Line Knots – Rapala Loop Knot
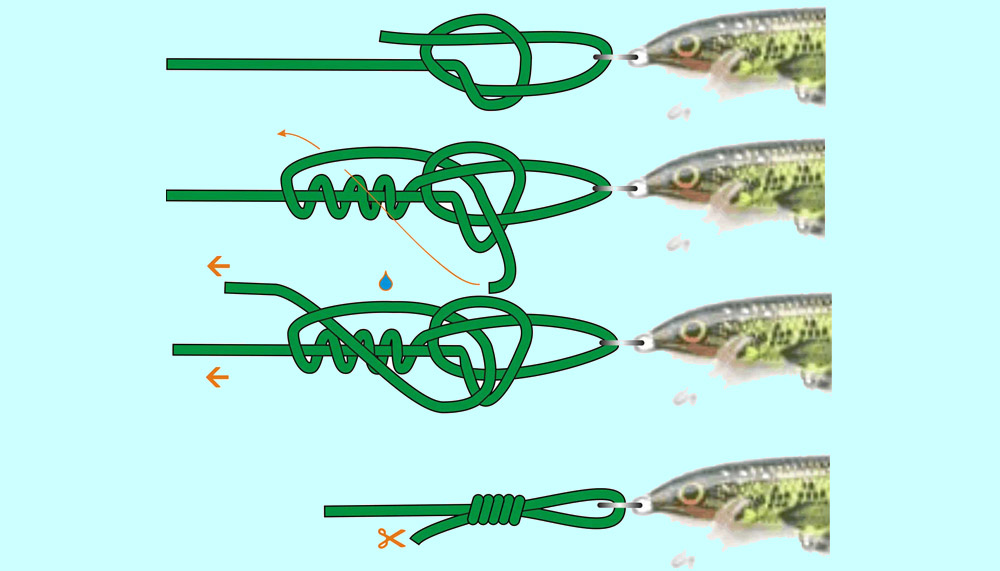
The Rapala knot comes from Finland and has been specially designed for fishing with Rapala wobblers. Of course, this doesn’t mean that it cannot be used with other wobblers. The Finnish father of the wobbler Lauri Rapala has developed a special loop knot that doesn’t tighten and gives the lure complete freedom of movement, which is called the Rapala knot. The advantage of the Rapala knot is that if tied correctly it increases the lure play as it doesn’t hang firmly on the line but can move better with a little play in the loop. The knot is suitable for both monofilament and braided lines.
With these instructions, I’ll walk you through the Rapala node step by step:
Step 1. First, tie the top of the cord with a regular knot, leaving about 10 cm of the cord protruding. Don’t tighten the knot yet and thread the end of the line through the eyelet on the bait.
Step 2. Now thread the free end through the knot on top, which is still open, and wind the cord around the cord 3-4 times.
Step 3. Now thread the cord through the top knot again. It is important that you do this from the bait side.
Step 4. Next, wet the knot and slowly pull both ends together. It is important that a loop about 2-3 cm in size forms here.
Step 5. Now cut off the protruding end, leaving about 0.5 cm of string. All is ready!
🪢 Choosing the Right Knot for the Job 🪢
The art of fishing isn’t just about casting a line into the water and waiting. Like a symphony, each element plays a role, with the knot being a pivotal note that can determine the crescendo of your catch.
The Strategic Knot Selection: Beyond Just Tying
The waters we fish in are as diverse as the fish we aim to catch. From the tranquil pond to the tumultuous ocean waves, each environment demands its unique approach. Similarly, the type of lure you use and the fishing conditions you’re in can greatly influence the kind of knot you should tie.
A perfectly tied knot can provide the necessary strength to reel in a hefty fish, while also allowing the lure to move naturally in the water. In essence, matching your knot to the lure and conditions is akin to choosing the right key for a lock.
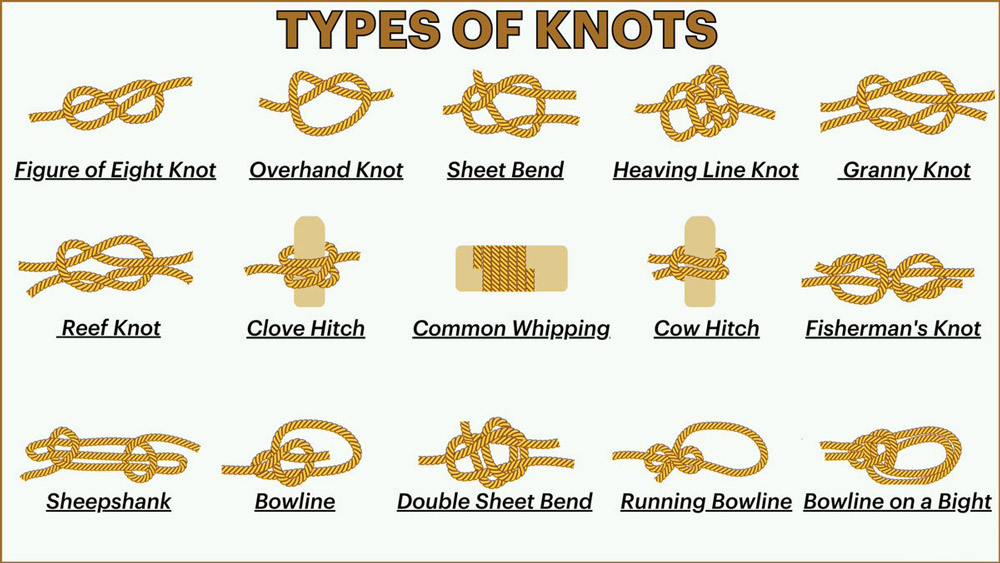
Knots Every Angler Should Know
Different situations call for different knots. The ability to choose and tie the right one can drastically elevate your fishing experience. Here’s a concise breakdown of some of the most widely-used knots in the angling world:
🌀 Loop Knot:
This knot forms a loop that ensures the lure or fly has more movement in water, making it especially enticing to fish. If your goal is to mimic the lively movement of natural prey, this is your go-to.
🎣 Palomar Knot:
Celebrated for its strength, the Palomar Knot is a staple among anglers using braided lines. Its simplicity combined with durability makes it a favored choice when fishing in environments with a lot of structures or undergrowth, where lines might face more abrasion.
⚙️ Improved Clinch Knot:
Known for its adaptability, this knot is revered by both beginners and professionals. Its primary strength lies in its ability to fasten a variety of lures or hooks to different types of fishing lines, making it versatile for numerous fishing scenarios.
Each knot comes with its nuances, and mastering them can open up a world of possibilities for any angler. In the following sections, we’ll dive deeper into the how-tos of tying these essential knots, ensuring you’re always prepared, no matter the fishing challenge that lies ahead.
🪢 Step-by-Step Guide to Tying Essential Lure Knots 🪢
To become an adept angler, understanding the intricacies of each knot is pivotal. In this guide, we’ll equip you with the knowledge to tie three fundamental knots with finesse and ease.
Gathering the Essentials: Materials and Tools
Before diving into the tying techniques, ensuring you have the right tools and materials at hand is crucial:
- Fishing Line: Depending on your target fish and environment, this could be monofilament, braided, or fluorocarbon.
- Lures/Hooks: The specific lure or hook you intend to use, as the tying technique can slightly vary.
- Nail or Small Tube: Useful for some knot tying techniques.
- Sharp Scissors or Line Cutter: For a clean-cut post tying.
- Wet Cloth or Water: Wetting the knot can reduce friction and ensure a tighter fit.
🔍 Tip: Using a brightly colored line can be beneficial when practicing your knots, allowing for better visibility.
Knot Tying Techniques: Detailed Breakdown
While this guide provides textual instructions, it’s highly recommended to refer to illustrations or videos for a clearer perspective.
🌀 Loop Knot:
- Start by making a single overhand knot in the line.
- Pass the tag end through the eye of the hook or lure and back through the loop of the overhand knot.
- Wrap the tag end around the standing part of the line.
- Pass the tag end back through the overhand knot, moving in the same direction as step 2.
- Wet the knot, pull both the tag end and the standing line to tighten.
- Trim the excess tag end.
🎣 Palomar Knot:
- Double your line to form a loop, then pass the loop through the eye of the hook or lure.
- Make an overhand knot with the doubled line.
- Move the loop over the hook or lure.
- Wet the knot and tighten by pulling on both the standing line and tag end.
- Trim any excess loop protruding from the knot.
⚙️ Improved Clinch Knot:
- Thread the end of the line through the eye of the hook, leaving enough length for wrapping.
- Wrap the tag end around the standing line five to seven times.
- Pass the tag end through the small loop nearest the eye of the hook.
- Pass the tag end back through the larger loop that you’ve just formed.
- Wet the knot and pull on the tag end to tighten the coils.
- Once snug and secure, trim the excess tag end. 🎣🔒
🔘 Grinner Knot
This method is also very popular among anglers, but it has a significant difference from the previous method of attaching a lure to the line. In addition to the fact that this unit is performed in a few simple steps, it also has a high carrying capacity. Experts in the art of fishing advise this method to be used for absolutely all types of fishing lines.
To bind the bait in this way, the following steps are necessary:
Step 1. Thread the end of the fishing line through the wire ring at the base of the lure, and leave the working end about 15 cm long. Then fold it in half and then form a regular loop.
Step 2. Wrap the end of the line around the main thread and pull it through the loop obtained earlier.
Step 3. It is necessary to wrap the main thread with the working end of the cord 5-7 times.
Step 4. It is necessary to moisten the line and tighten the formed “Grinner” tightly.
At first glance, it may seem that it is very difficult, but, having gained experience, fishermen tie the lure in this way even in the dark.
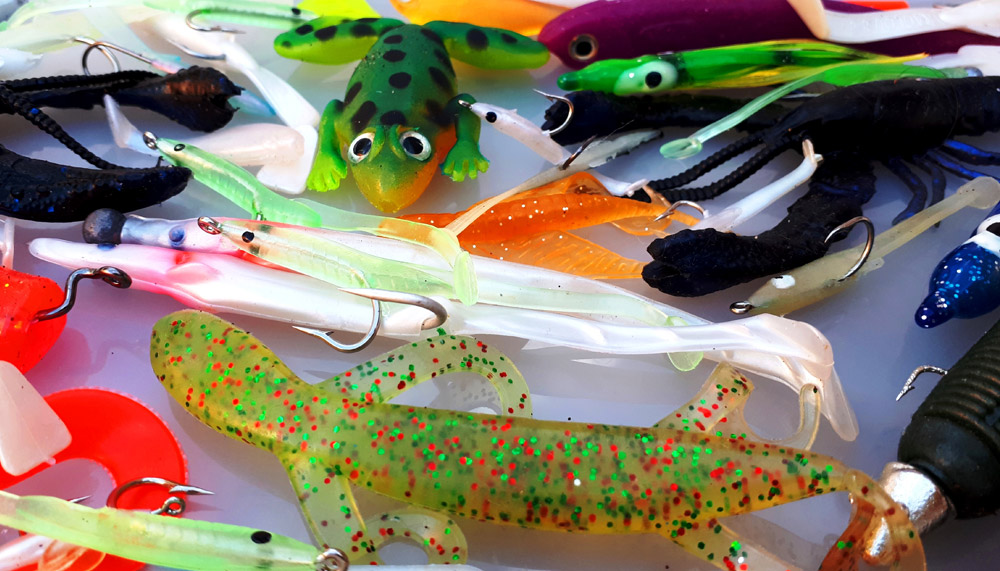
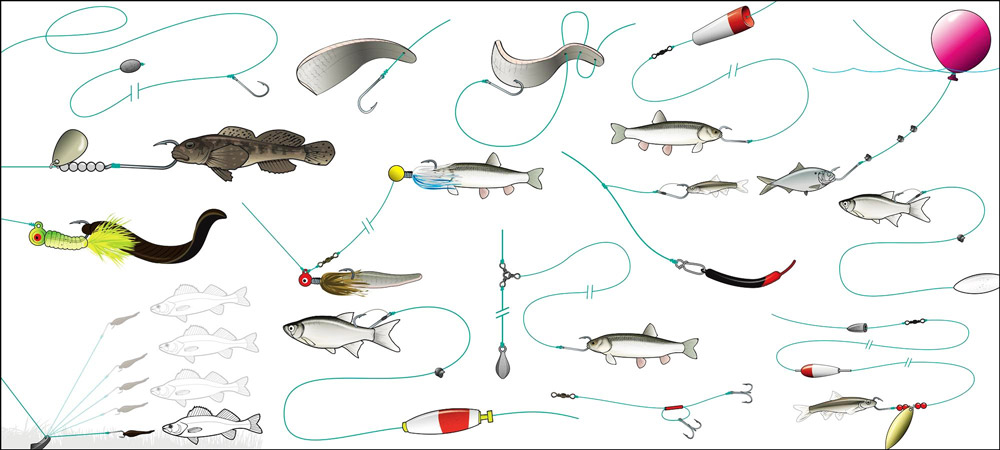
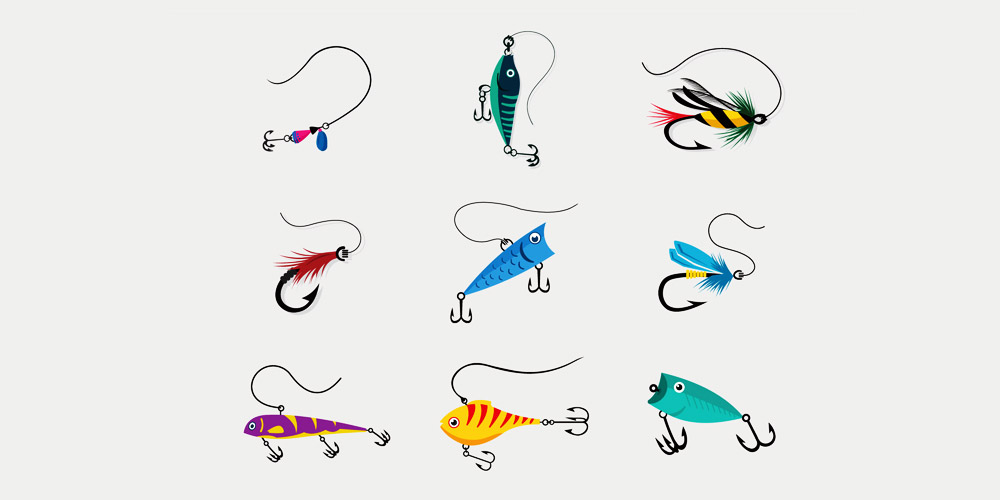
Types Soft Fishing Saltwater & Freshwater Baits
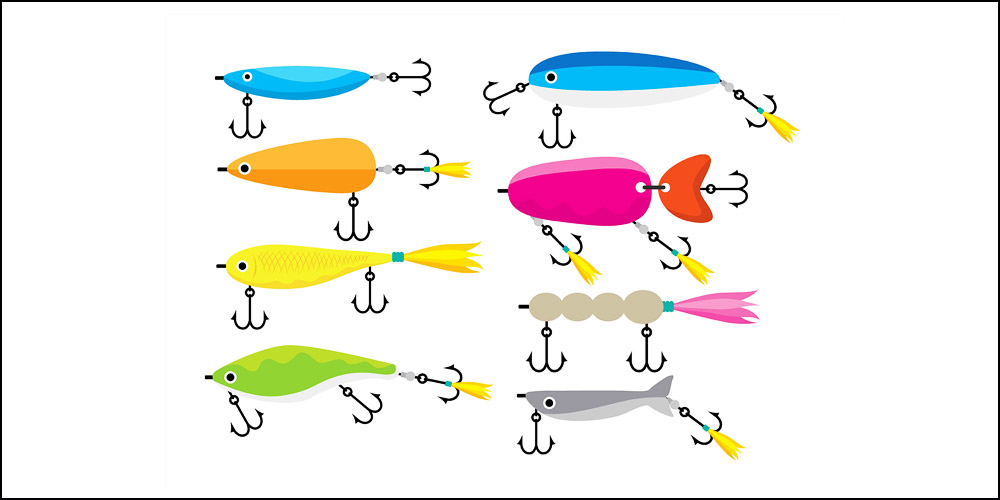
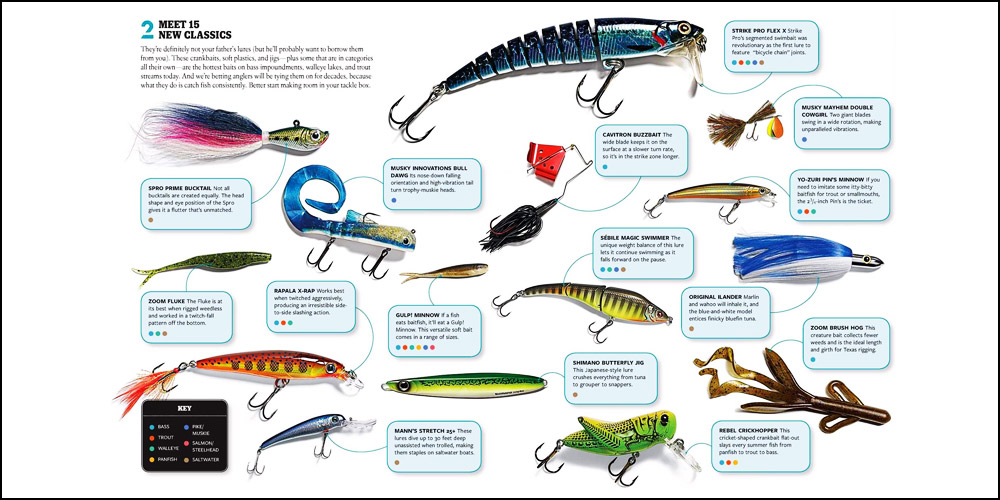
Learn about the different types of artificial fishing lures and which bait to use depending on the type of fish you want to catch. Artificial fishing lures are also a great option when live or rifled bait isn’t available. Artificial baits are hard or soft baits that attract fish with movement, vibration, brightness, and color. When fishing for predatory fish, artificial baits are used, usually, they imitate wounded fish, a desirable prey for predatory fish. There are hundreds of artificial fishing lures that you can buy. Very often fishermen get lost in this choice, but I advise you to just try a species or two to get started.
Minnow
Minnow is mostly fish-shaped oval metal lures. On the flat side, they are slightly dented, so they sway very seductively in the water imitating a wounded fish. They are often provided with decorative feathers or plastic tags to enhance their attractiveness. Turn signals can also be directed vertically towards the end of the rod, which is an advantage over wobblers.
Imitation Fly
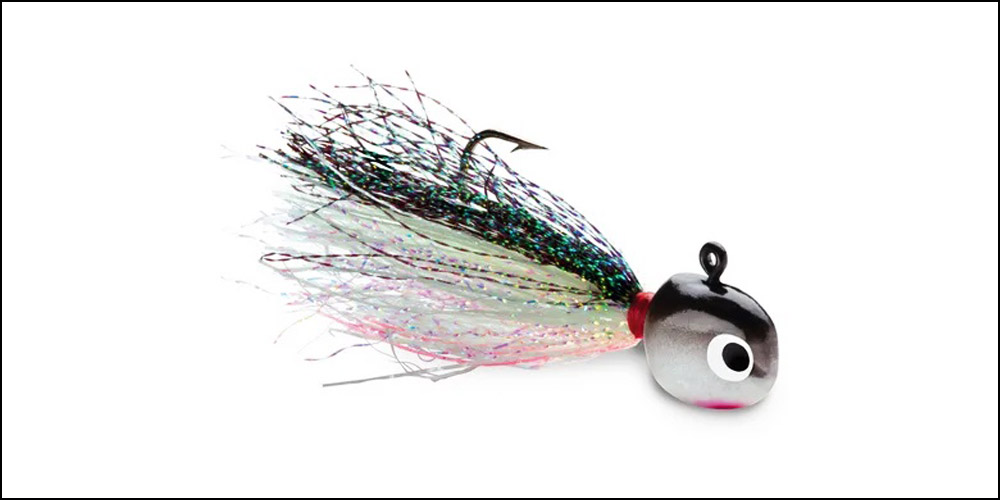
imitation fly consists of hooks that mimic insects using materials such as feathers, fur, and fish skin. They are used for fly fishing.
Jerkbaits
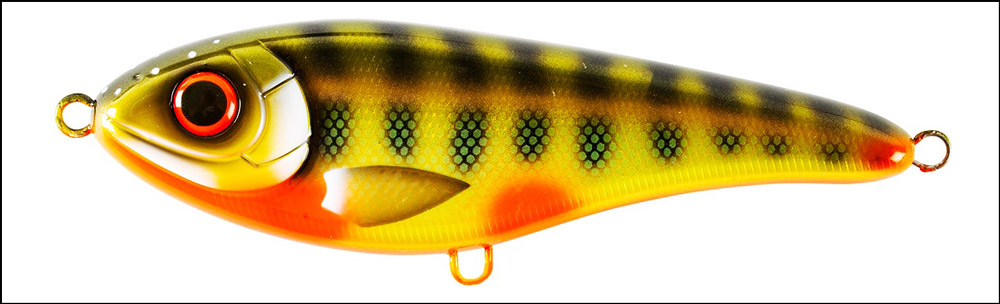
Jerkbaits are like big wobblers, but they don’t have a diving shovel. Its attractiveness is created by the sharp movement of the bait, which leads it through the water in a horizontal or vertical zigzag course, like a wounded fish.
Pilker
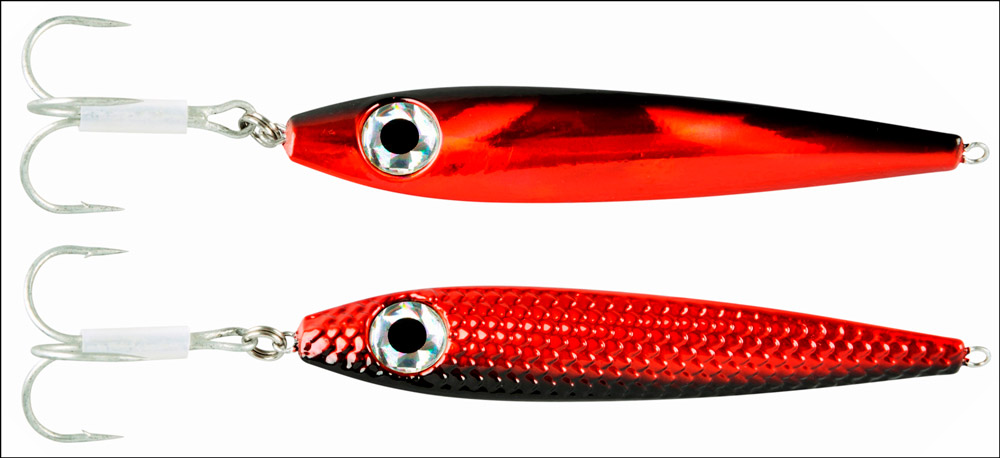
These are artificial lures that are used in sea fishing. They are made of saltwater-resistant metals in the shape of a fish and have a triplet at the end that serves as a bite site. Their weight varies depending on the depth of fishing, usually from a few grams to about 750 grams, but in deep-sea fishing, it can also exceed the kilogram limit. These are sinking lures that simulate the pressure waves of an injured fish during a dive.
Popper
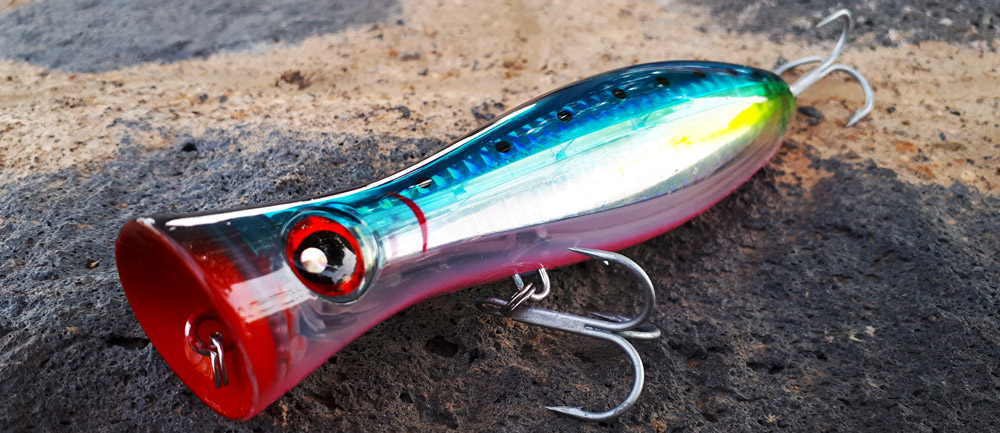
Floating lures that, when pulled in, dive briefly under the surface of the water and suck in air bubbles with them due to their shape, resulting in a seductive pop that magically attracts, for example, larger trout.
Spinner
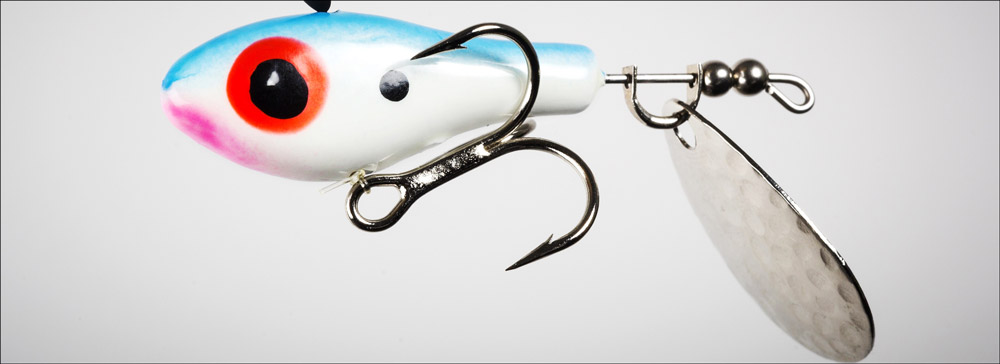
Their characteristic feature is their spinner leaf. A metal blade that, when the line is pulled, rotates around the axis of the bait like a rotor. The resulting pressure waves irritate the lateral line organ (remote tactile sensation) of the fish and induce them to bite. The glare from the spinner’s spinning blade also enhances the attractiveness of the bait.
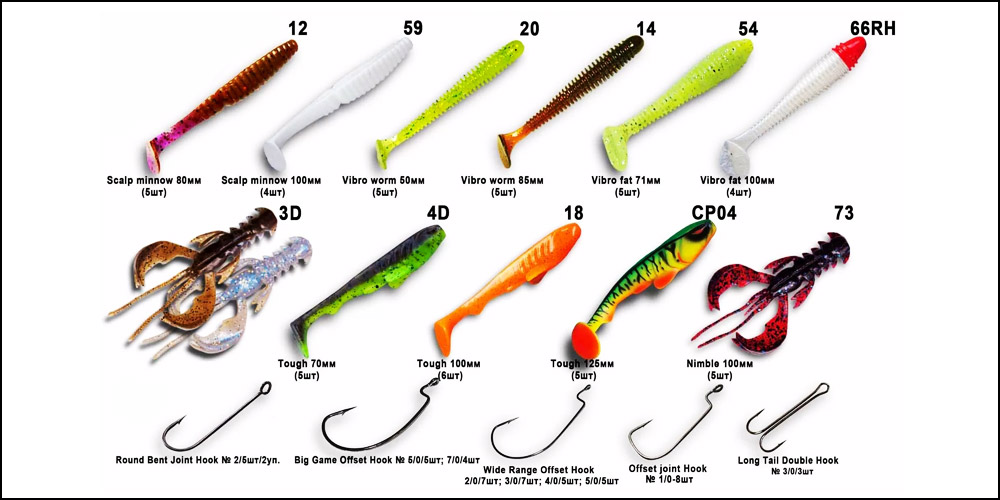
Soft Plastic Bait
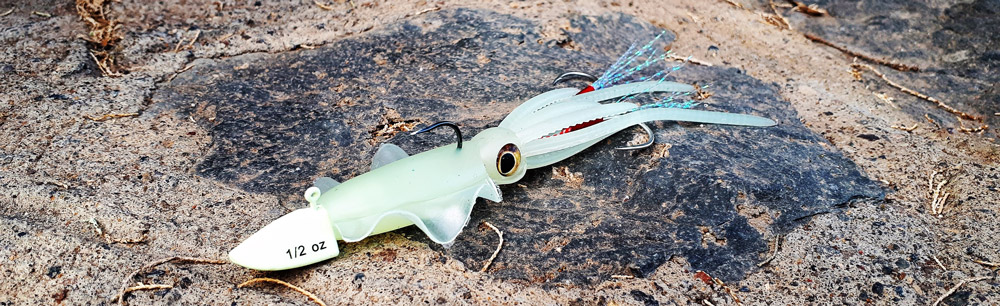
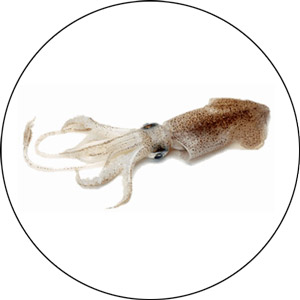
Soft baits are currently mostly made from silicone for environmental reasons. The most famous varieties are shads (bait that looks like a fish), twister (rubber bait that resembles a worm) and soft jerk (two-tailed bait), popular for fishing with a drop shot. However, there are no limits to creativity with soft plastic lures, so there is a corresponding rubber dummy for almost every lure: mini-eels, salmon, simulated worms and larvae, crabs, frogs, even flounders and octopuses are reproduced. Many soft plastic lures already have hooks or triplets built-in, but in many cases, the angler pulls them onto the hook. The water level can be adjusted with a jig head.
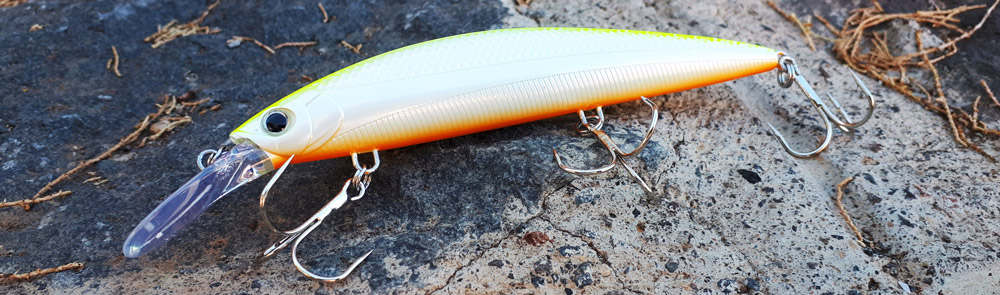
Wobbler
When lifting, the wobbler performs acrobatic movements that resemble a sick fish. Wobblers come in floating and sinking versions, most often made of wood or plastic. Their body usually consists of 1-3 elements and the same number of tees. It is distinguished by its diving shovel, which, depending on the shape and inclination, decides whether the plug is flat or deep. To increase the attractiveness, metal balls in the form of a rattle are inserted into some wobblers. Wobblers are available in countless color combinations, with the rule of thumb being brighter colors for rainy days and cloudy waters, and softer natural colors for sunny days and clear waters.
What Knots Are There For Artificial Baits?
Offset hook – Assembly of Soft Bait with Offset Hook
Installation steps for silicone bait:
- Calcined the head and remove the sting 6-9 mm, from the side of the abdomen
- Stretch the string through the fish, up to the lug
- Measure the entrance of the tip into the silicone body with your eye.
- Pierced the abdomen, remove the sting in the back
In this form, it can be fixed. On the sinker, a jig load, a diverter lead, the mainline.
Fixation method using twist lock. This is a special spring, it is wound on the central wire of the hook. This attachment is especially useful for very soft lures.
To fix the silicone with the offset holder and twist-lock fastener, we need to screw the head part on the ready-made fastener, then pierce it through the body, hide the tip.
Texas Rig Type
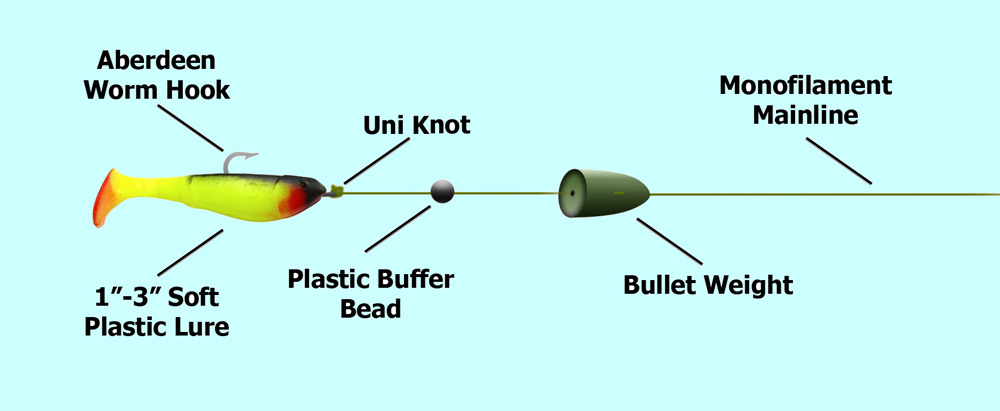
When installing a Texas rig, the mainline must be passed through the hole of the bullet-shaped sinker (the weight of the load must match the test of your rod), after which a bead is put on the line and a hook is attached using a regular or double clinch.
You need to pierce the silicone bait from the head, bring the sting out 5 mm, draw the hook through the body of the bait, turn and pull the worm onto the step of the hook, and then pierce the bait again and bring the sting out, the sting should fit snugly against the body of the bait.
Please note that if you don’t pull the tip of the hook out, then, while biting, the sting will have to first pierce the silicone bait, and then the fish lip, so there is a risk that the fish will slip away. If desired, you can install a worm, twister, vibrotactile, or other fancy silicone bait on the Texas rig.
The bait is correctly attached when the point of the hook is inside the silicone, however, the point of the hook doesn’t come out from the opposite side of the bait and the bait is straight.
Edible, streamlined silicone baits such as crayfish and worms work best for Texas rigs. The size of the bait depends on the type of predator and its activity. In turn, it makes sense to use floating silicone baits. Raising and hovering the bait above the bottom during a pause is the best way to provoke a passive predator to attack.
If the Texas rig is being used in open water, it is effective to use active baits such as twisters and Vibro-tails. This is the best way to quickly find a predator over a large area. However, when fishing in cover, use elongated, non-bulky lures such as crayfish and worms.
Carolina Rig Type
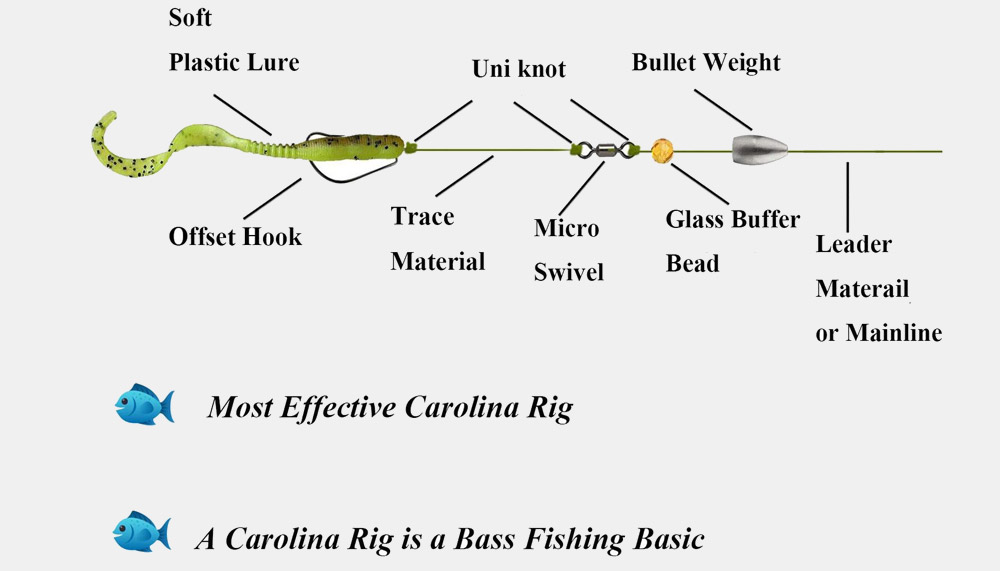
Carolina Rig, like most other spinning rigs, has American roots. In its original version, this type of bait installation consists of a main cord or fishing line, on which an unfixed sinker is put on, preferably a bullet-shaped one. After the sinker, a volumetric faceted bead is threaded on the fishing line, after which a swivel is tied. And only after the swivel, the leash is mounted with an offset hook at the end.
The fluorocarbon line is used for almost all types of drilling rigs. Particularly abrasion resistant and almost invisible underwater, we need about 80 cm of fluorocarbon cord to assemble the Carolina rig.
Offset hook. While Carolina rigs are less suitable for shelter use, an offset hook should also be chosen here. Alternatively, single hooks can only be used when the bites are very timid or the target fish is particularly suspicious.
Bullet weight. Tungsten bullets are used to make the Carolina projectile reach the bottom of the water at the desired speed. Due to the higher density of the material compared to lead, the bullets drop much faster and also fly better.
Bead. The centerpiece of the assembly is a glass ball or sound ball. If the weight of a bullet hits him while jigging, it draws attention to itself with a loud click.
Soft bait. The type of rubber bait on Carolina rigs is largely determined by the type of bait used and the target fish. I usually use bait in the form of animals, rubber crabs.
Mounting
Step 1. Depending on the maximum desired leash length, remove approximately 50 to 100 cm of fluorocarbon line from the reel and thread the tungsten bullet.
Step 2. Then thread the sonic or glass bead onto the side of the leash, where the cartridge weight has a large concave recess on the underside.
Step 3. For flexible adjustment of the leash length, the bullet pin is inserted into the side until it stops, and the protruding end is cut off. The bead sits firmly on the leash without damaging the line. The leash length can be individually adjusted by moving the bead.
Step 4. Connect the end of the leash with the offset hook with a knot, tighten the rubber lure, and the Carolina rig is already assembled.
🚫 Common Mistakes and How to Avoid Them 🚫
In the world of fishing, the slightest oversight can result in a lost catch. While experience is the best teacher, understanding common pitfalls can save a great deal of frustration. Let’s delve into these knots of trouble and how to untangle them.
Misjudging the Strength of a Knot: The Silent Saboteur
Many an angler has felt the sting of a lost fish due to a knot that couldn’t hold its weight. Every knot has a specific strength, and misjudging this can be disastrous.
Implications:
- Lost Gear: Weak knots can result in lost lures or hooks.
- Missed Catches: The disappointment of losing a fish, especially after a long battle, is immense.
- Safety Concerns: In some situations, a snapped line can pose a risk to the angler and others nearby.
🔍 Tip: Always consider the species you’re targeting and adjust your knot choice accordingly. For instance, a larger, more aggressive fish will require a stronger knot.
The Perils of Incorrect Tying
Even the sturdiest knots can falter if not tied correctly. The most common mistakes include missed loops, not wrapping enough, or leaving tag ends too short.
Consequences:
- Unreliable Knots: A knot that’s not tied correctly is unpredictable.
- Weakened Line: Incorrect tying can create points of friction, reducing the line’s overall strength.
- Reduced Performance: Your lure may not move naturally in water if attached with a poorly-tied knot.
🔍 Tip: Practice makes perfect. Regularly practicing your knots will help embed the right techniques into muscle memory.
Solutions: Perfecting the Knot
Nobody becomes an expert overnight, but these solutions will set you on the right path:
| Advice | Explanation |
|---|---|
| Learn from the Best | Countless online tutorials, many from seasoned professionals, offer insights and techniques. Utilize them for better knot-tying skills. |
| Practice with Different Lines | Different line materials and thicknesses have unique characteristics. By practicing with a variety, you can adapt to various scenarios. |
| Consistent Checks | Always test your knot after tying. A simple tug can help ensure its security, minimizing the risk of it coming undone during use. |
| Wetting the Knot | Moistening the knot before final tightening reduces friction. This allows for a more uniform and secure fit, preventing early wear. |
| Mind the Tag End | Ensure you leave a sufficiently long tag end and trim it neatly. This prevents the knot from unraveling and reduces potential tangling. |
🎣 Advanced Tips and Hacks for Knot-Tying Enthusiasts 🎣
Diving deeper into the art of knot-tying, we explore a few advanced techniques and tools that can refine your skills, optimizing your fishing experience.
Saliva: Nature’s Little Secret in Knot-Tying
Believe it or not, that innocent little droplet of saliva can be a game-changer when it comes to tying fishing knots.
The Science Behind It:
- When tying a knot, friction is generated as lines are pulled tight. This can cause lines to overheat, weakening them in the process.
- Saliva acts as a lubricant, reducing this friction and heat generation. The result? A tighter, more secure, and undamaged knot. 🌊
Application:
- Before pulling your knot tight, simply moisten the line with a bit of saliva.
- This lubrication facilitates a smoother sliding of the line, ensuring optimal knot strength and integrity.
🔍 Tip: While saliva is a handy and always-available option, if you’re not comfortable using it, water works as a good alternative.
Knot-Tying Tools: The Angler’s Best Friend
While experience and practice are irreplaceable, certain tools can make the process more precise and efficient.
| Tool | Description & Usage |
|---|---|
| Knot-Tying Tools | Compact devices, often pocket-sized, that assist in forming perfect knots every time. Particularly helpful for intricate knots or in challenging conditions. |
| Nail Clippers or Line Cutters | Used to trim the tag end of the line cleanly. A neat cut is essential as it helps prevent the line from fraying, which can lead to tangling. |
| Magnifying Glass or Glasses | Beneficial for those with vision challenges or when tying exceptionally fine lines. They magnify the line and knots, ensuring precision in tying. |
| Hook-Eye Cleaning Tool | A tool designed to clean the eye of a hook. The eye can become clogged with debris or paint over time, and this tool ensures the line can be threaded through smoothly. |
🔍 Tip: While tools can be of great assistance, always ensure you’re familiar with manual tying techniques, especially in situations where tools might be unavailable.
Line Types and Their Influence on Knot Choices
The type of fishing line you choose doesn’t only dictate its strength or visibility but also the kind of knot you should employ.
| Line Type | Characteristics | Recommended Knots |
|---|---|---|
| Monofilament | Stretchier and softer in nature. | Improved Clinch and Palomar are typically effective with this type. |
| Fluorocarbon | Denser and less visible underwater; slightly more rigid. | Knots like the Double Loop Knot and San Diego Jam are often recommended. |
| Braided | Features a multi-strand construction making it potentially slippery. | Favorable knots include those with more wraps or turns, like Modified Palomar and Uni Knot. |
🔍 Tip: It’s essential to match the knot to the line type. A mismatch can result in suboptimal performance and, in worst-case scenarios, a lost catch. 🐟
🎣 The Lifelong Adventure of Lure Tying 🎣
As the sun sets on our deep dive into the intricate world of lure tying, it becomes evident that this art form is more than just a technique. It’s a lifelong journey. Each knot tied, each lure fastened, offers a new lesson, a new story.
The journey of mastering lure tying is like the ebb and flow of tides – there are moments of clarity followed by challenges, but with persistence, the rewards are bountiful. 🌊
But here’s the thing: as with any art, the beauty of lure tying isn’t just in the mastery but in the process. The countless hours spent perfecting that one knot, the thrill of watching a lure dance in the water exactly as intended, the subtle pride in knowing that a successful catch started with skillful hands and a well-tied knot.
📣 Your Call to Adventure 📣
Now, it’s your turn. Whether you’re sitting by the cozy campfire shoreside or nestled in your urban dwelling dreaming of the open water, remember this: every great angling adventure starts with a knot.
Don’t just tie; weave your story, your experiences, and your aspirations into every lure. Practice, refine, and perfect because the difference between a fish tale and a successful catch often comes down to that perfectly tied knot. 🐟
Recommended Resources: Dive Deeper into the World of Lure Tying 📚
For those eager to expand their lure tying knowledge, here are some invaluable resources to guide your journey:
Books
- The Complete Guide to Knots and Knot Tying by Geoffrey Budworth: A comprehensive guide covering both basic and complex knots.
- The Fisherman’s Ultimate Knot Guide by John E. Sherry: Essential reading for anglers, focusing on the most effective fishing knots.
Online Platforms
- Animated Knots: Offers detailed animations for tying various knots.
- LureTying101 (forum): A community-driven platform where both beginners and experts discuss techniques, share advice, and showcase their tied lures.
Courses
- Masterclass on Lure Tying (Online Course): Dive deep into advanced techniques with experts in the field.
- Local Fishing Workshops: Many local fishing clubs and communities host workshops. These can be particularly valuable for hands-on learning and direct feedback.
Glossary of Terms 📖
Tag End: The end of the line that is used to tie the knot.
Loop: A full circle formed by a line or rope.
Bight: A bend in the line that doesn’t cross over itself.
Turn: A single wrap of line around another object.
Working End: The active part of the line used in creating a knot.
Standing End: The longer, inactive part of the line during knot tying.
Eye: A loop at the end of a hook, swivel, or lure through which the line is passed.
Clinch: A type of knot that binds the line directly to the hook.
Remember, while this glossary provides a quick reference, nothing replaces hands-on experience and learning from various sources. May your lure tying journey be filled with knowledge, expertise, and of course, plenty of great catches! 🎣
❓🤔 FAQ: How to Tie a Fishing Lure 🤔

I live in Tenerife (Canary Islands) for the last 10+ years and share my daily fishing experiences on my website. Many years of personal experience as a fisherman and the vast experience of my friends allow me to write professionally on any fishing topics (from choosing a flashlight and equipment to deep-sea fishing).
All of my advice is based on practical real-world experience and will be useful to both novice anglers and professionals. Read more about the author.
Affiliate Disclosure: FishReeler.com sometimes gets paid for listings, through sponsors or affiliate programs like Amazon, Ebay, Cabelas, Bass Pro Shop, Shimano, Daiwa, Rapala, Renn, Okuma, KastKing, etс. Clicking a link helps keep FishReeler.com free, at no extra cost to you!
About the author: Each article is verified by the fishing expert Sergio Smirnoff. The articles are written by professional and amateur fishermen with 20+ years of fishing experience.
Note: The views and opinions expressed in this article are those of the authors and do not necessarily reflect the official policy or position of any agency. The articles are for informational purposes only, share your opinions in the comments and join the fishing discussions, let's share our fishing experiences together!


I personally have some reservations about using a knot and a clip together when rigging for fishing. The probability of something going wrong with the rig increases, especially since it takes away from the natural movement of the lure. While using a clip to connect the lure can save time, it can also result in a longer-lasting knot holding up to multiple fish.
However, tying the lure directly to the line allows for a fresh knot and fresher line to be used, ensuring a better hold on the lure. It’s definitely not worth losing a once-in-a-lifetime catch just to save a minute of knot-tying. Even if it means spending a few extra bucks on additional fishing lines, it’s a small price to pay for ensuring success in fishing. These are just my personal thoughts on the matter.
It’s important to consider the type of lure and fish you’re targeting when deciding whether or not to use swivels and clips in your setup. For spoon-type lures, I usually add an extra swivel to the lure, but for wobbler-type lures, I remove all swivels and go for a direct connection with a blood or nail knot for the leader and a Palomar knot for the lure itself.
When it comes to spinners, I don’t use any clips or swivels, just a direct connection with a blood or nail knot for the leader and a Palomar knot for the lure. For poppers and similar lures, I also go for a direct connection with no swivels. For jig and pig types, I also use a direct connection with no swivels or clips. When it comes to bass plastics like Texas rig or Carolina rig, I do use swivels between the leader and main line.
As for leaders, I only don’t use them when night time spooning for salmon. Otherwise, I always use a leader made of steel for muskie and pike or fluorocarbon for everything else. For bass in thick, weedy areas, I use a fluorocarbon leader with a test higher than 4 lbs, but for everything else, I stick to 4 lbs or lower.
Of course, everyone’s setup and preferences are different, and what works for one person may not work for another. But for me, this system of selecting swivels and clips based on the type of lure and fish I’m targeting has been effective. While it can be a pain to switch between setups, I usually have multiple rods in the boat with different setups to make the process easier.
I have an uncle who is an avid adventurer and has explored many remote areas around the world, including the North of Canada, the Everglades, North South Africa, and various jungles. I always look up to him for his knowledge and experience in surviving in the wilderness.
During one of our fishing trips, I asked him how he ties his fishing line, expecting some unique method he developed during his travels. However, he simply replied, “I just tie a lot of knots. It works.”
It was surprising to hear that his technique was not something special, but rather just a result of years of practice and experimentation. It made me realize that sometimes, the most effective methods are the simplest ones that we have mastered over time.
The standard clinch knot works great for smaller hooks and lines. However, if you’re using heavier lines or bigger hooks, the improved clinch knot might be a better option as the standard clinch knot can slip in these situations.
That being said, I tend to stick with the standard clinch knot most of the time and simply adjust the number of wraps depending on the size of my line. I used to use the Palomar knot exclusively when I fished with braided lines, but have since switched to mono and fluoro lines.
One downside I’ve noticed with the improved clinch knot is that it doesn’t always seat as well as the standard clinch knot. This can lead to more break-offs or slipping knots, which is obviously not ideal. Overall, it’s important to experiment with different knots and find the one that works best for you and the type of fishing you’re doing.
Knot strength is crucial when fishing for certain species or in certain conditions. While a lower profile knot may be preferable in situations like fly fishing, bass fishing, or other high-impact scenarios, a knot with high strength is crucial.
I know there are other knots out there that are touted for their strength, such as the Palomar knot, but I personally have only ever used the clinch knot. I’ve spent a lot of time fishing for bass, as well as larger species like sharks, redfish, and snapper, and have never had an issue with the knot slipping or losing integrity before breaking.
Of course, everyone has their own preferred knot and there may be situations where a different knot is more suitable. But in my experience, the clinch knot has always held up well and has been a reliable choice.
Wow, I just learned that I’ve been using the Improved Clinch Knot instead of the regular Clinch Knot my entire life. I’m curious about the strength of the knot when tied directly to the hook, though. Both tests I’ve seen involved attaching a leader rather than going directly to the hook.
Additionally, I’m a little concerned about some of the techniques they demonstrate in their videos, such as pulling on the tag end when tying the knot and using too many loops. When tightening a clinch knot, pulling on the tag can disrupt the integrity of the knot and cause the loops to not thread down the line properly.
I’m also confused by their descriptions and videos, as their Clinch Knot video seems to be what’s usually described as the Improved Clinch Knot, and I’m not sure what their actual Improved Clinch Knot video is of.
Furthermore, I’ve found that the knot strength can be affected when using a very thin braided line, even at a high test like 20lb. I used the Improved Cinch Knot for many years but had to switch to the Palomar Knot once I started using the braided line on most of my reels. I still struggle with tying it when using lures, trying to make a loop in the hair-thin line large enough to pass the lure through without getting hung up.
That’s a great point about the Palomar knot and its potential wastefulness in fly-fishing. I’ve also found that using the improved clinch knot for larger flies works well, but sometimes I prefer using a non-slip loop knot for weighted wooly buggers or bead head flies that benefit from a little extra movement.
And when it comes to small or dry flies and nymphs, I’ve had success with the Davy knot, which creates a very small knot profile. Ultimately, it’s important to experiment and find the knot that works best for your specific fishing situation and preferences.
I’ve found that when tying the improved clinch knot, it’s important to make sure that everything is parallel. Before passing the hardware through the loop, I lightly snug the initial overhand and then add a bit of spit before tightening.
When tightening, I only pull on the tag end to avoid damaging the line above the knot. Once you get the hang of it, these knots are incredibly fast, strong, and easy to tie even in low-light conditions. For tests under 8#, I typically stick with the improved clinch, Trilene, or Uni knot.
Some of the information in this article may not be accurate and could lead to disappointment for some people. For instance, it suggests using a Palomar knot for light lines, which I believe is a bad idea.
Personally, I would only use a Palomar knot for the braid, and for mono and fluorocarbon, I would opt for slip knots like the clinch, uni, or sdj. The Palomar knot is an actual knot, and as you pull on it, it tightens and digs into the line beneath it, potentially weakening it.
However, I have found success using the Palomar knot for lighter flipping applications with fluorocarbon. Just be cautious not to let the loops cross each other before tightening the knot.
It’s important to note that there is no way for lines not to cross each other on a Palomar knot due to its knot-tying method. But if a particular knot works for you or anyone else, it’s best to keep using it as long as you have confidence in your ability to tie it correctly.
I agree that the Palomar knot is a solid knot and I remember reading test results that showed it has a strength of 90-95% of the line itself, making it a great knot for braiding as well. However, I do find it difficult to tie on larger lures, especially those with multiple treble hooks. It can definitely be a challenge around the 3-inch mark.
When it comes to cheap baits, I know some people may give me flak for this, but I’ve had good experiences with Walmart’s Ozark Trails brand. They offer some sweet deals on stuff and you can quickly fill up your tackle box for cheap if you’re just starting out.
I’ve also tried Shock swim baits before and found their Sweet Jelly swim baits to be pretty good. They do come at a slightly higher price point, with sets of three ranging from $10 to $20 depending on the size, but I think they’re worth it for the quality.
As a fishing guide, I have found the uni knot to be my go-to knot over the years. It has high strength and I have used lures or jigs for up to ten trips without re-tying, which is convenient when time is a constraint. However, I find the clinch knot much weaker in comparison.
Although the Palomar knot is not my first choice, it is still a great light-duty knot and the default drop-shot knot. However, I do not recommend it for the heavy line.
Another knot that I highly recommend is the San Diego Jam knot. It’s like an upside-down uni knot and works great for heavy lines and casting big jigs and irons. I hope this information helps you in your fishing journey!
There’s no need for extra security when tying a regular clinch knot on mono as long as it’s tied properly. I’ve fished with different sizes of mono, from 8 lb test for salmon to 60 lb mono for dragging in 40 lb fish on a plug, and never had a knot fail that wasn’t from tying it improperly.
It’s important to make sure you’re using the right number of loops for your diameter line, with 8 lb liking around 10 loops and 60 lb liking around 6 loops. You also want to wrap up and down the line the same number of times to ensure the knot falls onto itself properly.
When it comes to braiding, I’ve found success with a simple knot where you double up the line, put the loop through the eye, tie an overhand knot, and put the loose line tag through the doubled loop tag before cinching down.
This knot works well for braids between 20 to 50 lbs in my experience, although it may work for the lighter or heavier line as well. While it doesn’t look special, it just works.
The Rapala knot is a great choice for crankbaits because it allows for more freedom of movement. It’s not just for fly fishing. Similarly, the Trilene knot is actually the best line-to-lure knot for monofilament, not just for fly fishing.
However, it can be difficult to pass the line through twice with small flies, which is where the improved clinch knot comes in handy. This knot is better for fly fishing because it only requires one pass of the line, but it is slightly weaker than the Trilene knot. So, it’s important to choose the right knot based on the type of fishing you’re doing and the size of your lure or fly.