🎣 Why Every Fisherman Should Master the Fish Finder! 🐟
Ahoy, passionate angler! 🎣 Have you ever found yourself in the middle of vast waters, unsure where the fish are hiding? That’s where a fish finder becomes an angler’s best friend. But it’s not enough just to have one; understanding its readings is pivotal.
Benefits of Reading a Fish Finder Correctly:
📍 Pinpoint Fish Locations: No more guessing or relying solely on intuition. Get right to where the action is!
📊 Understand Fish Size & Movement: Recognize the difference between a trophy catch 🏆 and a tiny minnow 🐟.
🌊 Analyze Bottom Contours: Discover underwater structures, feeding spots, and breeding grounds.
⌚ Save Time & Effort: Streamline your fishing trip by heading straight to productive spots.
A Glimpse at Different Types of Fish Finders:
✅ Traditional Sonar: Offers a straightforward view of what’s directly below your boat 🛥️.
✅ Down Imaging: Provides a detailed snapshot of the underwater world with high-resolution images 📸.
✅ Side Imaging: Scan areas beside your boat to get a panoramic underwater view 🌐.
✅ GPS Combo: Navigate with precision while keeping tabs on fish hotspots 🌍📍.
Armed with the knowledge of reading a fish finder, you’re poised to not only increase your catch but also enhance your entire fishing experience. So let’s dive deep and uncover the mysteries of the underwater realm! 🌊🐠🔍
Unlock the Secret to Finding More Fish: Learning to Read a Fish Finder
👾It is very important to know! These days any fishing boat (small boat, kayak) is equipped with a fish finder. This device clearly shows the fisherman the bottom topography, depth, concentration and size of fish and much more. It is difficult to imagine a more necessary device than an echo sounder, navigator, walkie-talkie (radio).
When it comes to fishing, having a fish finder on board can make a world of difference in locating fish and increasing your chances of a successful catch. However, if you’ve never used a fish finder before, it can be a bit intimidating. In this article, we’ll break down the steps for reading a fish finder and give you tips for making the most of this valuable tool.
In recent years, technology has drastically changed the way we interact with and experience the world, including the way we approach recreational and professional fishing. One such advancement that has revolutionized the fishing industry is the fish finder. In this detailed review, we will explain what a fish finder is, as well as the importance of learning how to read a fish finder to maximize its benefits in our fishing endeavors.
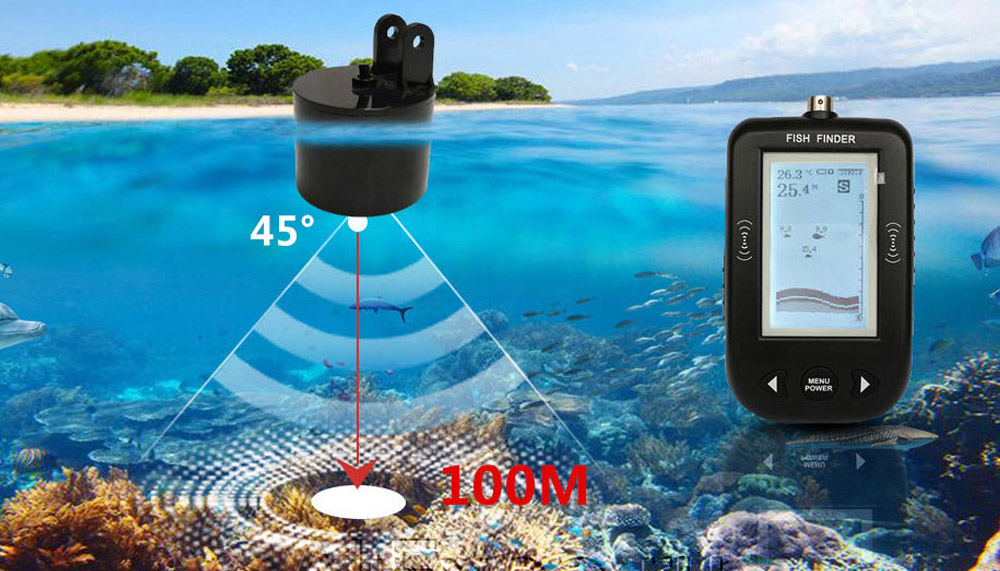
A fish finder is a sonar-based electronic device used by anglers to locate and identify fish underwater, as well as to analyze the structure and composition of the bottom, helping to make fishing more efficient and enjoyable. Fish finders work by emitting sound waves through a transducer which is typically mounted to the hull of a boat or attached to a fishing rod. These sound waves travel through the water and bounce off objects, such as fish and underwater structures, returning to the transducer as echoes. The fish finder then processes these echoes and displays the data on a screen, giving the angler a visual representation of what is below the water’s surface.
Fish finders come in various sizes and capabilities, ranging from compact handheld devices to more sophisticated systems with GPS navigation, chart plotting, and side-scan imaging. Some models may also incorporate additional features, such as temperature sensors and speedometers, to further aid anglers in their quest for a successful catch.
Reel in More Fish with These Tips for Reading a Fish Finder
Learning how to read and interpret the data displayed on a fish finder is essential for any angler looking to optimize their fishing experience. A fish finder can provide invaluable information that can lead to a more productive and efficient outing, ultimately improving one’s chances of catching fish. Some key benefits of learning how to read a fish finder include:
➤ Improved fish targeting: By understanding the fish finder’s display, anglers can accurately identify fish and their depth, making it easier to target specific species and ensure the bait or lure is presented at the right depth.
➤ Enhanced understanding of underwater terrain: Fish finders provide anglers with a detailed view of the underwater environment, such as the bottom composition, drop-offs, and underwater structures. By recognizing these features, anglers can pinpoint prime fishing spots, increasing their chances of finding and catching fish.
➤ Increased safety: A fish finder can help anglers navigate unfamiliar waters and avoid potential hazards, such as shallow areas or underwater obstructions, ensuring a safer and more enjoyable fishing experience.
➤ Time efficiency: By providing real-time information about fish locations and underwater features, a fish finder helps anglers avoid wasting time in unproductive areas. This enables them to focus on the most promising locations, making the entire fishing process more efficient.
Understanding Fish Finders
In order to make the most out of a fish finder, it is important to have a basic understanding of how these devices work, the different types available on the market, and their essential components. This section will delve into these topics, providing a comprehensive overview of fish finders and how they can aid anglers in their fishing pursuits.
Fish Finders Demystified: How They Work and What They Do
Fish finders operate using a principle known as sonar (Sound Navigation and Ranging). This technology involves emitting sound waves through a transducer, which then travel through the water column until they encounter an object or the bottom. Upon contact, the sound waves are reflected back to the transducer as echoes. The fish finder processes these echoes, calculating the time delay between the emitted sound wave and its return, as well as the strength of the echo. This information is then converted into a visual representation on the fish finder’s screen, enabling anglers to locate fish, determine water depth, and analyze the underwater environment.
Types of Fish Finders: Which One Is Right for You?
There are several types of fish finders available, each with unique features and capabilities. Some common types include:
⭐ Standalone fish finders: These devices are dedicated solely to displaying sonar information and are suitable for smaller boats or for anglers who prefer a simple, straightforward fish-finding solution.
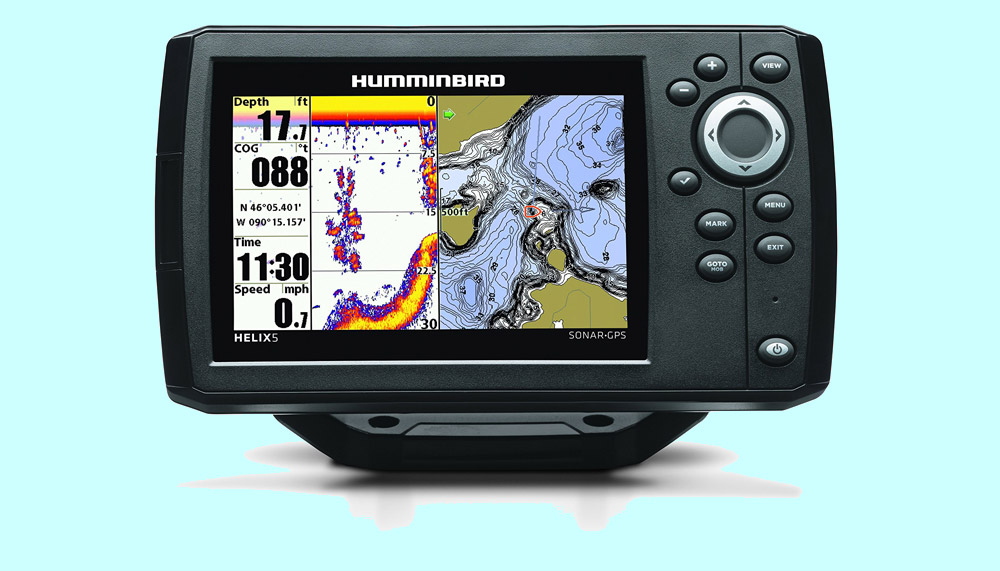
⭐ Combo fish finders: These units combine sonar capabilities with GPS navigation and chart plotting, providing a more comprehensive view of the angler’s surroundings. Combo fish finders are an excellent choice for those who fish in unfamiliar waters or require precise navigational information.
⭐ Networked systems: These advanced fish finders incorporate sonar, GPS navigation, and chart plotting, as well as other features such as radar, weather data, and video inputs. Networked systems allow anglers to share information across multiple devices and are ideal for larger boats or professional fishermen.
⭐ Portable fish finders: Designed for mobility and flexibility, portable fish finders are perfect for anglers who fish from kayaks, canoes, or rental boats. These devices typically have smaller screens and may use suction cups or clamps for temporary mounting.
The Anatomy of a Fish Finder: Understanding Its Parts
Fish finders are made up of several essential components, which include:
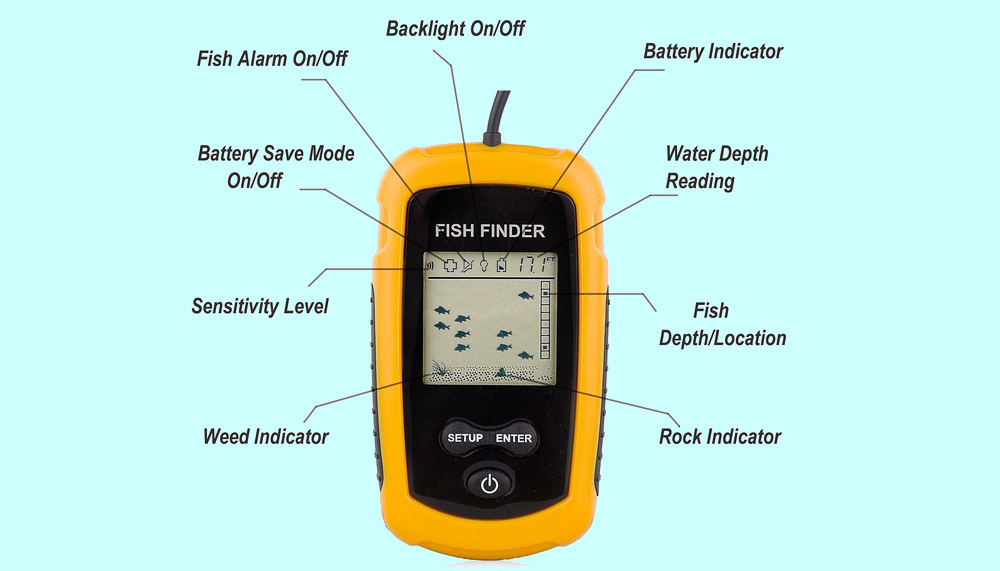
🎡 Display: The display is the fish finder’s visual interface, showing anglers the processed sonar data. Screen sizes can vary, with larger screens providing greater detail and easier readability. Displays can be monochrome or color, with color displays generally offering superior clarity and contrast.
🎡 Transducer: The transducer is responsible for emitting and receiving sound waves, making it the most critical component of a fish finder. Transducers can be mounted in various ways, such as through-hull, transom-mount, or in-hull installations. Different transducers may also operate at different frequencies, with lower frequencies being more effective in deep water and higher frequencies offering better resolution in shallow water.
🎡 Control unit: The control unit houses the fish finder’s processor, user interface, and power supply. Anglers interact with the control unit to adjust settings, navigate menus, and interpret the information displayed on the screen.
🎡 Power source: Fish finders are typically powered by the boat’s battery or, in the case of portable units, by built-in rechargeable batteries or replaceable battery packs.
In summary, understanding fish finders, their operation, the various types available, and their essential components can greatly enhance an angler’s ability to effectively utilize this technology. Armed with this knowledge, anglers can make informed decisions when purchasing a fish finder and better interpret the information provided to improve their overall fishing success.
Practic Understanding the Detail of a Fish Finder
In several articles, we talked in detail about how useful fish finders are for your fishing (especially trolling) and reviewed the list of the best fish finders. But do you know what we haven’t done yet? That’s right, we didn’t talk about how to use the fish finder and how to read it to know every little thing about the fish under your boat.
In this article, we will take a closer look at how the fish finder works, how to use it, and how to read fish with it.
What is a Fish Finder – Construction
Always seeing and knowing where the largest number of fish swims is every fisherman’s dream. The fish finder is just the device that allows you to do this. It can perform the following functions:
- Determination of depth, relief of the bottom surface.
- Search for fish, its accumulations.
- Special features depend on the manufacturer.
A fish finder must always come with at least two blocks. The first is a screen with a microcomputer that processes information, the second is a sensor that perceives information, which you drop in the water. The fish finder also includes an emitter and a transducer, which are built into the blocks.
How Does A Fish Finder Work
Now that we know what a fish finder is made of, let’s see how it works. The transmitter emits high-frequency pulses that are produced at a specific time interval. These signals are sent from the emitter to the transducer, where they are transformed into ultrasonic waves. Following this, such impulses are carried along the water surface at a speed of 1500 m/s.
Further, ultrasonic waves, falling on stones, fish, driftwood, the bottom, or any other solid object, are reflected from it. Then these signals are sent to the transducer. In it, they are again converted into high-frequency pulses and amplified by the sensor. Then they are sent to the screen, where they appear in the form of an alphanumeric or graphic image, which is convenient for perception and understanding. It sounds pretty complicated, so let’s figure out which of these you need to pay attention to.
How To Read A Fish Finder: A Simple Guide
This is the most basic and important part of our article. Below we will show you how to use the fish finder and distinguish on-screen data that is at first glance incomprehensible.
Signal Processing – What You Need To Know About Beams
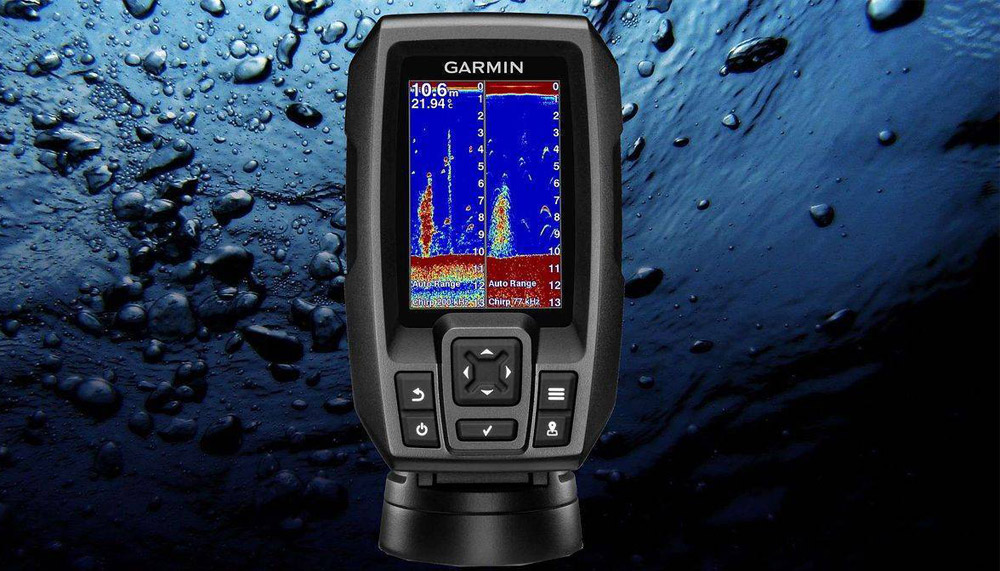
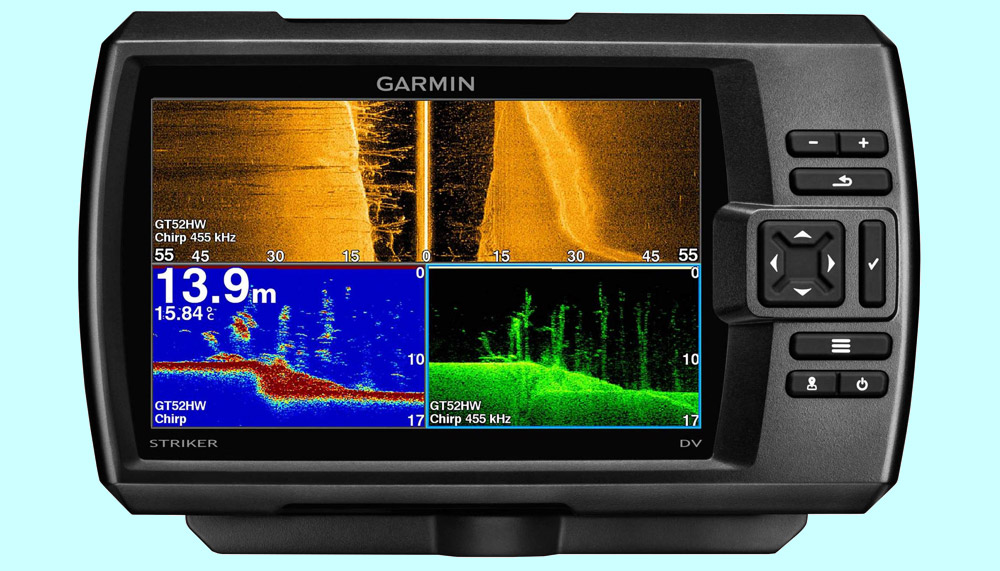
The size of the scanned area depends on the width of the scan beam angle which the emitter creates. The wide-angle is 40°–60° wide. The area it covers is quite large. The narrow beam is 10°–20° wide. When interpreting the data displayed by the fish finder, it is important to know which beam is being scanned (wide or narrow). Garmin fish finders have wide and narrow scanning beams (55° and 15°) and medium beams (40°).
Secondly, it is important to remember that the fish finder is continuously transmitting and receiving data, while the image on the screen moves all the time. The current scan data is displayed on the right. Old data is shifted to the left as new data is received.
Thus, when examining the data on the screen, it is important to remember two things: 1. Know which beam was scanning: wide or narrow. 2. Continuous movement of the image does not mean that the fish finder is moving.
Identifying Fish
Modern expensive high-tech fish finders can work in two modes – with fish icons and with fish arches. Cheap ones only work with fish arches. These icons, as you might have guessed from the name, show fish locations on your screen. The situation with arcs is a little more complicated. But each model has its own subtleties of work.
Fish Icons
Fish icons are a useful tool in the early stages of using a fish finder: the device interprets the received data about objects and tries to determine if it is fish or not. This takes into account factors such as the size of the object, speed, and the strength of the returned fish finder signal.
Garmin fish finders use a complex computer algorithm for data interpretation. But even the most complex devices cannot transmit data values with 100% accuracy. Different fish swim at different speeds and in different directions relative to the fish finder beam. This means that their numbers may not always be read in the same way. Besides, some underwater objects or algae can sometimes give similar performance to fish.
Therefore, you need to learn how to independently interpret the data received by the fish finder to use it as efficiently as possible. Take an important step and turn off fish icons – as a reward, you will receive more accurate indicators of the location of the fish. An additional bonus for decisiveness will be new useful knowledge and improved skills.
Fish Arches
If fish icons are disabled, how do I determine if there are fish on the fishfinder data screen? You need to look for fish arches. The fish will appear on the screen as arcs (since the sonar scans in a cone and the fish signal are reflected as an arc). It is important to remember that arcs can vary in size (length and width) and maybe incomplete – you should also pay attention to half arcs. They vary in length and width, some are incomplete, but they all represent fish.
Determining the Size of a Fish
Observing fish arches, you should understand how to determine the size of the fish from them. Let’s talk about their length and thickness, about full and half arcs.
Arch Length
When interpreting the indicators of a fish finder, fishermen are most often mistaken, taking long arcs for large fish. This is not true. On the fish finder data screen, the arch length indicates time. For example, imagine that the fish finder is stationary in the water (that is, you are not pulling or submerging the fish finder). If there is an equally motionless fish under it, how will it be displayed on the screen?
You will see one continuous line. This does not mean that you stumbled upon a huge blue whale in the lake. This means there is a stationary fish under your fishfinder, which can be very small in size. Or, for example, imagine that there are two fish swimming under your fishfinder – a large one and a small one. A large fish will swim much faster and leave a smaller arc than a small fish. A slow object always leaves a longer trail than a fast one.
Arch Width
So, we realized that it is difficult to determine the size of the fish from the length of the fish arches. The size is determined mainly by the width. The main rule when using a fish finder is to think vertically, not horizontally. Even if the arch is short but wide, it means that the signal has bounced off a large fish.
Full & Partial Arches
And the last point to remember when analyzing the data on the fish finder screen is that the arch does not have to be full. Half an arc or even a quarter also means fish. The fish can only swim through part of the fish finder beam and a half or quarter arch will appear on your screen. And an incomplete arch can also be from a large fish. Pay attention to incomplete arcs and remember that the most objective indicator is the thickness of the arch.
Result
Let’s summarize what we said above and highlight three main points:
- Fish icons do not always show exactly where the fish is. We recommend using them only in the early stages when you get used to the fish finder.
- Always think vertically, not horizontally, and look first at the thickness of the arch. This will help you distinguish large fish from small ones.
- Even if the arch is incomplete, this does not mean that there is no fish there. Pay attention to incomplete arches.
Determining Bottom Relief – Why It Is Sometimes More Important Than Finding Fish
The fish finder can not only look for fish in the water column for you. It is also a great tool for analyzing bottom topography, structure, and depth. This can often help you find a lot more fish if you know how deep your species is. For example, predators often hide in pits and depressions waiting for their prey. Analysis of the bottom topography with the help of a fish finder will help you easily track possible habitats of predatory fish.
But first, remember that the fish finder scans continuously. This means the image will move and the bottom will be flat even if the fish finder is not moving. Lower and raise the fish finder slowly and smoothly to get an accurate bottom image. Also, pay attention to the depth scale on the right or left side of the screen. This is a very useful indicator that allows you to determine the depth of any object.
These are very useful functions when fishing for many types of fish. And you always see them when using the fish finder. As you lower or raise the fishfinder, you will see changes in the bottom topography. Do not forget to watch the depth indicator (in Garmin fish finders it is located on the right side of the screen) to track the dynamics of increasing or decreasing depth.
There is no need to analyze arches or icons here – the bottom is shown as a flat shape and you can easily identify it. We will just give you a few tips when scanning the bottom.
Switching from a wide beam to a narrow beam. When you find a hole or depression, switch from a wide scanning beam to a narrow one and scan that area again. This will give you a more accurate picture of the change in terrain and remove the blind spots that appeared when using a wide beam.
Depth alarm. If you are fishing at great depths and your finder has a depth alarm, be sure to turn it on. This will allow you to navigate shallow water without having to keep an eye on the fish finder.
Algae and vegetation. Often a bottom scan can help you find areas of algae. This can help you if you are going to fish for perch in the summer or, on the contrary, want to avoid algae so that your bait does not get caught on them.
Small grooves. Many fishermen know that carp make small depressions in the bottom. The fish finder can find such places and show them to you. And you can easily get a few carps without wasting time looking for a place where they are waiting for prey.
Determining Water Temperature Using Fish Finder
Fishfinders have additional sensors that provide information about the water temperature. This is an important indicator to consider when fishing. Fish are cold-blooded animals, their own thermoregulation is minimal, and the central nervous system is very simple. This means they follow the comfortable temperature.
What Types of Fish Finders Are There
There are different types of fish finders. It depends on the number of beams and their frequency. The higher the indicators, the more accurate the picture. Portable echo sounders and fish finders are very popular with amateur and professional fishermen.
Single-beam and most common devices. Are inexpensive. Suitable for small ponds. They have only one beam directed to the bottom. Calculates depth and shows all passing objects along the way.
Double-beam have two rays, one of which is directed to the bottom and, accordingly, it determines the depth and topography of the bottom, and the second, less powerful, is emitted into the very water column and is looking for fish.
Three-beam has three beams in a direct sequence, and due to this, they have a large coverage of the territory. This type also allows you to find out the location of the object.
Four-beam fish finders have the same design as in the previous version, only with the addition of another beam of smaller diameter in the central circle, which is not intended for studying the bottom, but for searching for fish in the water column.
Multibeam fish finders are the most expensive but also the best option. Containing about 11 rays, they can show a three-dimensional image, which greatly simplifies the understanding of space underwater.
It is worth choosing a fish finder not according to which one is better and more complex, but according to the purpose of the device.
For boat fishing, pay attention to the fish finder mount. Fastening methods can be of two types: transom and through. The transom is installed at the place where the motor is attached to the boat. Through fastening will require you to punch holes. Choose a model with an amount that suits your needs.
How to Install a Fish Finder Correctly
There are two main options for operating a fish finder. You can use it from a boat, or you can use it from the shore. Let’s consider the features of each method in more detail.
Boat Installation
Depending on the method of attachment, the fish finders are placed in different.
If you attach it to the bottom, place the transducer on the floor of the boat and attach it so that there is no air gap. You can glue it on, or put it in a puddle of water – as you please.
Remember to set up the device during installation.
If you are going to sail slowly, the device is mounted on the front of the boat, if it is fast, it is better to install it at the back.
In winter, the method of attachment and the performance of the fish finder is different, which will be described below.
Shore Installation
This option is less common, so it all depends on the device itself. Basically, this device is attached to the boat. If you nevertheless decide to use it on the shore, you can, for example, throw a fish finder specialized for this business into the water, and then catch the signal using your smartphone.
Features of Using Ice Fishing Fish Finder
Going on ice fishing, you should consider the following features of using a fish finder during this period:
- It is worth protecting the device, and especially the battery, from the cold. For the battery, low temperatures are a disaster, for the device itself, temperatures down to -10 are quite ok. In any case, it is better to build an insulated bag or just a box laid with foam plastic with your own hands.
- There are two methods of using the fish finder: lower the transducer into the hole and freeze it into ice. Both are not perfect and can create additional difficulties. For example, make a holder for the transducer to be placed in water, or each time pick out the device from ice to change the place of fishing.
- Using the automatic fish recognition mode is not effective in winter.
- It will not be possible to find out the bottom topography, since the device is placed in one place, which does not allow studying a large surface.
Our recommendation for winter – Humminbird Ice Fishing Finder.
How to Read Garmin Fishfinder
The general rules for using the Garmin fish finder are no different from other fish finders. I will attach a helpful video below from the official brand to help you understand how the Garmin fish finders work.
🆘 Garmin Echo Series – Basic Settings
This video explores the basic operations of Garmin’s echo™ series fishfinders. For more information on Garmin marine products look on the official website of the brand.
Using Fish Finders Effectively
To make the most of a fish finder, it’s essential to understand not only how the device operates, but also how to use it effectively. This section will discuss factors that can affect fish finder performance, best practices for using a fish finder, and how to troubleshoot common issues.
Getting the Most Out of Your Fish Finder: Factors Affecting Performance
Several factors can influence the accuracy and effectiveness of a fish finder, including:
💎 Transducer frequency: Higher frequencies provide better resolution in shallow water, while lower frequencies are better suited for deep water. Some fish finders offer dual or multi-frequency options, allowing anglers to switch between frequencies based on their fishing environment.
💎 Transducer mounting: Proper transducer installation is crucial for optimal fish finder performance. Poor mounting can result in weak or distorted signals, negatively impacting the accuracy of the displayed information.
💎 Boat speed: Fish finders function best at slower speeds, as higher speeds can create turbulence and reduce the quality of the sonar readings.
💎 Water conditions: Factors such as water temperature, salinity, and the presence of suspended particles can affect sonar signal transmission and reception.
Fish Finder Best Practices: Tips for Optimizing Your Results
To maximize the effectiveness of a fish finder, consider the following best practices:
💫 Familiarize yourself with the device: Before heading out on the water, thoroughly read the user manual and familiarize yourself with the fish finder’s features, settings, and controls.
💫 Properly install the transducer: Ensure the transducer is mounted correctly, following the manufacturer’s recommendations, to obtain the best possible sonar readings.
💫 Adjust the settings: Experiment with different settings such as sensitivity, range, and frequency to optimize the fish finder’s performance based on your fishing environment and target species.
💫 Interpreting the display: Learn to recognize and differentiate between fish, underwater structures, and other objects displayed on the fish finder’s screen. This skill will improve over time as you gain more experience using the device.
💫 Maintain your equipment: Regularly check and clean the fish finder, particularly the transducer, to ensure it is free of debris and functioning correctly.
Troubleshooting Your Fish Finder: Common Problems and Solutions
Should you encounter issues with your fish finder, consider the following troubleshooting tips:
🔁 Weak or no signal: If the display shows weak or no signal, check the transducer’s mounting position, ensuring it is free of obstructions and correctly aligned. Verify the device’s power connections and examine the transducer for damage or debris.
🔁 Inaccurate depth readings: If the depth readings seem inaccurate, ensure the transducer is properly mounted and in contact with the water. You may also need to adjust the fish finder’s sensitivity or range settings.
🔁 Fish not displayed: If fish are not appearing on the screen, try adjusting the device’s sensitivity or switching to a different frequency. It’s also possible that fish are simply not in the area.
🔁 Interference: Electrical interference from other devices on the boat can affect fish finder performance. To minimize interference, separate the fish finder’s power source from other electronics and route the transducer cable away from other wiring.
By understanding the factors that can impact fish finder performance, employing best practices, and troubleshooting common problems, anglers can use their fish finders more effectively and enjoy greater success on the water.
Advanced Techniques
Once you’ve mastered the basics of using a fish finder, you can start exploring advanced techniques that can further enhance your fishing experience. This section will discuss fine-tuning your fish finder for different types of fish, utilizing GPS and mapping features, and interpreting multiple sonar readings.
Mastering Your Fish Finder: Fine-Tuning for Different Types of Fish
Different fish species exhibit unique behaviors and occupy specific depths and habitats. By fine-tuning your fish finder’s settings, you can increase the chances of locating your target species:
🔶 Adjust the sensitivity: The sensitivity setting controls the strength of the sonar signal, with higher sensitivity settings detecting smaller fish and weaker echoes. Adjust the sensitivity based on the size and depth of the fish you’re targeting.
🔶 Alter the frequency: Choose the appropriate frequency for your fishing environment and target species. Higher frequencies offer better resolution in shallow water and for smaller fish, while lower frequencies are more effective for detecting larger fish in deeper water.
🔶 Zoom in on target areas: Use the fish finder’s zoom feature to focus on specific depths or structures where your target species are likely to be found.
🔶 Customize the fish ID settings: Some fish finders offer customizable fish ID settings that allow you to select specific fish icons for different species. Familiarize yourself with these settings to improve your ability to recognize and target specific fish.
Going Beyond the Basics: Using GPS and Mapping Features
Fish finders equipped with GPS and mapping capabilities offer a wealth of additional information that can enhance your fishing experience:
💡 Marking waypoints: Use the GPS feature to mark productive fishing spots, underwater structures, or navigational hazards. This makes it easy to return to these locations on future outings.
💡 Track your route: GPS-enabled fish finders can track your boat’s route, allowing you to retrace your path and identify patterns in your fishing success.
💡 Utilize mapping software: Some fish finders offer built-in mapping software or compatibility with third-party charting tools. These maps can provide detailed information about the underwater terrain, helping you locate prime fishing spots.
💡 Overlay sonar data: Advanced fish finders may offer the option to overlay sonar data onto maps, providing a comprehensive view of the underwater environment and fish activity.
Interpreting Multiple Sonar Readings: How to Maximize Your Fishing Success
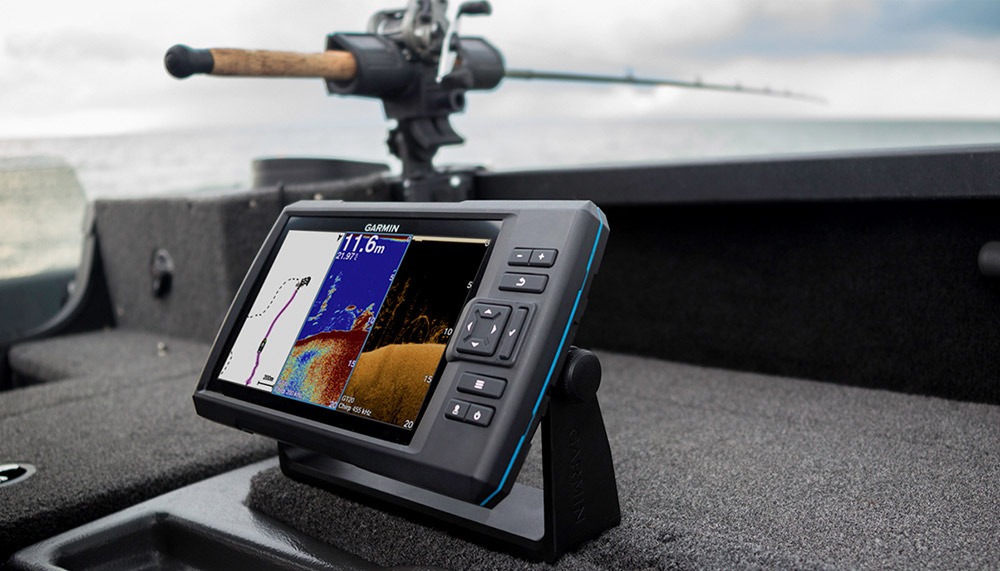
Some fish finders offer multiple sonar technologies, such as down imaging, side imaging, and CHIRP (Compressed High-Intensity Radiated Pulse). Understanding how to interpret these different sonar readings can greatly enhance your fish-finding abilities:
💩 Down imaging: Down imaging sonar provides a high-resolution, vertical view of the underwater environment directly beneath the boat. Use this technology to identify fish, structure, and bottom composition with greater clarity and detail than traditional sonar.
💩 Side imaging: Side imaging sonar scans to the left and right of the boat, offering a broad, horizontal view of the underwater environment. Use this technology to locate fish and structure that may be out of the range of traditional sonar.
💩 CHIRP: CHIRP sonar sends multiple frequency pulses, resulting in clearer and more detailed images with less noise and clutter. Use CHIRP to distinguish between fish and structure, even in challenging conditions or when fish are close to the bottom.
By mastering advanced fish finder techniques, such as fine-tuning settings for specific fish, utilizing GPS and mapping features, and interpreting multiple sonar readings, you can greatly improve your fishing success and make the most of your fish finder investment.
FAQs
Despite the large amount of material that we have provided, many users still have questions regarding the operation of fish finders. In this section, we have answered all of them.
Gone Fishing: A Beginner’s Guide to Navigating Fish Finder Screens
After exploring the intricacies of fish finders, their various types and components, best practices for use, and advanced techniques, it is evident that these devices are invaluable tools for anglers of all levels. 💥To recap some key takeaways:
- Fish finders utilize sonar technology to locate fish, identify underwater structures, and analyze the underwater environment, enhancing your overall fishing experience.
- There are numerous types of fish finders, ranging from standalone units to sophisticated networked systems. The type of fish finder you choose will depend on your specific needs and preferences.
- Proper transducer installation, understanding the device’s settings, and learning to interpret the display are essential for maximizing the benefits of a fish finder.
- By familiarizing yourself with advanced techniques, such as fine-tuning for different fish species, utilizing GPS and mapping features, and interpreting multiple sonar readings, you can further improve your fishing success.
As you continue to use your fish finder, remember that practice is key to mastering this technology. As with any skill, your ability to interpret the data provided by your fish finder will improve over time. Embrace the learning process, experiment with different settings and techniques, and don’t be afraid to ask for advice from more experienced anglers.
By investing time and effort into honing your fish finder skills, you will not only increase your chances of a successful catch but also enhance your overall enjoyment of the fishing experience.
💥Pay attention to such, at first glance, imperceptible details that at the decisive moment can ruin all the pleasure:
- The battery of the fish finder in winter sits down much faster. If you plan to fish for more than a day, take a spare battery or, if you have a car, an appropriate charge.
- The best and best quality fish finder is not always good and is often pointless. If you are going to use the device in a local lake three meters deep, the four-beam device will be superfluous. A cheaper single-beam, which will show all the information you need, will be enough for you.
- Reading the information from the screen of the fish finder, be prepared for the fact that he is mistaken and this is not one big fish, but a flock of small ones or even a shoe. This can especially happen in automatic mode with icons. If you want more accurate results, learn to do the analysis yourself.
Use the fish finder according to all of the listed rules, and it will brighten up and facilitate fishing, will not spoil your nerves, and provide a rich catch.
Tags: #how to read a fish finder / #ice fishing fish finder / #how to read garmin fish finder / #how to use a fish finder / #how to install fish finder / #how to effectively use a fish finder / #how to read a fish finder screen

I live in Tenerife (Canary Islands) for the last 10+ years and share my daily fishing experiences on my website. Many years of personal experience as a fisherman and the vast experience of my friends allow me to write professionally on any fishing topics (from choosing a flashlight and equipment to deep-sea fishing).
All of my advice is based on practical real-world experience and will be useful to both novice anglers and professionals. Read more about the author.
Affiliate Disclosure: FishReeler.com sometimes gets paid for listings, through sponsors or affiliate programs like Amazon, Ebay, Cabelas, Bass Pro Shop, Shimano, Daiwa, Rapala, Renn, Okuma, KastKing, etс. Clicking a link helps keep FishReeler.com free, at no extra cost to you!
About the author: Each article is verified by the fishing expert Sergio Smirnoff. The articles are written by professional and amateur fishermen with 20+ years of fishing experience.
Note: The views and opinions expressed in this article are those of the authors and do not necessarily reflect the official policy or position of any agency. The articles are for informational purposes only, share your opinions in the comments and join the fishing discussions, let's share our fishing experiences together!


I advise all fishermen to buy a fish finder with a big screen and a famous brand. The thing is expensive and you can not make a mistake and constantly change it. At night and when the waves the big screen is more comfortable. You get used to the menu, the design, and the keys. Water protection and the number of functions are important. I made my purchases on the recommendation of the sales clerk. You helped me to use it to the fullest. Thank you.
This is an excellent article that thoroughly explains how to read a fish finder! I appreciate the detailed descriptions of each aspect of the fish finder display, including colors, arches, and bottom composition. The step-by-step guidance provided in this article makes it a valuable resource for both novice and experienced anglers. Well done!
I found this article on reading fish finders to be very informative and easy to understand. As someone new to using fish finders, I appreciated the simple explanations and tips on how to interpret the data displayed on the screen. The article’s visuals also help to reinforce the concepts discussed. Great job, and thank you for providing such valuable information!
This article on how to read a fish finder is incredibly helpful and well-structured. It covers all the essential information that anglers need to know to make the most of their fish finders. The practical tips on fine-tuning the fish finder settings and recognizing different fish species are particularly useful. Keep up the great work!
I recently purchased a fish finder and have been struggling to interpret the data on the screen. This article has provided me with the knowledge and confidence I needed to start making sense of the readings. The explanations are clear, and the additional tips on how to locate underwater structures are an added bonus. Thank you for sharing this helpful resource!
I recently had an amazing experience using a traditional sonar fish finder while fishing for lake trout. The sonar’s cone-shaped reading allowed me to track my lure and see its depth in real-time, even in 70 feet of water. I noticed how the fish finder would instantly react when I jigged my lure, giving me valuable insight into its position in the water column.
While using a side scan would require movement, the traditional sonar worked perfectly for bottom fishing in this situation. As I was jigging, I saw a red mark rise from the bottom of the fish finder and approach my lure. The anticipation built as I started reeling, watching the mark follow my lure on the sonar screen. The excitement reached its peak when the two marks merged, and my rod bent over from the force of the fish.
Thanks to the fish finder, I had an incredible experience landing and releasing the fish. The sonar provided me with real-time feedback that greatly enhanced my fishing adventure. I can’t wait to get back on the water and put my fish finder to use again during my next outing. It’s truly a game-changer!
In my experience, I’ve found that using a fish finder has been extremely helpful in locating fish and underwater structures while I’m out on the water. When I spot a group of fish or an interesting structure on the fish finder, I usually drop a waypoint or, if my finder doesn’t have GPS capabilities, I make note of land-based references for future use.
After marking the spot, I continue forward a bit and cast back toward the area I’ve just passed over. This method works well for me unless I’m using a finesse technique. In that case, I rely on the fish finder to help me determine when my lure reaches the bottom and then work it from that point.
Overall, having a fish finder has greatly enhanced my fishing experience and improved my chances of success on the water. I highly recommend it for any angler looking to take their skills to the next level.
Fishfinders are indeed based on sonar technology, with the essential component being the transducer, which serves as both a transmitter and receiver. It generates sound waves that travel downwards into the water and listens for the echoes bouncing off objects below. These echoes are then translated into various images, depending on the fishfinder type.
The most apparent signal generated by a fishfinder is the bottom signal, which indicates the depth of the water when the sonar points directly downward. If there’s anything else within the sonar beam, like a fish, it will appear as a “mark” above the bottom signal, indicating an object creating a sonar echo between the transducer and the water bottom.
It’s crucial for the transducer to always point “down” for this process to work effectively. While there are sophisticated sonars designed to point sideways or in multiple directions, the focus here is on the traditional, downward-pointing transducers.
In a nutshell, when the transducer points directly downward, it provides a series of sonar echoes representing everything in the water directly beneath your boat (or under the ice, if ice fishing). Some fishfinders, often referred to as “graphs,” save these echoes for a short period, allowing you to see a few yards behind your boat in addition to what’s directly below. As your boat moves, the fishfinder’s display changes accordingly.
Understanding the fishfinder’s output would be easier if more information about its type was available. Nonetheless, the transducer’s position is essential, as it must point straight down to provide an accurate depth reading. The objects displayed on the fishfinder screen are located between the transducer and the water bottom, with the axis being perpendicular to the boat and pointing straight down.
The explanation provided for fish appearing as an arc on fish finders is incorrect. In reality, the arc is caused by the cone angle. To illustrate, if you have a 10-degree cone and a fish is 10 feet below the transducer, the fish will appear to be 10.2 feet away at the edge of the cone due to the angle. As the fish passes through the center, there is no angle, so it appears 10 feet down. When the fish continues to pass under the sensor and leaves the cone, it will once again be 10.2 feet from the transducer. This variation in the distance creates the arc appearance.
However, many times, fish don’t pass through the center of the cone or they move, resulting in asymmetric arcs. The cone angle can also create issues in deeper water, as objects very close to the bottom might not be detected unless you pass directly over them. For example, in 50 feet of water, a fish 6 inches off the bottom and several feet to the side of the boat would produce a return deeper than the bottom reading in the center of the cone.
Understanding the cone angle’s effect on fishfinder readings can help clarify why fish appear as arcs and improve your interpretation of the data displayed.
I recently ordered the same unit for my kayak and hope I can provide some helpful insights. Most standard transducers emit a cone-shaped beam, typically around 30 degrees in angle. While it’s possible to use geometry with the water depth to determine the scanning range, most people don’t usually concern themselves with this detail. The display’s leading edge, as it scrolls, represents the area directly beneath the boat, with the rest of the screen displaying what’s behind.
It’s worth mentioning that the new Lowrance transducers use an oblong beam, which is wider side-to-side than front-to-back. While this doesn’t change the way you interpret the screen, it does offer a clearer image and better contrast.
On a side note, I prefer the term “bottom machine” over “fish finder” because the latter can create false confidence when searching for fish. Using sonar to locate bottom structures and fishing around them is generally more effective than simply cruising around and looking for fish on the unit. Think of your bottom machine as a tool to identify where fish should be, rather than a crutch when they’re not biting your lures.
A standard fishfinder, without side or down imaging capabilities, sends a pulse straight downward in a cone with a slight angle (typically around 20 degrees, though some like Humminbird can go up to 60 degrees). This covers a relatively small area in shallow water, and in fact, it’s often challenging to mark any fish in less than 20 feet of water because they tend to spook away from the boat.
As a result, they move far enough away to be outside of the cone. In shallow water, fishfinders are mostly useful for identifying weed edges, rocks, downed wood, and other structures. To actually see fish on your fishfinder, you’ll typically need to venture into deeper waters.
I recently got a Garmin 5cv with a switchblade transducer arm, which makes it fully removable. After watching several videos on setting it up and interpreting the readings, I found it relatively easy to learn.
However, I must say that while a fish finder can help, putting fish in the boat still requires a good amount of knowledge. I view my fish finder more as a bottom reader to identify structure and grass rather than a direct fish locator. It’s crucial to understand environmental clues to determine which types of bottom and structure will hold the fish you’re targeting.
I know someone who has a PA14 and uses a Lowrance HDS10, which includes GPS and topo maps. It’s bigger than what most kayak fishers use, but it was almost free, so they went for it, and it works just fine on the PA14. Although their unit has the capability for structure scan and side scan, they haven’t purchased that transducer/box yet, so they only have the sonar. They find it quite useful for locating structures in open water, especially when fishing in reservoirs with buried bridges and other great structures.
If the price isn’t a concern, you might want to consider those new live scan units with real-time sonar. They cost around $2,000, but they’ve received excellent feedback. An upgrade to one of these units could be worth it someday. Lowrance is a reliable choice, and it’s already set up for easy mounting in your Hobie for the sonar transducer. There’s a really nice one available, which I recommend checking out. The only issue with a live scan or side scan unit is the need to mount a second transducer. It appears that the best way to do this is on the h-rail in the rear of the PA14, but it may get in the way and potentially get hung up on weeds.