Mastering the Knot: A Pro’s Guide to Tying a Fishing Hook
Casting Into the Basics: Tying a Fishing Hook 🎣
Welcome, avid anglers and fishing enthusiasts! Whether you’re a seasoned pro or just getting your feet wet, we bet you’d agree that the joy of fishing is more than just the thrill of the catch. 🚣♂️
One foundational skill that can make a sea of difference between a fruitful day at the water and going home empty-handed is knowing how to properly tie a fishing hook. 🪢 You see, tying a fishing hook is not just about securing a bait; it’s the lifeline connecting you to the fish, making it a crucial step in your fishing endeavor.
In this comprehensive guide, we’ll cover everything from the importance of tying your hook correctly to understanding your fishing equipment, mastering basic and advanced knots, avoiding common mistakes, and ensuring the longevity of your gear. With this knowledge, you’ll be well on your way to becoming a more successful angler. 🏆
🔶So, grab your fishing gear, and let’s dive right into the knots and bolts of securing your catch. Trust us, by the end of this guide, you’ll not just be tying a fishing hook; you’ll be crafting a connection between you and the fish that’s robust and reliable! 🌊🐠
Why Knot? The Key Role of Tying Your Fishing Hook Right 🎯
It’s time to talk about the not-so-secret weapon in a successful angler’s arsenal: the perfectly tied fishing hook. 🎣
Why is Proper Knot Tying Crucial? 🔑
Here’s the thing: the act of fishing doesn’t start when the fish bites, nor when the bait hits the water. It starts at the moment you tie your hook to the line.
Properly tying a fishing hook is critical as it forms the direct connection between you and your potential catch. A well-tied knot means you’re less likely to lose fish due to line breaks or slips. Plus, the right knot ensures that the hook remains secured in the fish, increasing your chances of a successful reel-in.
The Fallout of Faulty Tying ⚠️
However, if a hook is not properly tied, it can lead to a few concerning issues. 😧
Loss of Fish: Imagine this – you’ve been waiting for hours, and finally, you feel that pull. But just as you start reeling in, the line gives way. No one wants to lose a catch due to a poorly tied knot. It’s frustrating and can turn a potentially successful fishing trip into a disappointing one.
Damaged Equipment: A poorly tied hook can not only cost you your catch but also potentially damage your gear. An improper knot may cause undue strain on certain parts of the line, leading to weakened points that may break under pressure, damaging the line or the reel.
The Right Knot for Success 🥇
Having the right knot tied to your hook plays an instrumental role in successful fishing. It’s not just about strength, but also about how smoothly it casts and how unnoticeably it sits in the water. The right knot complements your fishing technique and the kind of fish you’re aiming for, enhancing your overall fishing experience. 🏞️🐟
🔶So, learning to tie your fishing hook correctly isn’t just an extra skill; it’s a necessary one for any angler aiming for a fruitful and seamless fishing journey. Let’s explore more about your equipment in the next section and find the right knot for you! 🎉
More Than a Hook: A Deep Dive into Your Fishing Arsenal 🎣🔍
Understanding your equipment goes a long way in maximizing your fishing experience. But fret not! We’re here to help you navigate the sea of fishing gear and understand how different factors impact your choice of hooks, lines, and knots.
A Look at Different Types of Fishing Hooks and Lines 🪝🧵
There’s a myriad of fishing hooks available, each designed to meet specific needs. From J-hooks and Circle hooks to Treble hooks and Double hooks, the diversity can be mind-boggling! However, knowing the differences and applications can help you choose the perfect hook for your catch. For example, J-hooks are great for live bait, whereas circle hooks are more suited for catch and release due to their design.
Similarly, fishing lines also come in various types, such as monofilament, fluorocarbon, and braided lines. Each line type has its strengths and weaknesses, affecting how they perform under different conditions and how they should be tied. For instance, braided lines are strong but slippery, requiring specific knots for secure tying.
Environment Matters: How Nature Influences Your Gear 🌳🌊
Different fishing environments and species call for different equipment. A freshwater lake brimming with bass will require different gear compared to a saltwater adventure chasing marlin.
Water clarity, depth, current, and the size and type of the target fish, all influence your choice of hook, line, and consequently, the knot you use. For example, if you’re fishing in clear water, a fluorocarbon line due to its low visibility would be an excellent choice, and a Palomar knot would be perfect for secure tying.
The Perfect Pairing: Hooks, Lines, and Knots 🎣💕
Learning to pair the right hook with the right line, and tie the right knot is a craft. It’s about understanding the strengths of your equipment and using them in harmony to enhance your fishing prowess.
🔶So, whether you’re gearing up for a serene lake fishing trip or planning an exciting deep-sea adventure, understanding your equipment is your first step towards a successful fishing experience. Let’s put this knowledge to practice in the next section as we dive into the art of tying fishing knots! 🌈🎉
The Basic Principles
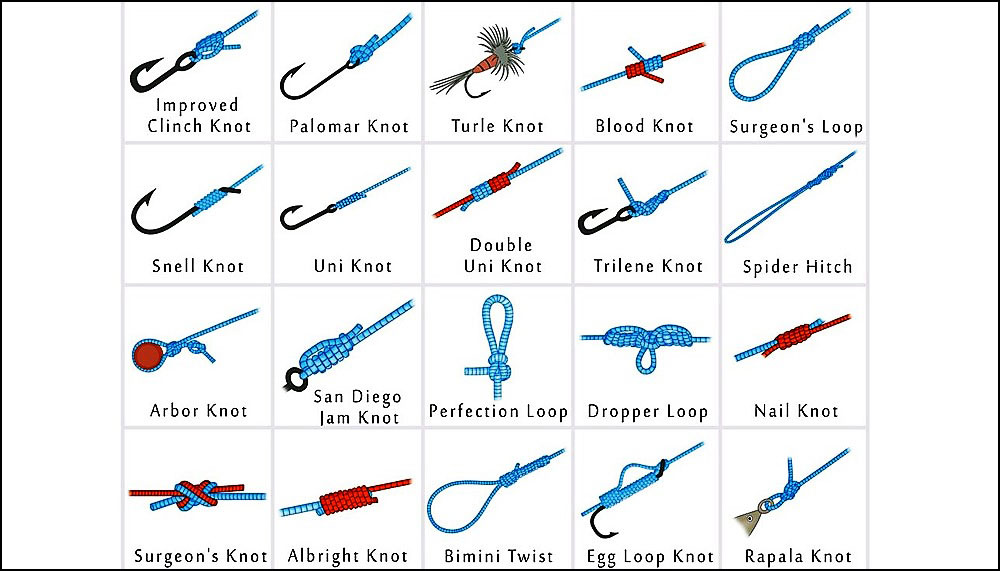
Why is it important to study how to tie fishing hooks? Tying a hook to a line so that the knot is easy to tie but still maintains the tensile strength of the line is not as easy a task as it may seem at first glance. For thousands of years, anglers have come up with hundreds of ways to tie a hook to a fishing line. The modern fisherman only has to choose one of them. In our article, we list all the basic fishing knots that are used to tie a hook to a fishing line. Choose one or two knots for yourself, try tying them at home.
The 9 Fishing Knots for Hooks, Lure, Swivels – Useful Video
From Novice to Knot Specialist: Essential Knots You Need to Know 🎣🪢
Every angler, beginner or seasoned, must know a few fundamental knots that form the backbone of almost any fishing expedition. We’ll cover the Improved Clinch Knot, Palomar Knot, and Loop Knot – essential knots that will level up your fishing game.
1️⃣ Improved Clinch Knot
The Improved Clinch Knot is a popular choice among anglers for its simplicity and strength. It’s perfect for tying fishing lines to hooks, lures, or swivels.
Step-by-step guide:
- Thread the line through the eye of the hook. Leave ample line for tying.
- Twist the free end around the standing line for about five turns.
- Pass the free end through the small loop near the eye of the hook.
- Now, pass the free end through the larger loop you just made.
- Wet the knot and pull tight. Trim the end.
📝 Ideal Usage: Great for light line conditions and suitable with most lines, making it a versatile knot for various fishing scenarios.
2️⃣ Palomar Knot
The Palomar Knot is known for its high strength and is considered one of the most reliable knots, especially for braided fishing lines.
Step-by-step guide:
- Double your line to make a loop and pass it through the eye of the hook.
- Tie a loose overhand knot with the loop.
- Pass the loop over the end of the hook.
- Pull on the line to tighten the knot and then trim the end.
📝 Ideal Usage: Best for braided lines and works well with a variety of hooks and lures.
3️⃣ Loop Knot
The Loop Knot allows the hook or lure more movement, which can attract more fish.
Step-by-step guide:
- Make a loop in the line a few inches from the end.
- Pass the free end through the eye of the hook and back through the loop.
- Tie an overhand knot around the standing line.
- Pass the free end through the first loop you made.
- Wet the knot and pull tight. Trim the end.
📝 Ideal Usage: Best when you need the lure to move freely and mimic live bait.
And there you have it! With these three fundamental knots, you’re well-equipped for most fishing adventures. Let’s take your skills a notch higher in the next section as we delve into some advanced knots for specific situations! 🚀🎉
Beyond Basics: Advanced Knots for Specific Fishing Scenarios 🎣👨🎓
Mastering advanced knots can make a significant difference in your fishing expeditions, especially in particular situations. Let’s take a deep dive into two such advanced knots: the Blood Knot and the Albright Knot.
1️⃣ Blood Knot 💉
The Blood Knot, with its symmetrical design and high strength, is ideal for connecting two lines of similar diameter. Here’s how you tie it:
Step-by-step guide:
- Overlap the ends of two lines you want to join. Twist one line around the other for five to seven times, and then pass it back between the lines.
- Repeat the process with the other line in the opposite direction.
- Wet the knot, tighten by pulling on both lines, and trim the ends.
📝 Ideal Usage: Perfect for tying together two fishing lines of similar size. It’s commonly used when you need to extend your line or replace a worn-out section.
2️⃣ Albright Knot 💡
The Albright Knot is versatile and strong, perfect for connecting lines of different materials and diameters.
Step-by-step guide:
- Make a loop in the heavier line and run the lighter line through it.
- Wrap the light line back over itself and both strands of the loop. Do this 10 times, then thread the line back through the loop the same way it entered.
- Wet the knot, tighten, and trim the ends.
📝 Ideal Usage: Particularly useful for tying together different types of fishing lines, like a monofilament or fluorocarbon leader to a braided main line. It’s a go-to knot for situations where strength and flexibility are required.
🔶Remember, tying these knots correctly might require a bit of practice, but don’t let that deter you! Knowing these advanced knots and understanding their uses can turn challenging fishing situations into successful fishing stories. Up next, let’s learn how to avoid common pitfalls in the art of knot tying! 🚀🎉
These Knots Every Fisherman Should Know
What are the best knots to tie a fishing hook to a line? The best knot for you will be the one you know how to make. The one you have chosen and mastered from our list. Read on: our article will help you visually learn how to tie a hook quickly and easily. More hands-on experience and everything will work out!
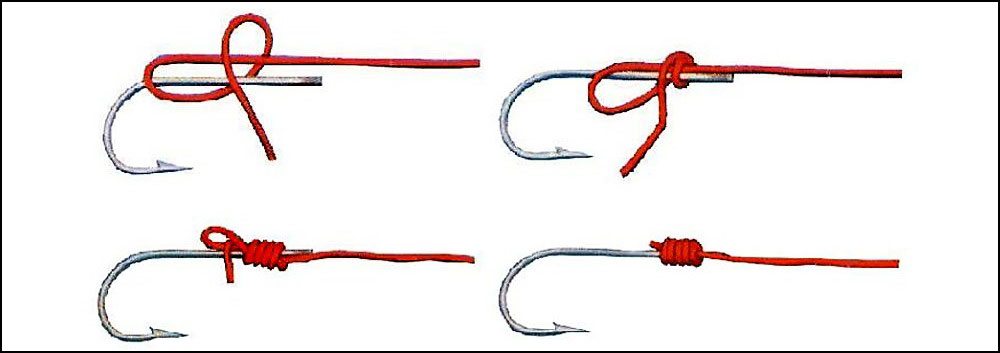
1# The Clinch Knot
To tie the line to the hook using the wedge knot, follow these steps:
- Pull the running end of the line through the eye of the hook.
- Wrap the moving end of the fishing line around the stake 4 to 6 times.
- Thread the running end through the loop which the hook eye passes through.
- Wet the line and tighten the knot.
The wedge knot should not be used in the following cases:
- To tie a line to a hook that has a large diameter lug.
- With a monofilament line having a diameter greater than 0.4 mm.
- With braided line.
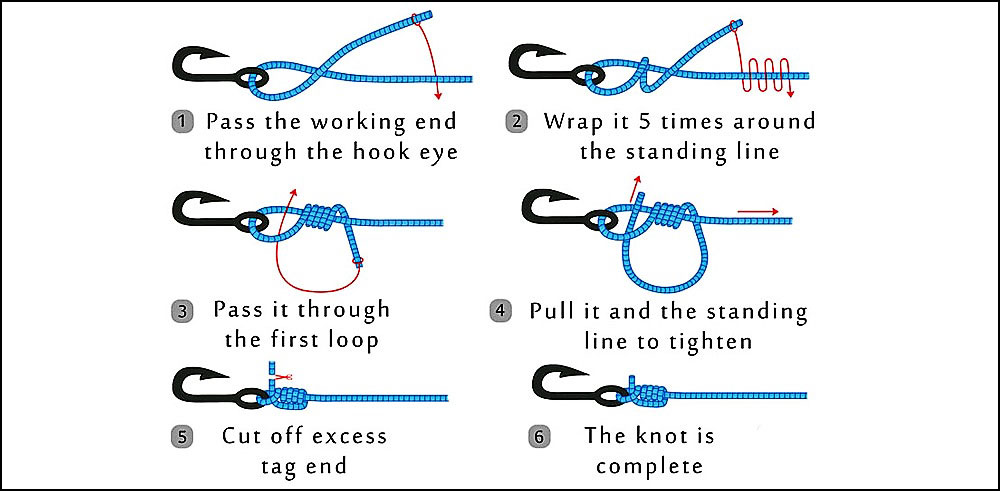
2# The Improved Clinch Knot (Aka Fisherman’s Knot)
The Improved Clinch Knot is very similar in tying principle to the regular Klintsch knot. The knot is very strong, with a tensile strength of up to 98% of the line’s breaking load. The Clinch Knot is well suited for tying small and medium diameter monofilament to a hook.
3# The Double Palomar Fishing Knot
The Palomar knot is one of the most popular and easiest fishing knots to tie. It is used to tie not only hooks to the line but also spoons, carabiners, swivels, and other elements of fishing equipment. The knot is most suitable for use with a monofilament fishing line. The breaking strength of the knot is 90% of the breaking strength of the fishing line.
In order to tie the fishing line to the hook with a Palomar knot, do the following steps:
- Fold the end of the line in half and pass the double line through the ear of the hook.
- With the resulting loop around the mainline and into the resulting loop, we pass the double end of the line.
- Let the hook through the double-end line and tighten it.
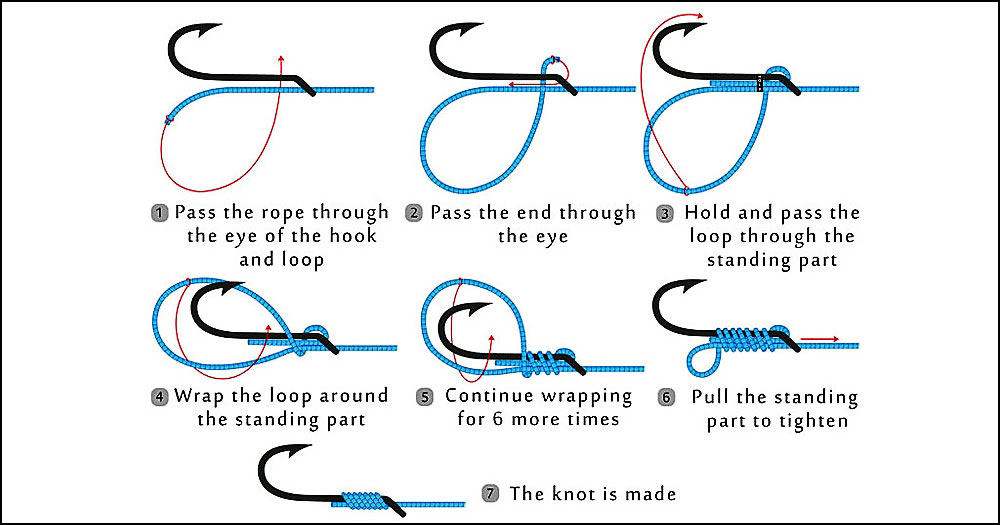
4# The Uni Knot
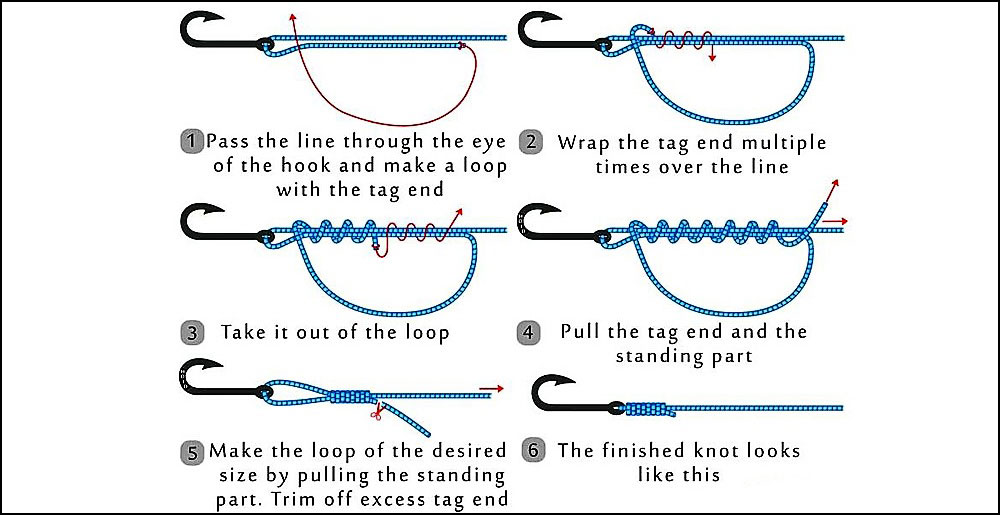
The Uni Fishing Knot is a good alternative to the famous “Clinch” fishing knot. The Uni multifunction knot was invented by Norman Duncan. The Uni knot is also known by the names “Grinner“, “Homer“. The name Uni knot itself comes from the English word universal, which translates to “universal”.
Fishing knot “Uni”, can be used for:
- For tying hooks, lures, carabiners, clasps to the fishing line.
- For tying the line to the bobbin of the reel.
- To tie two ends of the line together.
Uni knot can be used with both monofilament and braided lines. The breaking strength of the knot when tied to the eye of the hook is about 81% of the breaking strength of the line.
When connecting the two lines to each other, the strength of the knot is somewhat reduced and is between 73-75% of the breaking strength of the line. The strength of the knot, when using a braided line depends on its thickness and the shape of its section and is in the range from 65 to 73% of the breaking strength of the line.
The knot locks after it is tightened and depends on the degree of tension of the fishing line. As the knot is tightened, the turns of the knot change places, with the inner turns becoming outer turns and vice versa. When tightening the knot, be sure to wet the fishing line, this will maintain its strength and structure.
To tie the fishing line to the hook using this knot, do the following:
- Pull the line through the ear of the hook.
- Make a loop at the free end of the line and press it to the mainline.
- Wrap the end of the loop around the two folded strands of fishing line 5-6 times.
- Pass the free end of the fishing line through the loop.
- Bring the resulting knot tightly to the ear of the hook.
- Moisten the fishing line and tighten the knot completely.
- Cut off the excess end of the line.
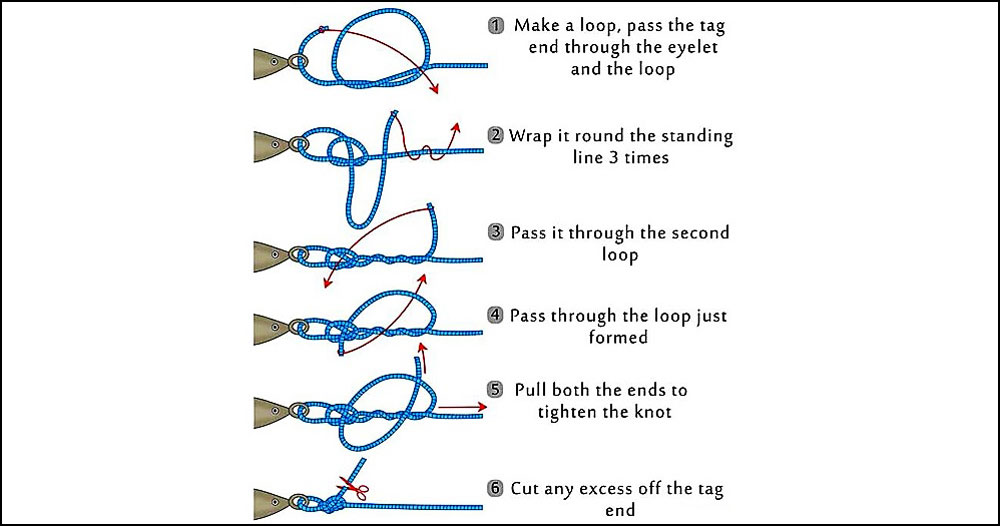
5# The Orvis Knot
The knot is a simple and reliable way of tying a hook to a line offered by the world-famous Orvis company. The knot is suitable for use with all types of fishing lines. The knot has a tensile strength of about 95% of the breaking strength of the line.
To tie a fishing line to a hook using the Orvis knot, follow these steps:
- Feed the line through the eye of the hook and pass the end of the line under the mainline.
- Pull the end of the line through the loop that is formed near the hook.
- Make three turns with the free end of the line around the resulting new loop.
- Moisten the knot and gently tighten the knot to the ear of the hook.
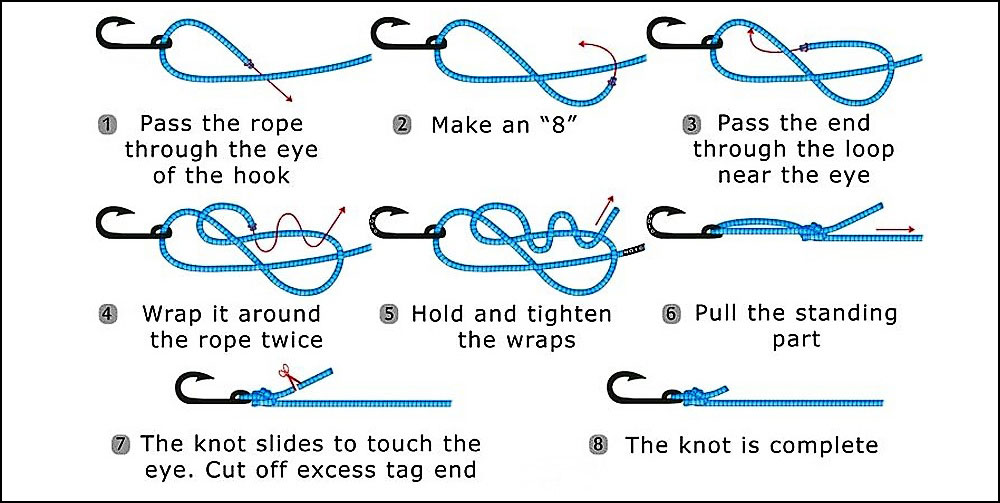
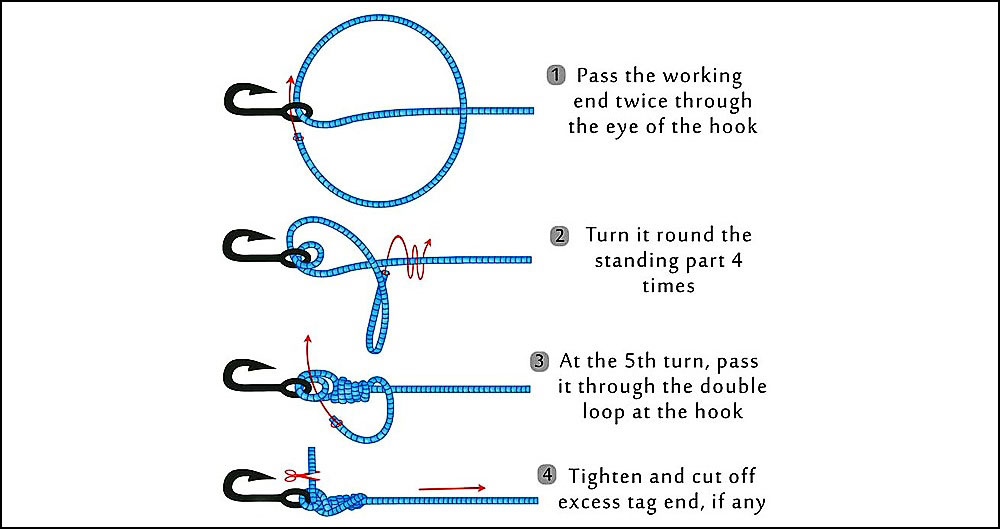
6# The Rapala Knot
The Rapala Knot is recommended by the world-famous Rapala Company. The knot is primarily used for tying wobblers and lures to the line but can be used for tying any lures and hooks. The advantage of the knot is that it allows you to keep the free play of the lure while providing a reliable strength connection. The knot can be used with both braided lines and monofilaments. The knot has 90% of the breaking strength of the line.
To tie a line to a hook using a Rapala Knot, follow these steps:
- Make a simple knot on the line without tightening it all the way.
- Pull the line through the eye of the hook and through the simple knot.
- Make 4-5 turns with the free end of the line around the mainline.
- Return the free end of the fishing line back and thread it through the simple knot and immediately thread it through the resulting loop.
- Tighten the knot.
7# The Dumhof Knot
The easiest knot to attach a line to a spade hook. Better suited for large hooks, it is more difficult to make on small hooks with a short shank. The strength of the Dumhof knot is 75-80% of the breaking strength of the line.
To tie a line to a hook with a Dumhof knot, do the following:
- Form a loop on the line and place it on the hook.
- Make 4-7 turns with the free end of the line around the noose and the shank, moving along the shank towards the bend of the hook, laying the turns one to one so they do not overlap or overlap.
- Thread the free end of the line through the loop, slide the knot to the blade of the hook, moisten the line and tighten the knot firmly.
8# The Snell Knot
The Snell knot can be used with an earless hook or for tying multiple ear hooks to a single lead. The Snell knot has a strength of 90% of the breaking strength of the line.
To tie a line to a hook using the Snell knot, follow these steps:
- Make a large loop at the end of the line that should loop freely over the hook bend.
- Make 7-8 turns of the loop around the hook’s forend, the size of the loop will decrease with each turn.
- Slide the knot along the strand toward the spatula, wet the line, and finally tighten the knot, holding both ends of the line.
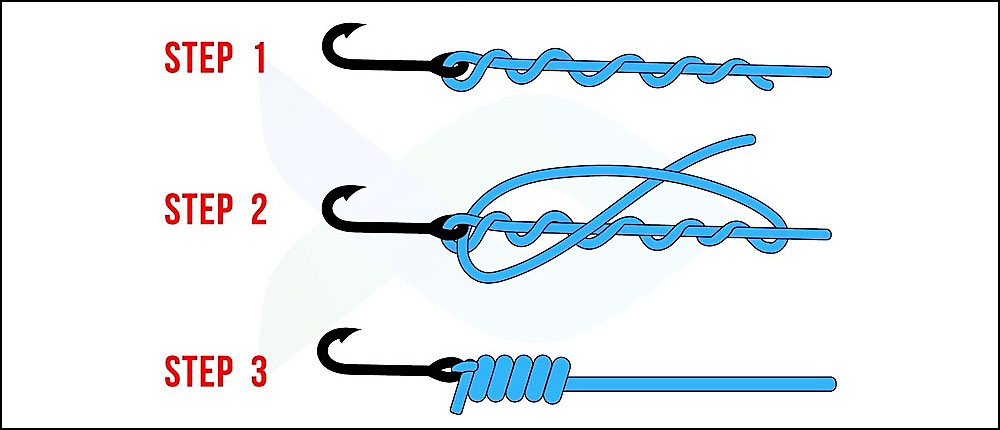
9# The Knotless Knot
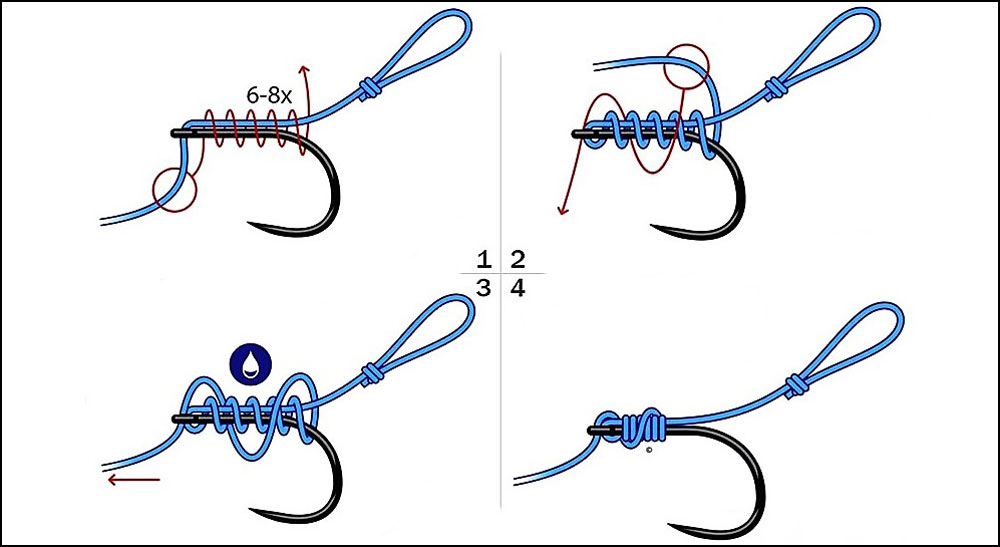
How To Tie A Knotless Knot? The Knotless Knot is a popular knot among carp fishermen. Various baits such as bullies can be secured to the loop section (also known as a “hair rig”). The rig is extremely effective when tied correctly and actually has some self-hooking properties.
Knotless knot tying instructions:
- Do a single overhand loop knot at the end of your line.
- Take the opposite end of your line and place it through the eye of the hook. You can make the loop end any length way from the hook as you’d like.
- If the eye of your hook has a sharp edge, then make sure you begin wrapping your end on the side that doesn’t have that edge; otherwise, your knot can be cut.
- Wrap your line down as many turns as you prefer, but generally at least five.
- Place the tag end of your line and put it back through the eye of your hook. Pull tight.
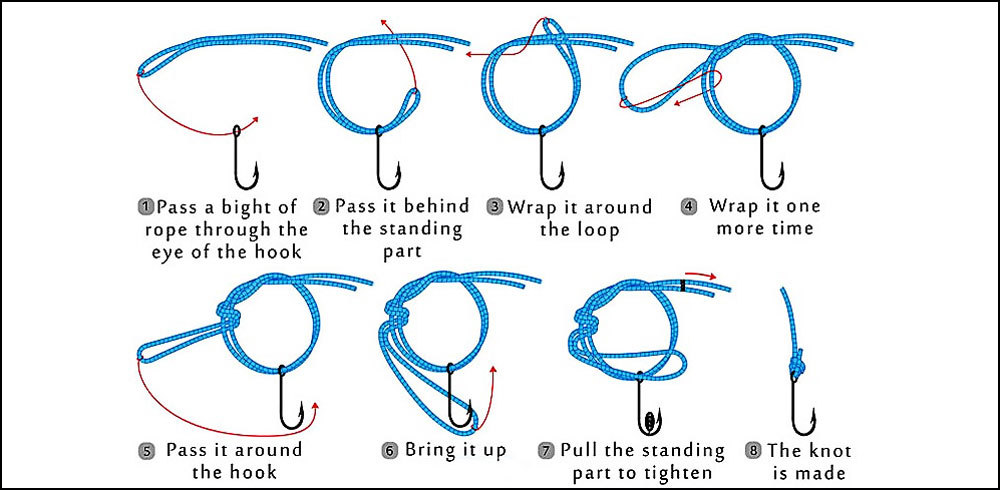
10# The Trilene Knot
11# The Double Surgeon’s Loop
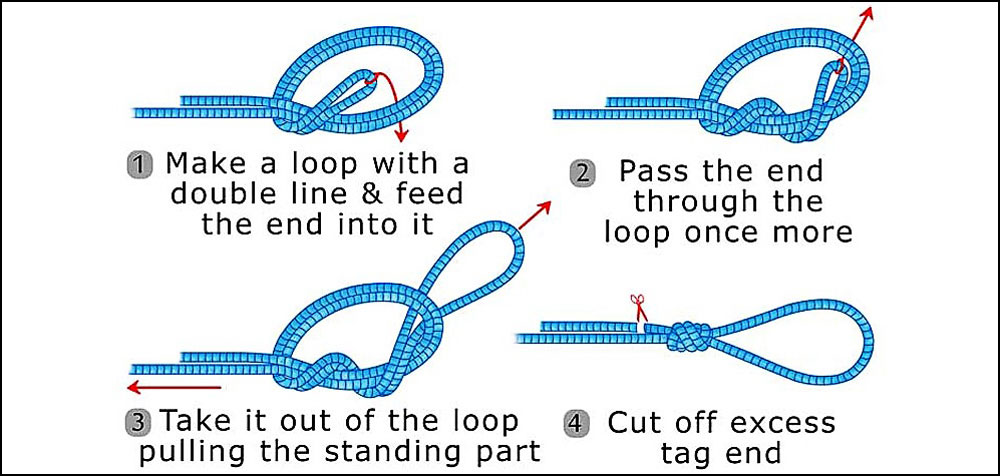
The Surgeon’s Loop Knot is an excellent way to connect your line with the hook or lure. It is very difficult for even large fish to escape this knot once it has been tightened, making it a good choice when you are fishing in deep water.
The surgeon’s noose is essentially a double knot on top. It can be tied quickly and easily at the end of the fishing line. It is often used to join a loop to a loop. It can create a fixed loop that allows the artificial bait or fly to move naturally.
An additional twist can be used to create a triple surgeon’s knot. However, this provides minimal additional benefits and makes the knot more cumbersome. The advantage of the Surgeon’s Loop is that it is reliable, easy to learn, and some sources claim that it retains most of the line’s nominal strength.
12# The San Diego Jam Knot
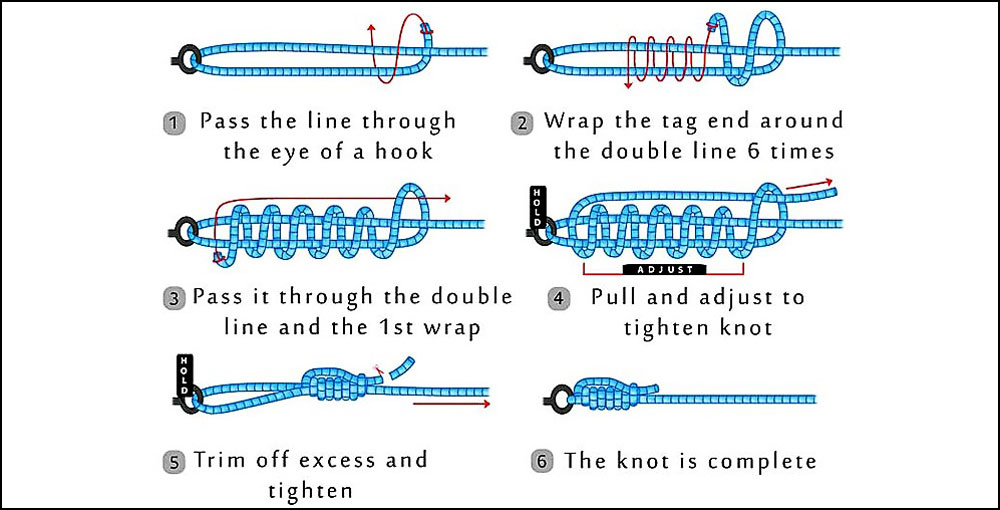
The San Diego Jam Knot is a common fishing knot used to tie a line to a hook, swivel, clamp, or artificial fly. This knot is also known as a San Diego knot, a backward wedge knot. It is a common knot used by fishermen because it is easy to tie, durable, and can be used with many types of fishing lines including monofilament, fluorocarbon, and braided lines.
Instructions on how to tie a knot:
- Thread the fishing line through the eyelet on the bait or hook, leaving yourself the end of the tag.
- Grasp the tag and the mainline about 4 inches away from the bait and turn the remaining end of the tag back to the eye.
- Wrap the end of the tag around both lines 5-7 times, returning to the eye.
- Thread the end of the tag through the loop closest to the eye.
- Then pass the end of the tag through the loop you were holding again.
- Wet the knot and tighten it gently.
- Trim the end of the tag.
13# The Egg Loop Knot
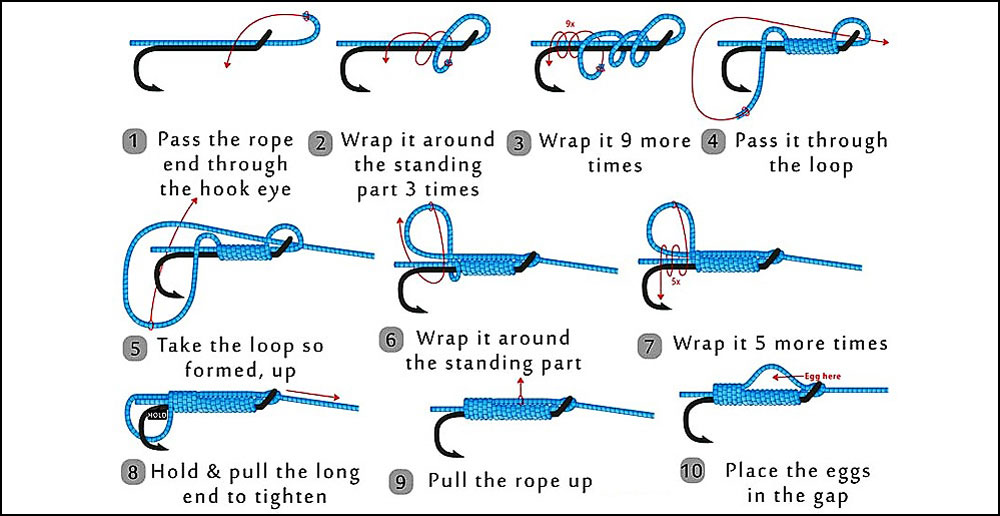
The egg loop knot is a good knot for holding soft bait securely on the hook rod. Sometimes this knot is also called a bumper knot or roe deer knot. Before you start tying a fishing egg loop knot, make sure you have enough material for the leash, and make sure you lubricate the knot every step of the way.
To tie an egg loop knot, follow these steps:
- Thread the end of the tag through the eyelet of the hook and guide the fishing line from the top of the hook down along the rod. Hold the fishing line in place with your thumb and forefinger.
- With the line running, make 10 to 20 tight turns around the standing line and shuttle rod back to the curve of the shuttle.
- Holding the wraps firmly in place, thread the lead end back through the hook eye from bottom to top until about one inch of fishing line is sticking out of the eye.
- With the same end, you wrapped in step 2, continue wrapping five more wraps on the hook rod, though this time makes the wraps tight enough that they won’t come undone. You should wrap the end of the tag as well as the leading end.
- Squeezing the hook and bandage, slowly pull the leading end all the way through the eye of the hook until the entire leading end comes out.
- Make a loop near the top of the hook to hold eggs or soft bait.
- By following these steps several times, you will be able to tie this knot quickly and confidently.
Tips for Any Fishing Knot
The weight of the fishing hook you choose will depend on what type of fish. If you are trying to catch fish that swim near or on top of the water’s surface (such as trout), then use a lightweight fly fishing hook. However, if your bait is located along deeper edges in rivers and oceans, then choose a heavier weight hook.
The next step in tying a fishing hook is to attach the line using a clinch knot. To do this, take your loose end of the monofilament or braided fishing line and wrap it around the long shank part of the hook five times (wrap counter-clockwise). Then bring the tag back down through each loop until it reaches the shank. Next, push the tag back up to its starting point and run your finger over each loop until they are tightened together.
The next step is to attach a bobber stop knot after tying on your fishing hook using another clinch knot just below where you tied the first one. To do this, take about three inches of lightweight fishing line and tie an overhand knot. Next, take your loose monofilament or braided fishing line and wrap it three times around where you tied the last end; this time make sure to wrap clockwise until there are no more loops left. Then tighten each loop until the knot is tight, and clip off any excess line.
Next, attach your bait to the hook using a snell knot. To do this take about an inch of light-weight fishing line (you can use tag end) and pass it through the eye of your baited hook. Next, bring one end up behind both lines above the hook, twist it three times around the two lines above your bait and pass through the loop between your two loose ends. Pull both ends to tighten the knot before cutting off any excess line.
🔶The last step is to attach the load with a similar clinch knot. Now that you know how to tie a fishing hook in preparation for an upcoming fishing trip, you can take your new skills and go out and try them for yourself.
Forming The Knot And Tightening
The basic principle of any fishing knot is to minimize the deformation of the line material structure. Therefore, the knot is formed from multiple loops and rings, duplicating each other, increasing its strength and reliability.
When choosing a knot for tying a hook, the fisherman must take into account the type of hook used (with an ear, without an ear with a spatula, offset, double, triple, various spinning lures, and so on).
You should also consider the material from which the line is made, the shape of the line, diameter, stiffness and ultimate breaking load, the approximate size of the fish you intend to catch.
Nylon, fluorocarbon, and braided line require different tying methods and different knots.
The force with which the knot is tightened also has a major impact on the final strength of the knot. Nylon and fluorocarbon are prone to burns and complete loss of strength as a result of friction when tightening the knot.
Braided fishing lines are susceptible to abrasion and subsequent friction fracture. For this reason, self-tightening knots should not be used with braided lines.
Important! Make the knot in such a way that there is enough free end of the line – usually 10 to 20 cm. The knot is formed, then tightened a little to the working position. After that begins an important moment – the tightening.
Important! The knot must be moistened before it is tightened. To do this, anglers usually use their own saliva by taking a piece of fishing line in their mouth. Another option is to moisten with plain water or any oil.
Important! The best way to tie a fishing hook to a line:
- Constant practice and the angler’s patience.
- Use the right types of knots for each situation.
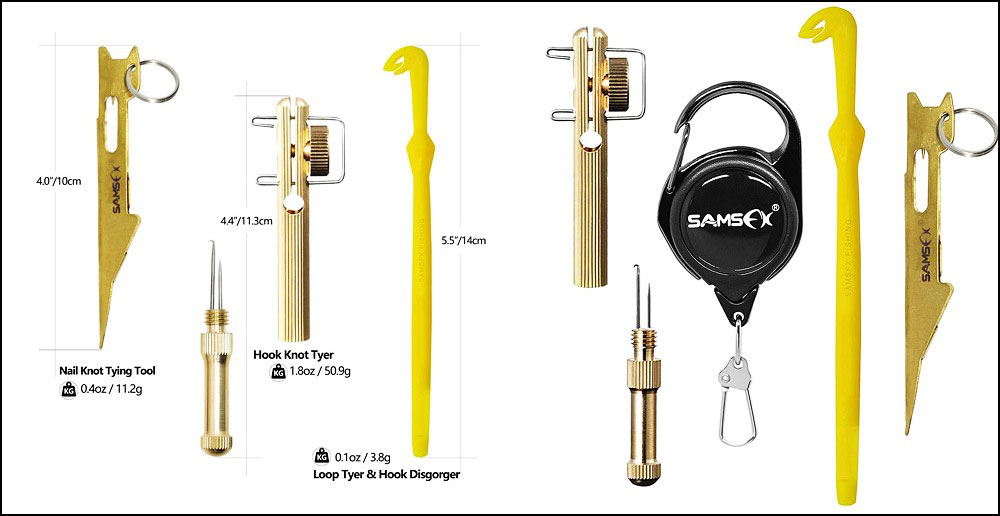
The Best Fishing Knot Tying Tools
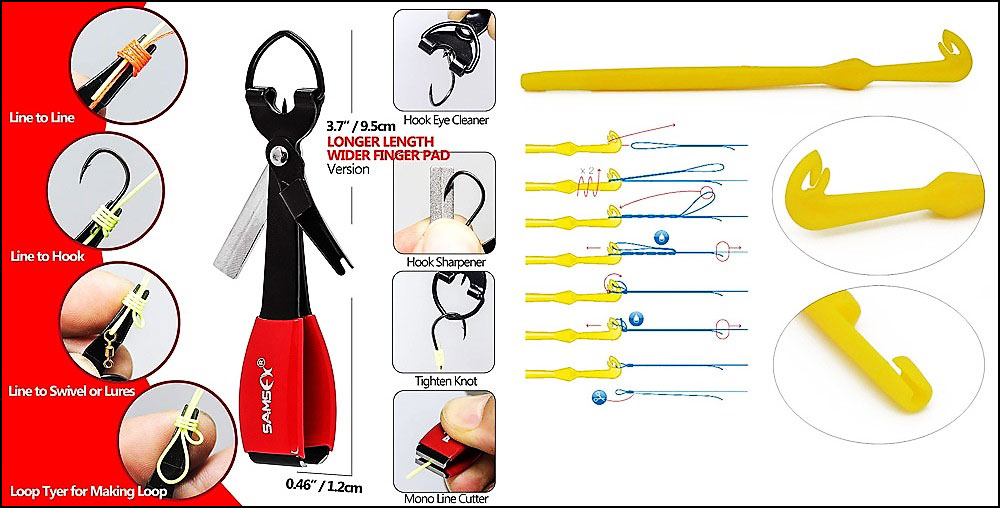
Tool for tightening knots. You can tie knots with your hands. Many people do just that. However, it is much more convenient to use specially designed devices for this purpose.
Pair of scissors for trimming. When tying, it is often necessary to cut the tip of the fishing line. This is best done with scissors specially designed for this purpose. Such a tool allows you to neatly cut the line without any additional effort. It works with braided lines and monofilament of various diameters. A special cap ensures safety during transport and use.
Fingerless Gloves: The gloves help you tie knots without hurting your fingers. They also keep your hands warm in cold weather!
Line Cutter: A-line cutter is great for cutting fishing lines, but can also be used to untie knots.
Tackle Box or Basket with Compartments: Having compartments in the box will allow you to separate items into different sections so that it is easier when trying to find the specific fishing lines, lures, and hooks.
Pliers can be used to pull hooks and knots tight.
Nylon Cord: The cord is flexible and good for tying most fishing knots, including the Palomar Knot and Improved Clinch Knots (however, it should not be used on braided or wireline). You might also want a lighter. In addition to these items, every angler needs a selection of lures.
Video to help you get started with fishing knots
There are even some videos there if you need help understanding exactly what we’re talking about when we talk about lines and knots!
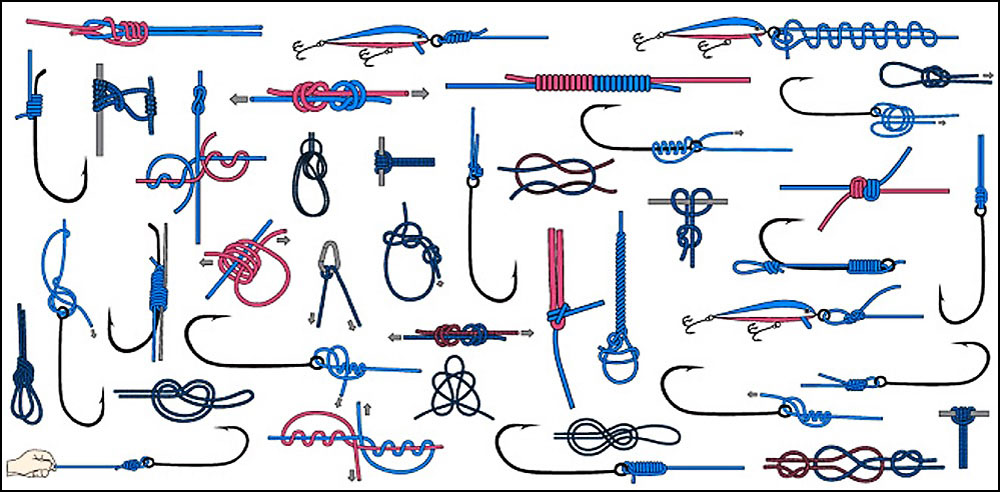
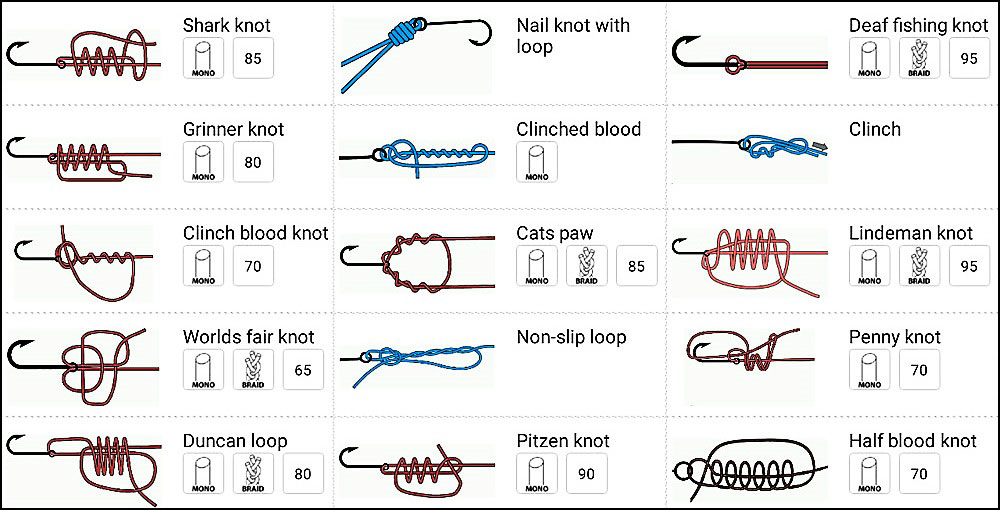
The 5 Levels of Knots for Hook Tying
Take a close look. What is the difference between these assemblies? Keep improving and success will follow. This is the basis of knowledge and skill – how to tie a fishing hook firmly and correctly to the fishing line. Good luck!
The Only 2 Fishing Knots for Hooks You Need To Know
Practice making these two fishing knots all the time. This is already a lot and enough condition to start successfully catching fish. Then move on to more complicated knots.
Avoid the Oops: Common Knot-Tying Mistakes and How to Dodge Them 🎣🚫
Even the most seasoned anglers can sometimes trip over these common knot-tying mistakes. But don’t worry, we’re here to help you navigate and avoid these snags. Let’s untangle the problem together!
1️⃣ Slippery Slope: Failing to Wet Your Knots 💦
A common error is forgetting to moisten your knot before tightening it. Friction can cause the line to weaken and potentially break when you pull it tight.
🛠 The Fix: Always wet your knots with saliva or water before tightening them. This lubrication reduces friction, making the knot more secure and the line stronger.
2️⃣ Over Complication: Using the Wrong Knot for the Job ❓
Some anglers use complicated knots where a simple one would do the job, leading to unnecessary trouble and potential failure.
🛠 The Fix: Understand the strengths and ideal applications of each knot. Use simpler knots when you can, saving the complex ones for specific situations.
3️⃣ Loose Ends: Not Pulling Knots Tight Enough 🪢
A loosely tied knot can slip and come undone when you least want it to—like when you’re reeling in a big one!
🛠 The Fix: Ensure that your knots are pulled tight. Don’t be afraid to use a bit of muscle, but be careful not to damage the line.
4️⃣ Cutting it Short: Leaving Too Little Line at the End ✂️
Trimming the end of your line too close to the knot can cause it to unravel under tension.
🛠 The Fix: Leave a small amount of line (1/8 – 1/4 inch) at the end of your knots. This will give it some room to tighten further under stress without coming undone.
🔶Remember, no one becomes a knot-tying pro overnight. Practice makes perfect, so don’t get discouraged if your knots don’t turn out right the first time. Keep practicing, and soon you’ll be tying knots like a seasoned angler. In the next section, let’s ensure your fishing gear remains in prime condition for many fishing trips to come! 🚀🎉
Gear Care 101: Ensuring Longevity of Your Fishing Lines and Hooks 🎣💪
Proper care and maintenance of your fishing gear is paramount to a successful fishing trip. Let’s dive into some practical tips to ensure your fishing lines and hooks stay in tip-top shape for the long haul.
1️⃣ Line Longevity: Care for Your Fishing Line 🧵
Fishing lines can deteriorate over time due to various factors like exposure to sunlight, saltwater, and general wear and tear.
- Regular Cleaning: Rinse your line with fresh water after every use, especially after saltwater fishing, to remove dirt and salt deposits.
- Proper Storage: Keep your line stored in a cool, dry place out of direct sunlight when not in use. UV radiation can weaken the line over time.
- Regular Inspection: Inspect your line regularly for signs of damage such as fraying or discoloration. If you notice any, it’s time to replace the line.
2️⃣ Hook Health: Taking Care of Your Hooks 🪝
Fishing hooks can rust and dull over time, reducing their effectiveness and potentially harming marine life.
- Regular Cleaning: Just like lines, hooks need a good rinse after each use. Saltwater and dirt can accelerate rusting, so keep them clean.
- Sharpness Check: Regularly check your hooks for sharpness. Dull hooks not only make catching fish more difficult but also can cause more harm to the fish.
- Proper Storage: Store your hooks in a dry place. Use hook protectors to prevent accidental injury and to keep them sharp.
3️⃣ Knot Untangling: Safe Knot Removal 🧩
Removing knots is not as simple as pulling on the lines. Doing it wrong can cause damage to your line and create waste.
- Use Tools: Use a hook disgorger or a similar tool for knot removal to prevent damage to the line and your fingers.
- Cut if Necessary: If a knot is too tight to undo, cut it off as close to the knot as possible to minimize line waste.
4️⃣ Responsible Disposal: Getting Rid of Used Hooks and Line 🗑️
Improperly disposed fishing gear can harm wildlife and the environment.
- Recycle: Whenever possible, recycle used hooks and line at a fishing store or recycling center.
- Dispose Responsibly: If recycling isn’t an option, dispose of your gear responsibly. Make sure it ends up in a bin, not in nature.
🔶By following these steps, you’ll not only extend the life of your fishing gear but also contribute positively to the environment. Let’s remember, we all share responsibility for our beautiful waters and their inhabitants. 🚀🎉
❓ FAQ: Tying a Fishing Hook Like a Pro 🎣💡
🔶Remember, knot tying is a skill that comes with practice. Don’t be disheartened if you don’t nail it the first time. 🚀🎉
The Knot’s End: Wrapping It Up 🎣🔚
There are many different ways to tie a fishing hook. The simplest is the improved clinch knot, which works well for most types of fish and line strength. It’s also easy enough that you can teach your kids how to do it so they will be able to catch their own dinner someday!
If you want more options or stronger knots, check out our other blog posts on this site about tying up fishing hooks with braid materials or fluorocarbon leader material.
I hope you found this article helpful. I’m sure it really comes in handy when the big one gets away from you and all your friends are there to make fun of you for not knowing how to tie a fishing hook. Don’t be that guy next time! Just follow our step-by-step instructions, and keep practicing. You’ll get it in no time.
Congratulations! You’ve journeyed through the captivating world of fishing knots, understanding their importance, mastering the basics, and even learning some advanced techniques. Let’s briefly revisit our voyage:
- 1️⃣ Why It Matters: Knowing how to tie a fishing hook correctly is crucial. A well-tied knot ensures you don’t lose your catch and helps avoid damage to your equipment.
- 2️⃣ Know Your Gear: Understanding the types of fishing hooks, lines, and how they’re influenced by different fishing environments is essential. It shapes the way you tie your knots.
- 3️⃣ The Basics: Knots like the Improved Clinch, Palomar, and Loop Knot are fundamental to any angler’s toolkit.
- 4️⃣ Beyond Basics: Advanced knots like the Blood and Albright Knot are perfect for specific scenarios and offer versatility.
- 5️⃣ Mistake Patrol: Common mistakes like failing to wet your knots or leaving too little line at the end can cause problems. Being aware and practicing can help you avoid these pitfalls.
- 6️⃣ Gear Maintenance: Proper care and responsible disposal of your fishing gear ensure their longevity and contribute positively to the environment.
In this journey of mastering the art of tying a fishing hook, remember that practice, patience, and the proper technique are your steadfast companions. So, don’t be disheartened if you don’t get it right the first time around. Keep practicing, keep experimenting, and you’ll soon be tying knots like a pro.
🔶Here’s to many successful fishing adventures! Remember, each knot you tie connects you not only to the fish but also to the long line of anglers that came before you. Keep tying, keep fishing, and keep the tradition alive! 🚀🎉
🎣 Dive Deeper: Additional Resources for the Avid Angler 📚🔗
Hungry for more fishing wisdom? Cast your net wider with these additional resources. Whether you’re interested in deepening your understanding or exploring new aspects of angling, these books, videos, websites, and tools will help you continue your fishing journey.
📚 Books to Hook You In
- 1️⃣ “The Complete Guide to Fresh and Saltwater Fishing” by Vin T. Sparano: An all-in-one fishing manual covering everything from fishing gear, knots, and bait, to cleaning and cooking your catch.
- 2️⃣ “The Little Red Book of Fly Fishing” by Kirk Deeter and Charlie Meyers: A compact guide filled with tips and strategies for fly fishing, including a section on knot tying.
🎥 Videos that Reel You In
- 1️⃣ Animated Knots website: This site offers step-by-step animated instructions on tying a variety of fishing knots.
- 2️⃣ Salt Strong’s YouTube Channel: Comprehensive video tutorials, product reviews, and pro angling tips.
🔗 Websites to Net
- 1️⃣ Take Me Fishing: A wealth of fishing knowledge, including how-to guides, fishing regulations, and where to fish or boat near you.
- 2️⃣ Fisherman’s Handbook: A broad range of fishing topics, tips, gear reviews, and fishing conservation news.
🧰 Recommended Gear and Tools
- 1️⃣ Rapala Angler’s Pliers: Essential for any angler’s toolkit, these pliers will help you tie knots, cut line, and remove hooks safely.
- 2️⃣ Berkley Coated Fishing Gloves: These gloves offer excellent grip for handling fish and provide protection while removing hooks or handling line.
- 3️⃣ Loon Outdoors Nip n Sip 2.0: A versatile tool that features a line cutter and bottle opener. It also comes with a lanyard to keep it easily accessible.
🔶Remember, the best anglers are always learning, always adapting, and never stop exploring. Keep casting your line into the depths of knowledge, and you’ll reel in plenty of wisdom. 🚀🎉

I live in Tenerife (Canary Islands) for the last 10+ years and share my daily fishing experiences on my website. Many years of personal experience as a fisherman and the vast experience of my friends allow me to write professionally on any fishing topics (from choosing a flashlight and equipment to deep-sea fishing).
All of my advice is based on practical real-world experience and will be useful to both novice anglers and professionals. Read more about the author.
Affiliate Disclosure: FishReeler.com sometimes gets paid for listings, through sponsors or affiliate programs like Amazon, Ebay, Cabelas, Bass Pro Shop, Shimano, Daiwa, Rapala, Renn, Okuma, KastKing, etс. Clicking a link helps keep FishReeler.com free, at no extra cost to you!
About the author: Each article is verified by the fishing expert Sergio Smirnoff. The articles are written by professional and amateur fishermen with 20+ years of fishing experience.
Note: The views and opinions expressed in this article are those of the authors and do not necessarily reflect the official policy or position of any agency. The articles are for informational purposes only, share your opinions in the comments and join the fishing discussions, let's share our fishing experiences together!


In my experience, I’ve found that the standard clinch knot is stronger when used on smaller hooks with smaller lines. However, when tying heavier lines to bigger hooks, the improved clinch knot is a better option as the standard clinch knot is more likely to slip in these situations.
While there are several different knots that you can use to tie a fishing hook, I typically use the regular clinch knot most of the time. I’ve found that you can adjust the number of wraps to be appropriate for the size line you’re using, making it a versatile option.
That being said, I’ve also tried using the improved clinch knot in the past. However, I’ve noticed that it doesn’t seat as well as the standard clinch knot, which can lead to more likely break-offs or slipping knots.
Ultimately, the choice of the knot will depend on the situation and personal preference. It’s important to experiment with different knots and techniques to find what works best for you and the type of fishing you’ll be doing. By practicing and gaining experience, you can become proficient in tying different knots and selecting the right hook for the job, increasing your chances of a successful fishing trip.
Tying a fishing hook properly is crucial to ensure that your bait stays on the hook and that you can hook the fish properly. There are several different knots that you can use to tie a fishing hook, including the improved clinch knot, the Palomar knot, and the uni knot. Each knot has its own strengths and weaknesses, and it’s important to choose the right knot for the type of fishing you’ll be doing.
In addition to knowing how to tie a fishing hook, it’s also important to know how to choose the right hook for the type of fish you’ll be targeting. Different types of fish require different types and sizes of hooks, so it’s important to do your research beforehand.
Overall, knowing how to tie a fishing hook is an essential skill for any angler. With practice and experience, you can become proficient in tying different knots and selecting the right hook for the job, increasing your chances of catching the fish you’re after.
When it comes to tying a fishing hook, knot strength is the most important factor. While slippage can be a concern, I’ve found that the Palomar knot is much better than the clinch knot in terms of overall knot strength.
Of course, in certain circumstances, a lower volume knot may be preferred – such as in fly fishing. However, for other types of fishing where there are a lot of impulses, such as bass fishing in cover, a higher knot strength is often preferred.
Personally, I’ve spent a lot of time fishing for bass, shark, red drum (redfish), snapper, and fly fishing – and I’ve only ever used a clinch knot. I have a hard time imagining a scenario where the knot loses its integrity and unties before simply breaking elsewhere.
Ultimately, the choice of the knot will depend on the situation and personal preference. It’s important to experiment with different knots and techniques to find what works best for you and the type of fishing you’ll be doing. By practicing and gaining experience, you can become proficient in tying different knots and selecting the right hook for the job, increasing your chances of a successful fishing trip.
Today, I learned that I’ve been using the improved Clinch Knot rather than the regular clinch knot my entire life. However, I’m now curious about the strength of the knot when tied directly to the hook, as both their tests involve attaching a leader rather than directly to the hook.
After watching their videos on tying the clinch knot and improved clinch knot, I’m slightly concerned as they perform a couple of things that I’ve always been taught to avoid when tying knots. First, they pull on the tag end when tying the knot, and second, they use too many loops. In their video of the clinch knot, they double the number of loops from 5-6 to 10, which I’m not sure affects the knot’s integrity, but I do know that pulling on the tag disrupts the knot’s integrity and causes the loops to not thread down the line correctly.
Normally, I wouldn’t go through the effort of looking this kind of stuff up, but I saw in their description that they put “while also having a tag end that sticks straight up,” which is counterintuitive to what they showed in their videos, where they cut the tag to the knot.
Furthermore, after doing a bit more research, I’m now even more confused. Their video of the clinch knot is what’s usually described as the improved clinch knot, and I’m not sure what their actual improved clinch knot video is, as I’ve never seen anyone double loop around the eye with a clinch knot before.
I’ve always been a firm believer that different knots are appropriate for different situations. The Palomar knot, for instance, is great because it continues to tighten under load, which reduces the overall stress on the line.
This is especially important with monofilament because it will compact the filament in the entirety of the knot and squeeze a wider area of the line as it gets pulled. On the other hand, overhand knots can put a lot of stress on a very short area of the line, creating a weak point.
If you’re using thick 20# test mono on small freshwater fish, then you probably won’t notice any difference in knot strength. But if you’re shore casting with a 3 oz storm sinker and a leader on the end, tying a proper knot is crucial to keeping the whole rig together.
It could also be the case that you’re using a line that’s much too heavy for what you’re fishing, in which case you might want to consider downsizing your line. Overall, it’s important to understand why different knots matter and to choose the appropriate knot for the situation at hand.
I completely agree with you on the benefits of the snell knot in fishing for bass in heavy cover using heavy punching tackle. It is a great knot as it ensures the hook is tipped up into the fish’s mouth when pulled, increasing the chances of a successful hook-up.
However, it is important to note that different fish species, baits/lures, and fishing styles require different types of hooks. The knots used in fishing may be universal, but they have different applications depending on the situation.
In my experience, I find the Palomar knot to be a versatile and reliable choice for most hook types. I also use the uni knot for hard baits and attach a leader to my main line for line-to-line connections. Of course, there are plenty of other knots out there, but I personally use these two knots about 99% of the time.
Ultimately, choosing the right knot and hook for your fishing needs will greatly improve your chances of success on the water.
I completely agree with your approach to using dropper loops or two loops for high-low rigs and teasers. However, I prefer using a simple doubled-up overhand knot for making loops for the sinker due to its weaker breaking strength relative to my other knots.
It’s important to note that different types of lines and gauges may require different knots, and certain knot setups can result in better presentations. When it comes to thinner monofilament lines, it’s crucial to be mindful of simpler loops and knots as they can easily cut through the line, sometimes even reducing its breaking strength.
Additionally, some braided lines may not work well with reusable loops, as the knot may slip or tighten itself to the hook or lure. However, the Palomar knot is an excellent option for braided lines, as others have mentioned.
Overall, understanding the properties and characteristics of your line and choosing the appropriate knot for your fishing needs is critical in achieving a successful and enjoyable fishing experience.
I think this is an excellent tip, particularly for beginners who may feel overwhelmed by the variety of fishing knots out there. You don’t need to learn every knot, but rather just focus on a few essential ones for different baits and techniques, and practice them until you become proficient.
As you mentioned, having a bad knot can be disastrous, no matter how much the fish may want your bait. For my own fishing needs, I personally use the improved clinch and Palomar knots about 99% of the time, along with an Albright knot for leaders.
It’s also crucial to re-tie your knots frequently, especially if you’re targeting larger fish. Taking an extra minute to tie a new knot can save you from losing a big catch, and it’s a small price to pay for a successful and enjoyable fishing experience.
In summary, focusing on a few essential knots, practicing them until you become proficient, and re-tying your knots regularly are key factors in achieving success on the water.